Monday, December 24, 2012

Peppermint White Chocolate MandM Cookies (Merry Christmas!)

White chocolate peppermint m&m cookies

This year, I'm spending Christmas with the Monkey Scientist's family.  His mom is an expert baker and I wanted to help contribute to the endless flow of Christmas cookies she's producing.  I picked up a couple bags of these MandMs at Target (uhh they were white chocolate and peppermint, of course I bought 2 bags) a few weeks ago but I'd been fighting not to eat them so I could make cookies! (I knew if I opened the bag without a plan, I'd eat it all in a day or two. I lack self-restraint.)

White chocolate peppermint m&m cookies


I whipped these up yesterday so that I wouldn't be contributing to the chaos once the Christmas cooking really begins.  We have them in an airtight container (along with his mom's famous sugar cookies) and I think they might last through tomorrow!  There is never a lack of good food around here - especially baked goods.  I was glad I could contribute a little something.

White chocolate peppermint m&m cookies

This is my first year not heading up north in New Hampshire to ski over Christmas, I think in my whole life.  Things were just a little too crazy for me to travel over the holidays.  Luckily, the Monkey Scientist and I will get a good weekend of skiing in just after the New Year.  It doesn't sound like the skiing I'm missing has been very bad lately, anyways!  I'm certainly missing my family, but looking forward to seeing most of them in a few weeks. I'm also lucky the Monkey Scientist's family takes me in as one of their own!  It's my first Christmas with a tree, rather than a pile of presents at the bottom of the stairs or under the fireplace.

White chocolate peppermint m&m cookies

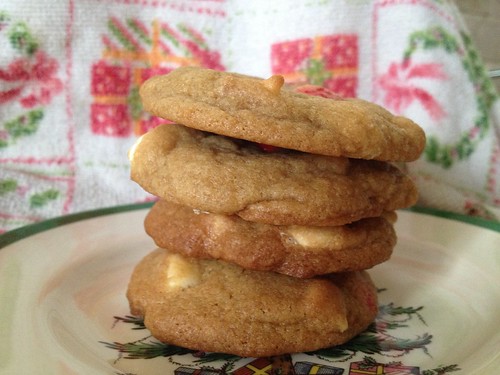
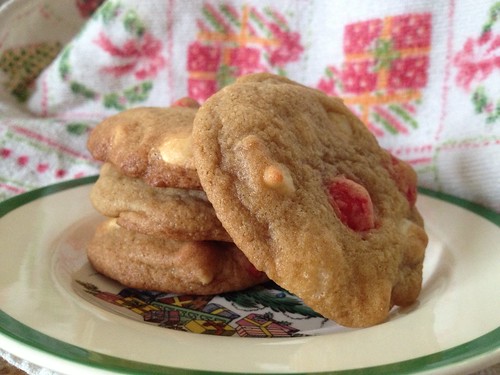
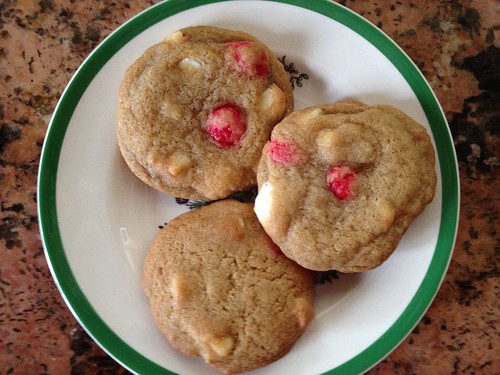
These cookies are super sweet and minty - just how I like them!  They would be perfect to leave for Santa under the tree as well.  They came out a little bit puffy for me, which I tried to fix with my rapping against the oven door trick, but I think you could also reduce the flour a bit.  I also left out the candy canes because the Monkey Scientist thinks they stick in his teeth too much.  Regardless, they taste wonderful!

Have a happy holiday!

White chocolate peppermint m&m cookies

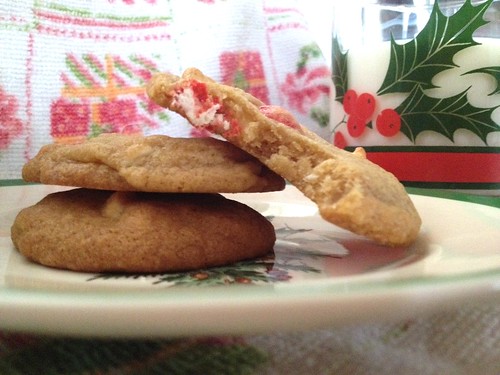
White Chocolate Peppermint MandM Cookies
slightly adapted from Two Peas and Their Pod

Ingredients
2 1/2-3 cups all-purpose flour
1/2 teaspoon salt
3/4 teaspoon baking soda
1 cup unsalted butter, at room temperature
1 cup brown sugar
1/2 cup granulated sugar
2 large eggs
1 tablespoon vanilla extract
1 cup white chocolate chips
1 cup White Chocolate Peppermint MandM's

Instructions
1. Preheat the oven to 350.
2. Mix the flour, salt, and baking soda in a large bowl.
3. In the bowl of the standing mixer, cream the butter and sugars until blended. Add the egg and vanilla and mix to incorporate.
4. Slowly add the dry ingredients, mixing on low until fully incorporated. Mix in the white chocolate chips and MandM's.
5. On a baking sheet (I lined mine with a Silpat) drop the cookies in tablespoon-sized balls about 2 inches apart. Bake for 5 minutes, then remove from the oven. Bang the pan against the open oven door or your stove-top to flatten the cookies. Bake for an additional 5-7 minutes or until the cookies are browning around the edges (but still soft in the middle).
6. Remove from the oven and let rest on the cookies sheet for 2 minutes, then move to a cooling rack to cool completely.

Friday, December 14, 2012

Apple Cider Pound Cake with Apple Cider Glaze

apple cider cake

Last week I had a very special treat. My former coworker was visiting Chicago and invited me and the Monkey Scientist to have dinner at her sister's house.  I used to eat lunch with her every day, but now I hadn't seen her in months!  It was great to be able to spend time with her and catch up.  I can't believe how many people I used to work with have had babies since I left.  I miss the flurry of baby pictures I used to get in my email.

apple cider cake batter

As I've mentioned before, my coworker isn't a big chocolate person.  I dug through my recently starred recipes in Google Reader and it seemed like everything was chocolate!  Finally, I came across this cake and I knew it was perfect.  I love cakes that are sweet and this cider glaze was perfect. I knew she'd love it.

Untitled

Besides that, the Monkey Scientist gave me a bundt pan last Christmas and I still hadn't used it until now!  His mom makes a few really amazing bundt cakes, so I never wanted to compete with her.  Fortunately, this cake was far enough from her chocolate chip cake that I wasn't too worried. However, after the first 70 minutes I could tell the cake wasn't going to keep its shape and was going to become a pool of dough.  I threw it back in the oven for another 20-30 minutes, though, and it really did the trick.  So even if your cake is starting to turn brown around the edges, don't fret! Let it cook all the way through! (Especially if you have a silicon bundt pan).

Untitled

To no big surprise, this cake came out really delicious. It's sweet without being too sweet, and has a nice subtle apple cider flavor.  I love the warmth of the cinnamon throughout.  I didn't reduce the cider quite enough so the glaze looks pretty white compared to what it should have looked like.  It didn't matter though - I liked the white color and it tasted great.

Untitled

Apple Cider Pound Cake with Apple Cider Glaze
very slightly adapted from Buns in My Oven

Ingredients
For the cake:
3 cups sugar
1 1/2 cups butter, softened
6 eggs
3 cups flour
1/2 teaspoon salt
1/2 teaspoon baking powder
1 teaspoon ground cinnamon
1/2 teaspoon ground nutmeg
1/8 teaspoon ground cloves
1 cup apple cider
1 teaspoon vanilla
For the glaze:
1 cup apple cider
1/2 - 1 cup powdered sugar
2 tablespoons butter, melted and cooled
dash of salt
1/4 tsp cinnamon

Instructions
1. Preheat the oven to 325 and grease a bundt pan.
2. In the bowl of a standing mixer, cream the butter and sugar.  With the mixer on low speed, add the eggs one at a time until incorporated.
3. In a large bowl, whisk to combine the dry ingredients.  In a measuring cup, combine 1 cup of apple cider with 1 teaspoon vanilla.
4. With the mixer on low speed, add the dry mixture and cider a bit at a time, alternating between which you are adding.  When everything in incorporated, spoon the batter into your bundt pan.  Bake for 70 minutes or until a toothpick comes out clean (I used a silicon bundt pan and it took closer to 90 minutes).
5. Remove from the oven and let the cake sit for at least 20 minutes in the bundt pan.  Remove from bundt pan and allow to cool completely.
6. Add the remaining 1 cup cider to a small saucepan and bring to a boil.  Allow to boil for at least 10 minutes or until the liquid reduces by half (I don't think mine reduced enough, so it wasn't dark in color).
7. Add the butter, salt, cinnamon, and powdered sugar.  If it isn't thick enough, continue to add powdered sugar until it reaches desired consistency.
8. Allow to cool slightly, and then pour over cake.  I recommend doing this over a jelly roll pan so you can collect the drippings and pour it over again if you like (I did this 3 times).  Serve at room temperature.

Monday, December 10, 2012

Santa (and Rudolph) Ornaments

Untitled

Even though I'm Jewish, I can't help but love Christmas.  We have my menorah set up (I have a gorgeous one that my mom's friend gave me) but I've also done a lot of Christmas decorating.  Since the Monkey Scientist's family celebrates both Christmas and Chanukkah, this year he gave me the perfect excuse to get my first Christmas tree ever.  It's a tinsel tree - so it's not exactly traditional - but I'm loving it nonetheless.

Santa ornaments

I bought most of my ornaments at Crate and Barrel and Target, but I had to make a few of my own!  When I found these cute little Santas on Floral Blossom (via Home and Garden) I knew I found this year's craft.  All of the instructions to make these yourself can be found right here.

Santa ornaments

I started out by following the instructions exactly - using my hot glue gun to stick on all the pieces besides the base.  But then I tried to actually sew on all the pieces to each side and then sew it all together and I liked how that came out a lot more. Plus it was pretty relaxing to sit and sew while we watching Sunday football.

rudolph ornament

In fact, I was having so much fun that I decided to make a little Rudolph, even though I hadn't actually bought the fabric for the Rudolph pattern. I think I did pretty well with what I had!  I think the Monkey Scientist liked my homemade ornaments too. He suggested that this be the start of a tradition, so I wrote 2012 on the back of these in hopes that they'll be the first of many!

But don't worry that Christmas has totally taken over.  We've still been lighting the menorah every night!

Untitled

No matter which holiday you celebrate, I hope you have a wonderful and safe holiday season filled with love!

Wednesday, December 5, 2012

Sweet Potato Bread Pudding

sweet potato bread pudding

I don't think I've ever eaten as much food over a 4 day period as I did this Thanksgiving.  We had huge dinners with both sides of my family, sandwiching a couple of delicious restaurant meals.  I feel ready for hibernation - I do not need to eat another thing for the next month!

Untitled

One dish I just had to make was this sweet potato bread pudding.  We never grew up having sweet potato casserole, but I love it.  I mean, what's not to love?  Sweet potatoes. Marshmallows.  YUM.  I'd take that over tzimmes any day!

Untitled

My cousin, who is 8, is a fairly picky eater.  He's usually willing to try new things, but I've seen him not like a lot more things than he likes.  When he tried this bread pudding, he actually sought me out to tell me how much he liked it.  That was a major compliment coming from him!  His sister loved it as well, but I'm not sure she didn't just pick the marshmallows off the top.

Untitled

This recipe is dessert, but it really isn't that bad for you.  I think you can totally justify it as a starch, rather than a sweet.  We used unsweetened almond milk in our version because my grandfather is allergic to dairy, and I think it made it better! It added a new dimension of flavor to the dish in addition to making it lactose-intolerant friendly.

Untitled

The challah we used is from one of my favorite places in the world - Rein's Deli - that we picked up on our way back to New Hampshire from Connecticut.  Normally, I would probably make my own bread, but I know I can trust bread from Rein's.  We served it alongside my Lobster Mac and Cheese.  It was quite the indulgent evening.  We also had my grandmother's famous pastrami that my brother craves all year.  It was a pretty fantastic meal all-around.  I may have been full - but I think it was well worth it!

sweet potato bread pudding

Sweet Potato Bread Pudding
adapted from Baking Bites

Ingredients
2-3 medium-sized sweet potatoes
2 2/3 cups unsweetened almond milk (cow's milk is ok)
4 large eggs, lightly whisked
1 cup brown sugar
1 tsp vanilla extract
1 tsp ground cinnamon
1/4 tsp ground nutmeg
1/4 tsp salt
9-10 cups cubed challah
4 cups mini marshmallows

Instructions
1. Wrap the sweet potatoes in foil and roast in a 400 degree oven for about 40 minutes or until soft enough to pierce with a fork.  Remove the potatoes from the oven and lower the temperature to 350.
2. Remove the skins and puree in a large bowl with an immersion blender (or in a food processor).  Whisk in the almond milk, eggs, brown sugar, vanilla, cinnamon, nutmeg, and salt.
3.  Add the bread to a separate large bowl and pour the potato mixture over it.  You could add the bread into the original bowl, but it's really difficult to stir and your bread will get all broken up.  Fold to coat all of the bread and let it sit for 20 minutes so the bread can soak up the liquid.
4. Grease a 9x13 baking dish, then transfer the bread into it.  Bake in the 350 degree oven for 40 minutes, or until the pudding is set and springs back when lightly pressed.
5. Take the dish out of the oven and carefully sprinkle the top with mini marshmallows. Place under the broiler for 1-2 minutes (WATCH CAREFULLY, marshmallows burn easily!) until the marshmallows puff up and turn brown.
6. Let cool for 15 minutes, then serve.

Wednesday, November 28, 2012

Lobster Mac and Cheese

Untitled

I'm pretty sure the thing I miss the most about living in New England is the seafood.  The ability to go to the grocery store, grab a lobster or some fish without spending a week's grocery budget (or fearing digestive disaster) is a luxury I took for granted growing up in Massachusetts.  Now, when I'm back home, I take any advantage to enjoy all the seafood there is to offer.

Untitled

We had my little cousins over for dinner on my last night home and decided to make mac and cheese.  Of course, this meant I had to get some lobster in there.  It was the right thing to do.  It's the bacon of the ocean, after all.

Untitled

I was mostly inspired to eat lobster because of my camp friend.  She grew up a pescatarian, so she's never had meat or poultry at all.  For Thanksgiving, her family has lobster and oysters.  How amazing is that?  I am not a turkey person so I'd take lobster and oyster Thanksgiving over the traditional any day!

Untitled

By the way, why does anyone still eat mac and cheese out of the box?  I mean it serves its purpose, and sometimes I crave it, but man it does not COMPARE to homemade mac and cheese. Sure, it's more expensive to make it from scratch, but it's easy to do and the taste is night and day.  This is the serious comfort food I need in the middle of winter.  Plus you can change it up in so many different ways - using different kinds of cheese or any mix in from lobster to bacon to pumpkin.  It's a versatile dish that guests of all ages love.

Untitled

Oh right, the recipe. I don't think I even need to tell you how good this was.  My little cousins scarfed it down despite being sometimes-picky eaters (we conveniently didn't tell them there was lobster in it) and I couldn't resist taking a second helping.  We doubled the recipe and used meat from 2 small-ish lobsters and I'm not sure how many ounces it actually was, but I'd use more next time.  I'm sure it was way less than 24 oz though so I think you'll be OK using the recipe as is below.  I might need to go home soon so I can make some more!

Untitled

Lobster Mac and Cheese
from Annie's Eats

Ingredients
8 oz. pasta (I used cavatappi)
4 tbsp. unsalted butter, divided
3 tbsp. all-purpose flour
2 cups milk
6 oz. fontina cheese, shredded or finely diced
4 oz. white cheddar cheese, shredded
½ tsp. kosher salt
¼ tsp. ground black pepper
Dash grated nutmeg
12 oz. cooked lobster meat, cut into ½-inch chunks (claws and tail)
½ cup Panko breadcrumbs
Minced fresh chives, for garnish

Instructions
1. Preheat the oven to 400˚ F.
2. Lightly grease a 2-quart baking dish with butter.
3. Bring a pot of water to boil. Cook the pasta for about 2 minutes less than the package directions say is "al dente". Drain well into a large colander.
4. While the pasta is in the colander, return the pot to the medium heat. Melt 3 tablespoons of the butter in the pot. Whisk in the flour and cook, stirring constantly, until light golden brown, about 1-2 minutes.
5. Slowly whisk in the milk in small additions until completely added and no lumps of flour remain. Stir in the salt, pepper, and nutmeg. Continue to heat, stirring frequently, until the sauce bubbles and thickens, about 5 minutes.
6. Once bubbling, cook for 2 more minutes, stirring constantly, scraping the bottom of the pan to prevent burning. Remove the pan from the heat.
7. Stir in the cheese one handful at at time and mix until completely melted.
8. Return the pasta to the pot and mix to coat well with the cheese sauce. Gently fold in the lobster meat. Transfer to the prepared baking dish.
9. In a small bowl, melt the remaining 1 tablespoon of butter in the microwave. Stir in the Panko and toss until the crumbs are evenly coated. Sprinkle the crumb mixture over the pasta in the baking dish.
10. Bake uncovered for about 20-25 minutes or until the top is browned and the cheese is bubbling. Serve warm topped with fresh minced chives, if desired.

Monday, November 19, 2012

Thanksgiving Favorites

Maple Pecan Bars

I know my posts have been a bit scarce lately.  When work gets really busy, I end up working late, getting home late, and by the time we're done with dinner I'm too exhausted to write up posts.  Hopefully things will calm down a bit more soon and I'll be able to share recipes again!

In the meantime, I wanted to share a few links to some of my favorite recipes for Thanksgiving:
Mom's Stuffed Mushrooms
Buttery Cloverleaf Rolls
Yankee Maple Cornbread
Tourtière (French Canadian Meat Pie)
Lentil Pot Pie
Brussels Sprouts with Bacon, Dried Cherries and Israeli Couscous
Cinnamon Maple Applesauce
Sweet Potato Bread Pudding (from Baking Bites)
Maple Pecan Bars
Mint Chocolate Polka Dot Cookies
Chocolate Bourbon Pecan Pie (from She Wears Many Hats)

We started out our Thanksgiving early this year with a Friendsgiving on Saturday.  My friend made one of the best turkeys I've ever had! (And I am NOT a turkey person!)  The simple tips I gave her were 1) UNDERcook, not over cook, since it will keep cooking under the foil while it rests, and 2) Use something to keep it covered in the oven. I've used a turkey bag before but foil works well too, but then uncover at the end to crisp up the skin.

I'm also not into stuffing my bird - I prefer to fill it with citrus and herbs. That way I don't have to worry about cooking the stuffing to 165 to kill bacteria (and in turn overcooking my bird!).  The Monkey Scientist's family stuffs their bird with White Castle burgers.  What do you do?

I hope everyone has a wonderful turkey day.  This is a great time to remind everyone in your life just how thankful you are for them!  Enjoy!

Butter Clover Rolls

Monday, November 5, 2012

Avogolemeno

Avgolemono

I should start this by saying, I fully stand behind the idea that people from the East Coast live in a bubble.  Growing up in New England, everything between Pennsylvania and California is a big jumbled mess in my head.  Even after years of now living in the Midwest.  The Monkey Scientist constantly makes fun of me when I mix up Iowa and Idaho (you think living one state away that I'd get it, but it's still a frequent flip flop in my head) or when I try to think about how far West certain states are.  Once you get to the South, I have no idea what falls on which side of Texas.  Including Louisiana, and I've driven there.  It's pretty embarrassing.

Ingredients for Avgolemono soup

Before I went to Michigan for undergrad, I thought it was about a bajillion miles from Boston.  Once I'm in Michigan, I'll be able to take road trips to California, right?  And I for sure thought it was about two times zones over when it turns out it's totally in the same time zone.  And I know I'm not the only one from the East Coast who thinks that.  The first time my mom and I went out there to look at U of M, we thought it was a good idea to "go check out Detroit" and so we went to a Coney Island in Greektown (which is amazing by the way) and I first tried this amazing soup.  Avgolemono.  Even the name is fancy.  And I fell in love.

And then we subsequently drove three hours in the wrong direction into Canada.  Who knew that actual Canada was ever that far South? We thought it was just a city named Canada! (i.grew.up.in.a.bubble)

Avgolemono from This Is a Cookbook

Anyways....

I have been trying to replicate this recipe for a long time but without much success.  I recently bought a new cookbook called "This is a Cookbook" after reading about it in the NY Times.  I'm not a big cookbook buyer (the ever growing blog roll in my Google Reader gives me more recipes than I could ever make) but this book spoke to me.  It's exactly how I love to cook. SIMPLE. Short ingredient lists. Lots of low and slow cooking to develop flavor. A little bit of Asian food.  Plus there was a recipe for Avgolemono. AND it's based on the Avgolemono from Coney Islands in Detroit.  I knew I had a winner.

Avgolemono

And it's everything I hoped it would be.  The ingredient list is so simple.  Nothing fancy here at all.  Chicken broth, a whole chicken, white rice, lemon juice, egg yolks, salt and pepper.  It's exactly what needs to be there and nothing more.  It's sour and lemony but hearty and warming at the same time.  There's nothing quite like it.  If you're missing Detroit, or you just love a REALLY good soup, you should make this.  Unless you're feeding my dad or brother or some other crazy person who hates lemon.  Then you're on your own.

Avgolemono

Avgolemono Soup
slightly adjusted from This is a Cookbook

Ingredients
six cans (87 oz) high quality, low sodium chicken broth (or make your own)
1 4-lb whole chicken (neck and things removed and saved for stock)
1 3/4 c white rice
4 egg yolks
juice from 4 lemons
salt and pepper

Instructions
1. Add the broth and chicken to a large pot.  Cover partially and bring to a boil, then turn the heat down to low and simmer 30 minutes.
2. After 30 minutes, skim the fat from the top of the broth and flip the chicken over.  Cover partially again and simmer for an additional 30 minutes.
3. Remove the pot from the heat.  Remove the chicken and set aside to cool on a large plate.  Add the rice to the pot and bring it back up to a simmer.  Cover and allow to cook for 20 minutes.
4. Once the chicken is cool enough to touch, remove and discard the skin.  Remove all the meat from the bones and shred.  (Save the bones for stock!)  After the rice is cooked, add the chicken back into the pot. Remove from heat.
5. Whisk the egg yolks in a heat proof bowl.  While whisking continuously, slowly add 1/2 c ladles of soup to the yolks to temper (prevent curdling) until they are close in temperature to the soup.
6. Add the egg/broth mixture back into the pot, along with the lemon juice. (Do not turn on the heat!)  Season with salt and pepper.  Serve immediately.


Wednesday, October 31, 2012

Happy Halloween!

blackberry ice cream sandywiches

Happy Halloween! Unfortunately, I am not spending the holiday at home, waiting for trick or treaters.  I guess I will have to check with the boys to see if any kids show up.  I have been stuck in DC for the last few days due to Hurricane Sandy.  At least I got plenty of use out of my Pumpkin Shirt while I have been here!

At least a few days inside led to some super tasty treats.  I made homemade ice cream sandwiches Sandy-wiches for my friends who let me stay with them while I waited until I could get a flight.  I used the regular old Toll House Chocolate Chip Cookie recipe, but halfway through baking I took the tray out of the oven and banged it on the open oven door to flatten the cookies out and make them extra crispy.  It's my mom's college roommate's trick and the key to her amazing cookies. (Although mine never come out quite as good as hers).

My friends don't have a standing or hand mixer, so I actually made the dough totally by hand (don't worry, we didn't lose power from Sandy, but I would have been prepared!).  In a bit of kitchen trickery, I used a lemon juicer (like this) to cream the butter and sugar.  It actually worked amazingly well!  While the cookies were still a little bit warm, I put blackberry ice cream between 2 cookies and wrapped them in Saran then threw them in the freezer for an hour or two.  They came out perfectly!

Untitled

We finally escaped the storm on Tuesday night and made it to the restaurant where the Monkey Scientist and I had our first restaurant date - Nam Viet - for some delicious Pho.  It hit the spot on a cool, rainy evening.

It's been great being back in DC - I had missed it (and my camp friend) a lot - but I'm ready to head back to Chicago.  Cross your fingers that I make it back tomorrow!

Have a great Halloween!

Friday, October 26, 2012

October's Secret Supper at Southport Grocery

When we moved to Chicago a few months ago, I have to admit I was nervous. Not because I didn't think we'd love Chicago, but because we signed a lease before I'd ever even stepped foot in the neighborhood we'd be living in. I'd gotten stuck in NYC with a cancelled flight after a business trip, and was unable to make it out to Chicago the weekend that the Monkey Scientist and our roommate came to look at places. Still, I trusted their judgement and I quickly realized how much I love our part of town!

Menu at Southport Grocery's October Secret Supper

One of the best restaurants in our area is the Southport Grocery & Cafe. A coworker had actually told me about it before I moved and I was not disappointed. Their brunch is top notch and their cupcakes are out of this world. And I moved from DC, land of cupcake shops. Plus they have a great little market with high end ingredients like jellies, pickles, sprinkles and real maple syrup. So when I heard they host a "Secret Supper" once a month, I knew I needed to get an invite. I grabbed 4 seats to the October party as soon as I heard about it (by joining their email list) for me, my bff, my roommate and the MS.

New England Clam Chowder at Southport Grocery Secret Supper

All of the food was really a step above anywhere we've gone lately. My favorite course was the clam chowder. Now I'm a New England girl, and this was some seriously good clam chowder. The liquid wasn't too thick and there was a great substance-to-liquid ratio. I hate when there are big chunks of potatoes in chowder, but these were perfectly diced and the texture was offset by crispy shallots. The clams were cooked exactly how I like them - just a bit chewy and not at all briny.  Plus the sourdough bread bowl they baked upstairs was perfection.  Sourdough is my favorite bread by far - I think I could live off of it. I couldn't ask for anything more out of this course (except for, well, more).

Pork and Orchiette at Southport Grocery Secret Supper

The main course was a Pork Confit and Orchiette served in a large mug.  As the Monkey Scientist put it, there might not be anything better than a mug full of pork.  It was topped with currants and a juniper gelee, and was mixed with local arugula and carrots.  Some of our table found it a bit sweet, and I thought the sauce might have been a little heavy.  Plus, cooked carrots just don't do it for me.  It wasn't the highlight of the meal but it was really great nonetheless.

Pumpkin Rice Pudding with Sesame Lace Cookie at Southport Grocery Secret Supper

For dessert, we were served a pumpkin rice pudding with a black sesame lace cookie.  I'm not sure I'd ever had a homemade lace cookie before, but now I'm determined to make them myself. They melt in your mouth  and have the perfect bit of crunch.  Sesame seeds aren't my favorite thing ever so I might experiment with other things I can put in the caramel if I make them at home.  The rice pudding sitting below the cookie was great too.  Rice pudding is one of my favorite desserts.  To be honest, I think we all expected a little more pumpkin flavor, but it was topped with dried cranberries and candied ginger which was amazing. I loved the mason jar presentation, too!

The only thing I didn't capture was the special treat at the end of the meal. They had homemade Reese's, Three Muskeeter, Almond Joy, and Butterfingers that their pastry chef had whipped up for us. I think we all felt sweets overload at the end of the meal (OK everyone but me. I don't understand sweets overload until it's way too late) but they were absolutely delightful, albeit a bit melty.  I especially liked the Butterfinger and thought the Three Musketeers was unique and delicious (the consistency was denser than the original).  This was definitely a special dinner for us (we even got a bottle of wine, and we never drink at dinner), but I'm hoping we can go to another Secret Supper sometime (maybe if my folks come visit!). It was a blast!

All gone

Tuesday, October 23, 2012

Salted Caramel

Untitled

Now that autumn is in full-swing, all I want to do is go apple picking. Unfortunately, the weather has not cooperated between the drought and early heat this spring - which led to a small harvest this year - and the rain storms we've had lately. I tried to plan a big trip and we had tornado warnings all weekend. Such a bummer. Still, there have been great Honeycrisps from Michigan at the grocery store and I've really been enjoying them!

boiling caramel

This weekend, I decided that if I was going to eat apples inside in the rain, I needed to dip them in caramel. This recipe was SUPER easy. I think I could have let the sugar get a little bit deeper caramelization, but I was so afraid of burning it that I pulled it off a little early. Next time I'll let it get a little darker. This recipe is fantastic though! I brought the leftovers to the Monkey Scientist's parents - I'm hoping his mom uses it to make some spectacular baked goods. It would be wonderful swirled in brownies or cake!

salted caramel sauce with apples

Salted Caramel Sauce
slightly adapted from Lick My Spoon

Ingredients
1 cup sugar
6 tablespoons unsalted butter, cut into chunks
1/2 cup heavy whipping cream
1/4 cup water
1 1/2 teaspoons sea salt
1 tsp vanilla extract

Instructions
1. Heat sugar and water in a 2-quart or 3-quart non-stick saucepan over medium-high heat. Stir to help the sugar dissolve, but stop stirring when the sugar comes to a boil. You can swirl the pan a bit if you want.
2. When the liquid sugar hits a dark amber color (I don't think I waited quite long enough), add all the butter to the pan. The mixture will foam up and thicken. Whisk until the butter has melted. Once the butter has melted, take the pan off the heat.
3. Add the cream to the pan (the mixture will foam up again) and continue to whisk to incorporate.
4. Add the sea salt and vanilla and whisk until caramel sauce is smooth.
5. Let cool in the pan for a couple minutes, then pour into a glass jar and let cool to room temperature. Don’t worry if the sauce seems a bit too thin at first, it will thicken as it cools. Store in the refrigerator for up to 2 weeks. Warm before serving to loosen it up again.

Saturday, October 20, 2012

Butternut Squash Risotto

butternut squash risotto

When I first met the Monkey Scientist, he was taking his MCAT and getting ready to apply for med school.  I knew when I met him that he probably wouldn't be staying in DC, but I think it only took about 3 months of dating before I agreed I'd probably move wherever he went.  The main reason being that I knew he was from Chicago and therefore that's where he'd probably end up.  After college, a whole bunch of my friends moved to Chicago (and my baby brother is here for college), so I'd actually been contemplating a move here long before I met him - he was just giving me the push I really needed to make it happen.

Lucky for me, this is exactly what happened.  By the time we moved here, some of my Chicago friends had moved on to other places, but some were just moving here and others were contemplating moving back.  It's been so wonderful being close to family and friends, even though it's meant leaving some DC friends behind. This week was a great example - we had my college roommate and her boyfriend over.  She's one of my favorite friends and we went through a lot together in college, so it feels like old times when we eat with her.

grated butternut squash, sage, chopped onions

For this particular meal, I decided to make one of my favorite comfort foods - risotto.  My college roommate and I learned to make risotto when we shared a tiny bedroom in our first apartment. It was so small, we could lie in bed and hold hands - despite our twin beds being up against opposite walls.  We would often lay in bed late at night or on a lazy Sunday and watch Food Network.  That year was a huge learning experience for me cooking.  It was my first time living on my own in a place with a kitchen and we spent loads of time experimenting with all different recipes.

The risotto we made in college always started with shallots and was pretty simple, but the basic technique for this was the same.  This version is just perfect for fall, though.  It fit well with ingredients I had leftover from making this pizza a few days prior (but with bacon instead of proscuitto, duh).  The butternut squash adds the perfect bit of sweetness to risotto.  The smell of grated butternut squash mixed with the chopped sage smelled perfectly like October.  And now that it's getting cold outside, risotto is just the perfect stick-to-your-ribs food.  We all really loved this recipe and I'm sure your family will, too!

butternut squash risotto

Butternut Squash Risotto
very slightly adapted from Recipe Girl

Ingredients
4-6 c low-sodium chicken broth (use vegetable for vegetarian)
2 tbsp extra-virgin olive oil
1 large yellow onion, finely chopped
1/2 tsp kosher salt
1/4 tsp black pepper
2 tbsp finely chopped fresh sage
1 small butternut squash- peeled, seeded, and grated (about 4 cups)
1 large clove garlic, finely chopped
1 1/2 c Arborio rice
1 c dry white wine
1/2 c freshly grated Parmesan cheese
juice of 1 lemon

Instructions
1. Warm the broth in a small saucepan over low heat. (Seriously, keep it on low.  Do not turn it higher.)
2. Meanwhile, heat the oil in a large saucepan over medium heat. Add the onion, salt and pepper and cook for 4 minutes or until the onions become translucent. Add the chopped sage and cook for 1 minute. Add the grated squash and garlic and cook until the squash begins to soften, about 3 minutes.
3. Add rice and cook, stirring constantly, for 3 minutes, or until the rice becomes somewhat translucent. Add the wine and cook, stirring frequently, until the liquid is absorbed, about 3 minutes.
4. Keeping the stove on medium to medium low, add the broth, 1/2 cup at a time, stirring as you add more and then occasionally while it's absorbing. Waiting until it is absorbed before adding another 1/2 cup.  To tell when it's time to add more, I like to push the rice to the side so I have a little well in the middle where I can see the bottom of the pan.  If that well has liquid in it, stir and wait a minute.  If it's really dry, time for more liquid. It should take about 30 minutes for all of the broth to be absorbed.  Start with 4 cups and taste it.  If the rice is still really hard, keep adding until it has a bite but doesn't taste uncooked.  When it's almost done, squeeze the lemon juice in and stir to absorb.
3. Remove from heat and stir in the Parmesan. Spoon into individual bowls. For presentation, you can garnish with chopped sage (or in my case, chopped chives).

Wednesday, October 17, 2012

Jack-O-Lantern T Shirts!

Untitled

A couple weeks ago, my friends and I participated in a scavenger hunt to raise money for a local hospital.  I agreed I'd make our team uniforms, so I decided I'd make us orange shirts with Jack-O-Lantern faces.  I thought it would be a fun way to bring in the Halloween spirit, plus we can always use them again for Halloween.  To save money, I wanted this to be a total DIY project!

attempt at ombre

The t-shirts are just men's undershirts that I bought in a 6-pack at Target.  I dyed them with Rit liquid dye from Michael's.  At first, I attempted to dye them ombre, so they faded from white to dark orange, but I couldn't get a straight line across the top so it didn't look very good.  Then I tried to just make a fade from light to dark orange, and although there is some fade I ran out of time and patience to make it very distinct.  I think if you waited long enough, though, it could be very cool.

Drying my tie dye

I decided to paint on the faces using fabric paint and a stencil I cut out of cardboard. At first, I tried to use spray fabric paint on a tester piece of paper but it really didn't work well at all.  Instead, I used regular fabric paint and a sponge brush to paint it on.  Since it's hard to make brush strokes on fabric, I basically dabbed the paint inside my stencil with the sponge brush.

Untitled

Although we didn't win our scavenger hunt, I am really happy with how our shirts came out.  And they ended up only costing about $30 for 6 shirts (I only made 5, but I had enough to make 6). We wore them with these cute Jack-O-Lantern socks that I got for $1 at Target.  Sadly, I'm going to be on a business trip on Halloween, but I'm going to bring along my shirt to wear at night.  I'm sad that I will miss any trick-or-treaters we get (I'm not really sure we'll even get any, but the odds are better than when I lived in a high rise apartment in DC), but I plan on dressing up the weekend before while I'm visiting DC.  I think I'm going to be Jordyn Wieber, since I received so many phone calls during the Olympics that I sort of look like her.  What are you going to be?

Jack-o-lantern t-shirts (DIY)