Showing posts with label whole wheat. Show all posts

Sunday, January 8, 2012

Tortilla Pizzas

Tortilla Pizzas

I have a confession to make.  These are iPhone photos.  And, I was simply the sous chef behind this recipe. It was a Monkey Scientist creation (although I may or may not have emailed him the recipe).  Regardless, this is such an easy, healthy recipe, that I wanted to share it with you despite not having my camera with me when the MS was cooking.  Forgive any lack of quality in photos - it doesn't indicate a lack of quality in the recipe.
Tortilla pizzas

My next warning I should give you, is about the jalapenos. They make this pizza VERY spicy, especially if you use whole slices, with seeds, and as many as we did.  The Monkey Scientist liked it, but my mouth was on fire and I ended up having to peel a lot of them off.  Giardiniera was a little less spicy, although of course it's very regional and you may not be able to find it (the Monkey Scientist may or may not have smuggled a jar back with him from Chicago).  If you're not into spicy (I'm talking to you, Mom and Dad), leave the jalapenos out.  The pizza will still be delicious!

Tortilla Pizzas

I am a huge pizza lover.  I mean seriously, who isn't?  But come New Year's Resolution time, it just doesn't fit the healthy diet I'm striving for.  These tortilla pizzas are such a great alternative.  The carb-filled crust is swapped out for a crispy, crunchy tortilla.  It's no Chicago deep dish, but it turns into almost a sweet cracker - absolutely awesome.  Plus, if you load on enough veggies, you don't need to add nearly as much cheese while maintaining that cheesy taste of a delicious pizza.

Tortilla Pizza

I love this pizza! It can be adapted so many different ways to fit the ingredients you love.  While we pretty much stuck by the original recipe, we added sausage for some extra protein. I absolutely LOVED the white beans in it.  I didn't stick by the proportions of the original recipe, but compared to what you see on my pizza, I wish I'd had a lot more beans.  Per usual, I also dug the artichokes on this pizza - they're one of my favorite things.  As far as portions - I had 1 plus less than 1/4 of a second, and the Monkey Scientist ate 2.  I would aim for 1 for a light (read: female) meal and 2 for a more robust (read: male) meal.  This would also be a really fun recipe to make with your kids - let them load the toppings on themselves! (Just do the "putting in the oven" yourself please!)

Tortilla Pizzas

Tortilla Pizzas
from Eighty Twenty, with some small additions

Ingredients
4 10" whole wheat flour tortillas
3 Tbsp olive oil, divided
1 cup sliced onions
2 tsp minced garlic
1 cup white beans, drained and rinsed well
1 1/3 cups quartered artichoke hearts (patted dry if canned), separated into smaller pieces
1/2 cup low fat, low sodium chicken sausage, sliced (optional)
1 1/3 cups baby spinach leaves, stemmed
2 oz crumbled feta cheese
1 cup shredded part-skim mozzarella cheese
1/4 cup jalapeno slices or giardiniera (optional)

Instructions
1. Preheat oven to 350 degrees.
2. Heat 1 tsp in a skillet over medium heat. Add sliced onions and saute until soft, ~5 minutes. Remove from heat and set aside.
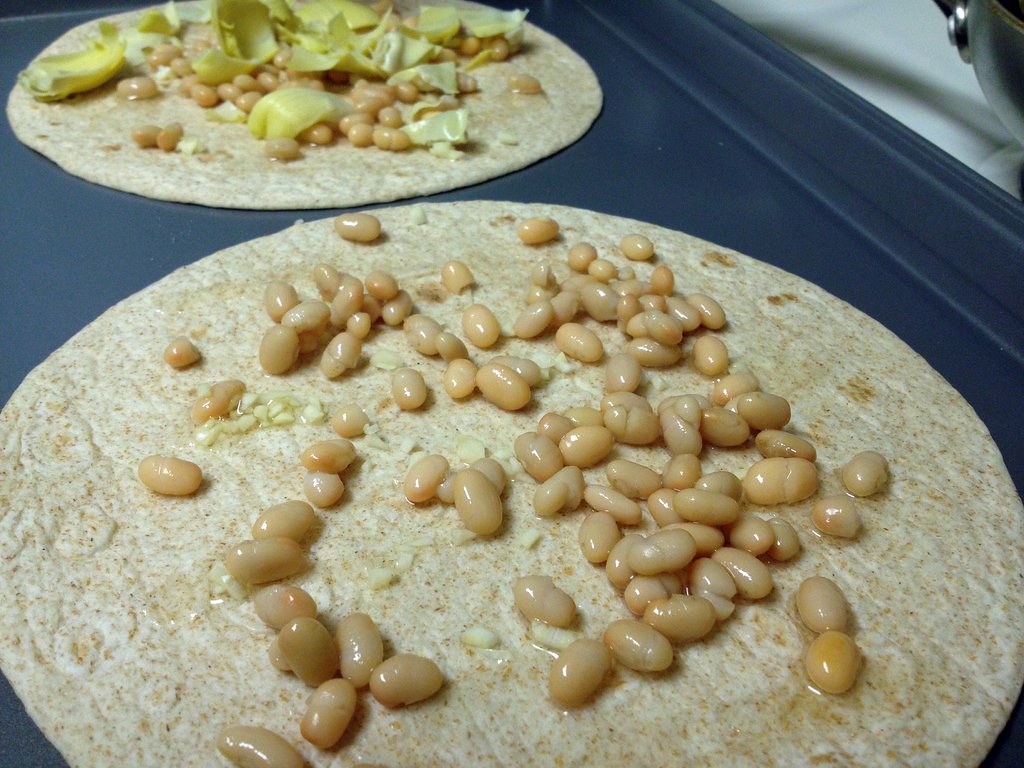
3. On each tortilla, spread 1/2 tsp olive oil. Sprinkle 1/2 tsp minced garlic onto each tortilla, then spread white beans, artichoke pieces, sausage, spinach leaves, sauteed onions, cheeses and jalapenos (if desired) evenly onto tortillas.
4. Place in oven, directly on middle rack or on a cookie sheet, and bake for 10-16 minutes, or until tortilla is crispy and cheese is melted. Remove from oven and allow to cool for ~2 minutes prior to cutting into quarters and serving.

Monday, October 3, 2011

Honey Cookies


Now I know I'm way late for Rosh Hashanah, but I debated whether or not I'd share these, since it isn't my favorite recipe of all time.  However, they are parve and do not contain eggs, so I thought they may excite those of you with egg allergies out there.


You could use butter, of course, but to keep them parve I used Fleischmann's margarine.  Growing up my mom always called this "Dad's butter" because my grandfather is highly allergic to dairy and we always used it when we baked for him.  Every time I see the silver foil wrapper I think of him.


The margarine creams well enough, although it doesn't get that sugary crunch like when you cream sugar and butter.  Maybe the honey affects this as well.  Additionally, the recipe doesn't call for any eggs (even egg replacement) which is unique for me in a cookie recipe.


The dough itself is good enough.  It rolls out quite nicely so that you can cut it into any shape you like.  I loved this adorable apple shape for the Jewish New Year - it's a fun riff on "apples" with honey!  The apples are a little sticky so it may help to cut them right on the parchment paper or silpat where you're going to bake them. I didn't find a fantastic way to make this work but you probably can!


I have to admit, these cookies come out really dry.  They'd be good for sandwich cookies - spread the middle with apple jam, cream cheese frosting (if you didn't need them to be parve of course!), or you could dip them in chocolate.  I think it would help cut the dryness.  They do have a wonderful honey flavor, which you can alter using different types of honey.  It's a very easy recipe for a last minute parve dessert!


Honey Cookies
adjusted slighty from Chick in the Kitchen

Ingredients
2 sticks margarine, room temperature (I used Fleichmann's)
1/2 c. white sugar
4 Tbsp. honey (I used clover honey)
1½ c white flour
1 c whole wheat flour

Instructions
1. With a hand mixer, cream margarine, sugar, and honey in a large bowl. (If you spray your measuring spoon lightly with non-stick spray first, the honey will slide right out.)
2. Slowly add flour, continuing to mix, until dough is smooth. Form into a large ball and wrap with plastic wrap. Refrigerate for at least 2 hours, or overnight.
3. Preheat oven to 300° F.
4. Cut dough into thirds, and work with each piece individually. Roll out to 1/2-inch thick on top of waxed paper or foil. Cut out cookies with a glass or cookie cutter, and place on a non-stick baking sheet.
5. Bake on the middle rack of the oven for 25-30 minutes, or until cookies are golden and edges have just begun to dark. Allow cookies to cool — they will harden as they do so. Use a flat, stiff spatula to remove them from the baking sheet.

My apologies to the vegan community - these cookies are not vegan - obviously veganism is not my fortay!

Thursday, August 25, 2011

Low Fat Chocolate Chip Zucchini Bread


For the 2nd year in a row, we had a big international potluck at work.  Last year, we did it for our colleagues who were training with us from our Chennai office in India.  This year, it was simply because last year was so tasty.


Now last year I went back to my roots - I made my mom's Kugel - but this year...well I was feeling a little lazy, so I made this low fat zucchini bread. It may have turned out great, but making it was a disaster.  I hesitated to even share the recipe with you - but I figured it was probably me. It may have been the size of my loaf pan...I'm not sure.


I thought it'd be a great idea instead of using regular butter (only 2 tbsp) so use Land O' Lakes Cinnamon Sugar butter spread.  I'm going to go ahead and blame this on my demise, although I'm sure I mis-measured something else too.  The bread just never really baked all the way.  And I baked it a good 15 minutes longer than it said.


Well, that was after I took it out of the oven, flipped it over, and the whole middle fell out.  It was totally raw so I put it back on top and baked it more - is that gross? I was so mad.  Baking can be so hit or miss for me - it's either super relaxing or something goes wrong and it's makes me so frustrated.


Anyways, despite the mistakes, it still came out tasting pretty good.  I adjusted the seasoning below to make it ...better... but I didn't change anything else given my disastrous results, but I gave you notes of what I changed. If you try it, please let me know how it comes out - I"m interested to hear if it's me or the recipe! (probably the former) And if you can figure out where I went wrong - PLEASE let me know!


Low-Fat Chocolate Chip Zucchini Bread
slightly adjusted from Gina's Skinny

Ingredients
1 c all purpose flour (Gina used unbleached, I used regular)
1 c whole wheat flour (Gina used white, I used regular)
1/2 c brown sugar (not packed, which I thought was odd)
1 1/8 tsp baking soda
1 tsp ground cinnamon
1/2 tsp ground nutmeg
1/2 tsp salt
1/2 c chocolate chips (note this isn't a whole bag)
1 large egg, beaten
1 tsp vanilla
2 tbsp melted butter (I used Land O'Lakes cinnamon sugar butter spread)
1 c apple sauce (I used unsweetened)
1 1/2 c shredded zucchini (not packed - I didn't squeeze to drain)

Instructions
1. Preheat the oven to 325 degrees F.
2. Combine flour, sugar, baking soda, salt, cinnamon, and nutmeg in a large bowl.  Mix well.
3. Add chocolate chips and gently mix to combine.
4. In a medium bowl, mix egg, vanilla, melted butter, apple sauce, and zucchini.  Add to the flour mixture and stir until just blended.
5. Pour the batter into a large 9x5 inch loaf pan (OK I used a normal loaf pan here, how big is that?).
6. Bake at 325 degrees F for 45-55 minutes, or until a toothpick inserted into the center comes out clean.  MAKE SURE IT'S DONE! Cool for about 10 minutes.  Remove loaf from pan and let it cool before slicing.

Tuesday, April 26, 2011

Chicken Souvlaki Pita with Skinny Tzatziki


I had some leftover chicken breast tenders from my trip to H-Mart, so when this simple recipe popped up on the Tasty Kitchen blog I thought it would be a great way to use them up! (Don't worry, I kept them frozen since I bought them!)


I use chicken breast tenders pretty frequently. I'm not sure of the nutritional difference between full breasts and the breast tenders, but the tenders are usually a lot less expensive.  When I'm chopping up the chicken by the end of the recipe anyway, like I do here (especially because I pounded it out), it made a lot of sense to go this route.


The real secret ingredient to this recipe is Cavender's All Purpose Greek Seasoning.  I know, another pre-mixed spice blend, but they are so easy to use! I found it at a specialty market, but hopefully you can find it in larger grocery stores as well.  Penzy's also has a greek spice blend, and it may be worth trying that instead (probably has less sodium!), although Cavender's does have a very unique flavor.


Tzatziki is one of the most delicious condiments - and it's so easy to make a skinny version.  I adapted this recipe from missamy's version on Tasty Kitchen as well as the version on Gina's Skinny.  Greek yogurt is now really easy to find in grocery stores and it gives the tzatziki the perfect tang!


Don't cut up the cucumbers in the tzatziki too small - it's nice when they give a little bite to the sandwich!

P.S. there is no cottage cheese in this recipe.  I used the old container to store the tzatziki!  It's all about recycling!


Overall, we really enjoyed this sandwich.  I loved that I could prep everything either in the morning, the night before, or even right when I get home from work, and then, when we get hungry, throw the chicken on the Foreman for 2 minutes and have a meal ready in under 5. When the Monkey Scientist got home from a late flight, I had dinner ready before he could walk to my apartment from the metro, even though I'd been running errands all evening. And he told me I make a mean tzatziki - didn't even notice that it was skinnified! The chicken has so much flavor from the greek seasoning, and the tzatziki balanced it perfectly.

Now that the weather is warming up (it's been in the 80s in DC!) and we're days away from the pool being open on weekends, I'll have to have this prepped at all times for a perfect Sunday lunch by the pool!


Chicken Souvlaki Pita with Skinny Tzatziki
Serves 2-3

Ingredients:
for the chicken
1 lb boneless skinless chicken breast (about 6 tenders)
4 teaspoons Cavender's All Purpose Greek Seasoning
4 teaspoons olive oil

for the tzatziki
6-8 oz plain, non-fat greek yogurt
1/2 cucumber, chopped
3 cloves garlic, minced
1 tablespoon lemon juice
1 tsp salt
freshly ground pepper

3 whole wheat pitas

Instructions:
Pound out the chicken breast until they are about 1/2 inch thick.

Rub down with a little bit of olive oil, then season both sides generously with the Cavender's Greek Seasoning. Wrap in plastic wrap and return to the refrigerator to let marinate at least 2 hours or overnight.

Meanwhile, mix greek yogurt, chopped cucumbers, minced garlic, lemon juice, salt, and pepper in a small bowl.  Cover and refrigerate until ready to use.

Grill the chicken until no longer pink. (This takes about 2 minutes on the George Foreman grill, but you could definitely use a real grill!)

Spoon a good amount of tzatziki in each pita.  Slice chicken into strips and divide evenly between pitas. Enjoy!

Sunday, April 10, 2011

Lemon Poppy Seed and Lavender Muffins


It has been a while since I last made muffins.  Please don't think that's because I don't love them.  They are one of my favorite breakfast foods. It just can be difficult to make a healthy muffin and not feel like I'm eating cupcakes for breakfast.


In fact, when my coworker bought me poppy seeds, all I could think of was lemon poppy seed muffins.  I've been talking about them for weeks. But typical me, I procrastinated making them.


And then, when I was at World Market, I was inspired! I found lavender for $0.99 for a small baggie and I knew it would put these muffins over the top.


Dorie Greenspan is a kitchen great - and who am I to adapt her recipes? Yet, of course I did. I didn't stray too far from the original, but I did make it whole wheat and add the lavender.  Plus, I didn't have any sour cream in the house, but I did get a good deal last week on greek yogurt (close to free with store discount and coupons) so I made that substitution.


And of course, because my mother's good friend, also known as "the Oops-a-Baker", taught me how to bake, I forgot an ingredient while making these muffins.  Let's just say they were very low-sodium. Next time I'll remember the dash of salt.


Still, I have to admit, they came out pretty darn tasty.  They're super lemony and the poppy seeds give them a nice pop. The lavender give them a subtle flowery note, but isn't at all overpowering.  I'm sure Dorie's original is the best lemon poppy seed muffin ever, but for a little something different - these were perfect.


Lemon Poppy Seed and Lavender Muffins
Yield: 12 muffins

Ingredients:
2/3 cup sugar
Grated zest and juice of 1 lemon
2 cups whole wheat pastry flour
2 teaspoons baking powder
¼ teaspoon baking soda
2 teaspoons lavender
¼ teaspoon salt
¾ cup greek yogurt (1 6-oz container)
2 eggs
1 teaspoon pure vanilla extract
½ cup unsalted butter, melted and cooled
2 tablespoons poppy seeds

Instructions
1. Center a rack in the oven and preheat the oven to 400 degrees F. Butter or spray the 12 molds in a regular-size muffin pan or fit the molds with paper muffin cups.

2. In a large bowl, rub the sugar and lemon zest together with your fingertips until the sugar is moist and the fragrance of lemon strong. Whisk in the flour, baking powder, baking soda, lavender, and salt. In a large glass measuring cup or another bowl, whisk the greek yogurt, eggs, vanilla, lemon juice and melted butter together until well blended. Pour the liquid ingredients over the dry ingredients and, with the whisk or a rubber spatula, gently but quickly stir to blend. Don’t worry about being thorough – a few lumps are better than over mixing the batter. Fold in the poppy seeds. Divide the batter evenly among the muffins cups.

3. Bake for 18 to 20 minutes, or until the tops are golden and a toothpick inserted into the center of the muffins comes out clean. Transfer the pan to a rack and cool for 5 minutes before carefully removing each muffin from its mold. Store leftovers in an airtight container at room temperature.

Monday, March 7, 2011

Spinach and Goat Cheese Turkey Burgers with Homemade Buns


I love ground turkey.  Not only is it tasty and healthy, it's cheap!  I bought all-natural, 97/3 ground turkey for LESS THAN $3 today!


Right before leaving work I very quickly had to find something to make for dinner.  These burgers seemed like a quick and easy dinner.  I am not a big feta fan so I substituted it for  goat cheese, which I LOVE.  I don't even know why they make cheese from cows when they can make it from goats!


I have decided recently to give up purchasing bread.  Most companies use high fructose corn syrup and other un-natural ingredients - so it is much more healthy to make it myself and not that difficult!


These buns were easy to make, but I think I added too much flour.  I'll have to try this recipe again to give it a fair shot.


The burgers on the other hand were DELISH!  I learned from Bobby Flay to salt and pepper the outside of the burger instead of mixing the seasonings inside.  It helps create a nice crust on the outside of the burger.  The goat cheese make the burgers creamy and yum.


I also added caramelized onions, ketchup, and Chulula on top of the burger.  It was a perfect dinner after today's run! 


Spinach and Goat Cheese Turkey Burgers
Adapted from Eat, Live, Run 
Ingredients:
1.3 lb ground turkey
1 egg, slightly beaten
1 box frozen spinach (about half of a bag), defrosted and squeezed dry
3 oz goat cheese
1 tsp salt + pinch of pepper
Directions:
Mix together all ingredients with your hands and form eight small patties. Cook patties in a greased skillet for about 6 minutes per side, or until meat is completely cooked. Serve on toasted buns with extra cheese, hot sauce, sliced onion, lettuce and ketchup.

Homemade Burger Buns
from creationsbykara 
Ingredients: 
  • ¾ cups Hot Water
  • 2 Tablespoons Oil
  • 2 Tablespoons Sugar
  • 2 teaspoons Instant Yeast
  • 1 teaspoon Salt
  • 1 whole Egg
  • 2-¾ cups Flour - half AP, half whole wheat (I used much less and probably could have used less)
Instructions:
Combine all the ingredients with about 1 1/2 cups of the flour in a large bowl. I use my Bosch. Beat till smooth. Add enough flour to make a dough that is slightly sticky, but doesn’t stick to your fingers. Knead for about 5 minutes.
Let dough rest for a couple of minutes, then divide into 8 portions. Roll each portion into a ball. Place on a well-greased cookie sheet and press down with the palm of your hand to flatten slightly. Let rise till doubled. (Mine took about 30 minutes, but it depends on the temperature of your kitchen.) Bake in a preheated oven at 350F for about 15-18 minutes. Cut in half and serve, for the yummiest hamburger you’ve ever had.
Note: If you want sesame seeds on top, take them out of the oven after 10 minutes of baking. Brush with beaten egg white and sprinkle with sesame seeds. Then return them to the oven for the remaining 5-8 minutes.

Wednesday, February 16, 2011

Whole Wheat Fig Newtons

Still sick, and still baking to feel better.


I was reading through some old blog posts that were posted before I started following some of my favorite blogs, and stumbled across this recipe.  Although my grocery store doesn't sell dried figs (I'll have to bring some home next time I'm at my parents' house, they always have some) I had a jar of fig spread that I'd used to make a stew a few weeks ago.

I'll have to make the stew again and remember to take pictures, because last night I was all about some cookies. I replaced the fig newton filling with the fig spread.


Unfortunately, it probably wasn't as thick as the spread that ELR suggested making.  Next time I will try to follow the original recipe.


Other than that, I highly recommend flouring your work surface when you roll out the dough.  It's really sticky and hard to fold otherwise.  And as a a result, I had a bunch of cracks, which led to a lot of my filling pouring out of the cookie during baking.  Which meant some of my newtons were almost fig-free :(


Although mine didn't turn out exactly how I wanted, the cookie dough did taste a lot like the original and I think they'd be pretty tasty if you make the filling as instructed.  I'll definitely have to try this one again once I get a hold of some dried figs!


Mmmm, cookies and cold medicine with Muppets tissues.  At least I have cookies.


Whole Wheat Fig Newtons
from Eat, Live, Run
makes about 40 cookies
1 1/4 cup all purpose flour
1 1/4 cup whole wheat flour
3 ounces butter, softened
1/2 cup + 2 T brown sugar, packed
1 T cream (I used half and half)
2 eggs
1 tsp baking powder
1/2 tsp baking soda
1/4 tsp cinnamon
1/2 tsp salt
for filling:
2 cups dried figs, stems chopped off
about 3 cups apple juice
1/4 cup granulated sugar
Cream together the brown sugar and butter. Add the cream and beat until light and fluffy. Add the eggs, one by one, beating after each addition.
In a separate bowl, combine the dry ingredients. Add to the butter and sugar mixture and mix until a soft dough forms (be careful not to over-mix). Turn dough out onto a floured countertop and form a smooth ball. Let chill in fridge for 2-4 hours, or overnight.
Meanwhile, make the filling. Place the figs in a saucepot and cover with apple juice. Let sit for 15 minutes. Add sugar and bring to a boil, then reduce heat and simmer for 30 minutes. Let cool and puree figs and juice together.
Preheat the oven to 350. Cut dough ball into two parts and keep the part you’re not using in the fridge. Roll out one part into a large rectangle (see above photo). Carefully pick rectangle up and put on a lined baking sheet. Spoon about a half cup of fig puree down the center of the rectangle, being sure to save room around all edges. Fold top and bottom down over the middle of the rectangle and let the edges barely overlap. Fold the outer edges of the rectangle in and pinch together. Repeat with other piece of dough.
Bake for twenty five minutes, until golden. Let cool before slicing into newtons.

Monday, February 14, 2011

Easy Peasy Whole Wheat Bread


I have been meaning to try out making bread for a while now. This was a big cooking and baking weekend, so I finally took the plunge. And it was easy!


This recipe was a little bit strange because you mix the yeast right in with the dry ingredients instead of putting it by itself in warm water. However the recipe was exactly what it said - easy peasy. I made it in my standing mixer with the dough hook instead of using my hands and an electric mixer, as the original recipe called for.


A great tip I read somewhere online - you know the dough is done rising when it has doubled in size and when you poke it, it dimples instead of bouncing back.


It was super tasty!  It made great sandwich bread with a little mayo or hummus, turkey and fresh spinach.  My coworkers were really impressed with the look of it - they couldn't believe I made it!  It was also awesome, of course, as french toast :)  I think I'm ready to step it up and try my favorite... sourdough bread!


Easy Peasy Whole Wheat Bread
adjusted from scrapper jade on tasty kitchen

Ingredients
  • 4-¼ cups Whole Wheat Flour, Or As Needed To Make A Soft Dough
  • 2-¼ teaspoons ActiveYeast
  • 1-¼ teaspoons Salt
  • ¾ cups Skim Milk
  • ¾ cups Water
  • ⅛ cups Honey
  • ⅛ cups Oil
Directions
Combine 1-3/4 cups flour, undissolved yeast and salt in a large mixing bowl. Heat milk, water, honey and oil until very warm (not boiling—it should just be a bit warmer than lukewarm). Gradually add to the flour mixture; beat 2 minutes at low speed in a standing mixer fitted with the dough hook, scraping the bowl occasionally. Add 1 cup flour, a little bit at a time, stirring between each addition until combined, scraping bowl occasionally. If the dough is sticking to the side of the bowl, add a little more flour, 1 tbsp at a time.
Knead with dough hook until smooth and elastic, about 6 to 8 minutes. Let rest 10 min.
Roll dough on a floured work surface into a 12 x 7-inch rectangle. Beginning at the short end of each rectangle, roll up tightly as for a jelly roll. Pinch seams and ends to seal. Place, seam side down, in a greased 8-1/2 x 4-1/2-inch loaf pan. Cover; let rise in a warm, draft-free place until doubled in size, about 30 to 60 minutes.
Bake in a preheated 375ºF oven for 35 to 45 minutes or until done (mine took about 30 minutes, but I discovered that my oven was cooking too hot). Remove from pans; let cool on wire racks.