Monday, November 18, 2013

Maple Pumpkin Pie

Maple Pumpkin Pie

This weekend, we continued our annual Friendsgiving tradition.  Our first Friendsgiving was my senior year of college, when my (still) roommate and I hosted everyone at our apartment.  It was a great way to kick off the holiday season.  When we moved to Chicago, our friends started organizing a Friendsgiving at their apartment.  The tradition has grown - we had over 30 people this year!

Friendsgiving for us is potluck-style.  We have a sign up and everyone brings one of their favorite dishes.  We had so much food this year: 2 turkeys, tons of mashed potatoes, salads, sweet potatoes, challah, cranberry sauce, stuffing, yams, brussels sprouts, and traditional polish sausage.... followed by cookies, cake, ice cream and at least 5 pies for dessert!  The best part was that my friends are some of the best cooks I know.  Everything was unbelievably delicious!

Maple Pumpkin Pie

I brought challah, pecan pie, and this maple pumpkin pie.  I love this recipe because... well obviously I'm obsessed with anything maple.  But seriously, it's a great twist on a classic.  It isn't a huge deviation - it still has that traditional pumpkin pie flavor - but with a little hint of maple.  I have to confess, I used store-bought crust this year... but I feel so guilty about it and disliked the taste so I don't think it's ever going to happen again!  Still, it made assembly super easy.  I promise anyone can pull this off for Thanksgiving!

Maple Pumpkin Pie

Maple Pumpkin Pie
from Real Simple

Ingredients
1 piecrust (store-bought or homemade)
2 large eggs
1 15-ounce can pure pumpkin puree
1 c heavy (whipping) cream
1/2 c pure maple syrup (not pancake syrup)
3/4 tsp ground cinnamon
1/2 tsp ground ginger
1/2 tsp kosher salt
1/8 tsp ground cloves

Instructions
1. Set the oven rack to the lowest position. Preheat the oven to 350.
2. Place a pie tin on a baking sheet and place the pie crust in the tin. Crimp the edges, if desired.
3. In a large bowl, whisk together the eggs, pumpkin puree, cream, maple syrup, cinnamon, ginger, salt and cloves. (I added a little bit of pumpkin pie spice too because I had it on hand.)
4. Pour the pumpkin mixture into the pie crust. Bake for 60-70 minutes, or until the center is set and a knife inserted into the center comes out clean. Allow to cool to room temperature before serving (I like pumpkin pie chilled so I keep in the fridge until I'm ready to serve it) and serve with whipped cream.

Tuesday, October 1, 2013

Harvest Roasted Chicken with Grapes, Olives, and Rosemary

Harvest chicken with grapes olives and rosemary

Fall is here.  Well, it's officially here, but we've had plenty of days that still feel like summer.  I'm not complaining.  Summer was so short this year in Chicago that I welcome the gorgeous days where I can spend my weekend basking in the sun.  I know it's going to hide behind the gray clouds of winter soon enough, so I want to enjoy every last minute before that happens.

Harvest chicken with grapes olives and rosemary

But that doesn't mean I'm not ready for fall foods.  The summer produce is dwindling.  Last week was the glorious bit of time where the peaches were OK enough to make peach applesauce - the Monkey Scientist's favorite - with the first of the fall apples.  I think by this week that short overlap of seasons will be over.  I'm just waiting on pumpkin as long as I can so I don't get sick of it too quickly.  And so the season of roasting begins.

Harvest chicken with grapes olives and rosemary

My first autumn meal was this roasted  chicken.  I love the sweet grapes with the savory rosemary, contrasted by the brine-y olives.  I picked up the world's largest shallot at the Farmer's market (which sadly has only 3 weeks left) as well as some small pink potatoes to serve on the side.  It was a perfect and hardy warm dinner that the Monkey Scientist even loved, despite his hatred of olives (he picked around them).  And when Deb says your guests will slurp this up with a spoon, she's spot on.  I totally found the Monkey Scientist with a spoon in the serving dish as we were cleaning up.

Harvest chicken with grapes olives and rosemary

Harvest Roasted Chicken with Grapes, Olives, and Rosemary
from Smitten Kitchen via Serious Eats

Ingredients
2-3 lbchicken parts (thighs, drumsticks, and/or breasts), with skin and bones
Table salt
Freshly ground black pepper
1 tbsp olive oil
1 c seedless grapes
1 c pitted Kalamata olives
2 small or 1 very large shallot, thinly sliced
1 tbsp finely chopped fresh rosemary
1/2 c dry white wine
1/2 c chicken broth

Instructions
1. Put the oven rack in the middle of the oven. Preheat the oven to 450.
2. Heat the olive oil in a cast iron skillet over medium high heat. Pat the chicken dry then season well with salt and pepper. Once the oil is hot, add the chicken skin side down and cook until the skin is seared and golden brown (3-5 min). Then flip over and sear on the other side, 2-3 minutes.
3. Turn the heat off and add the shallots, then olives and grapes to the pan in all of the gaps around the chicken pieces. Sprinkle half of the rosemary over the chicken.  Carefully move the skillet to the oven and bake for 20 minutes or until the meat is no longer pink. (I like to poke the chicken with my finger to tell when its done using the finger test it should feel at least "medium").
4.  Remove from the oven and transfer the chicken, grapes and olives to a serving platter.  Return the skillet to the stove over medium to medium-high heat.  Add the wine and scrape the pan as it's boiling off to get all of the remaining chicken bits.  Add the chicken broth and allow to simmer until the liquid thickens and reduces by at least half.
5.  Pour the sauce over the chicken.  Garnish with the remaining rosemary and serve immediately.

Sunday, September 15, 2013

Homemade Bagels

Bagels

The Jewish Holidays are one of my favorite times of year to be in the kitchen.  Whether it's making my favorite brisket, making a kugel, or just spending time with my mom, I love it.  I spent Rosh Hashanah this year at home with my family, which I haven't had the chance to do in far too many years.  My mom makes one of the best Rosh Hashanah meals and this year was no different.  I'd pick that meal over Thanksgiving any day!

Bagels

I was back in Chicago for Yom Kippur, so we got to break the fast with the Monkey Scientist's family.  We hosted at our place this year and I decided I wanted to make as many things from scratch as possible.  I made a challah (with raisins this time, per request from his dad), my mom's kugel (with a little almond extract, which was a fun little twist on a favorite), a kale quiche with 
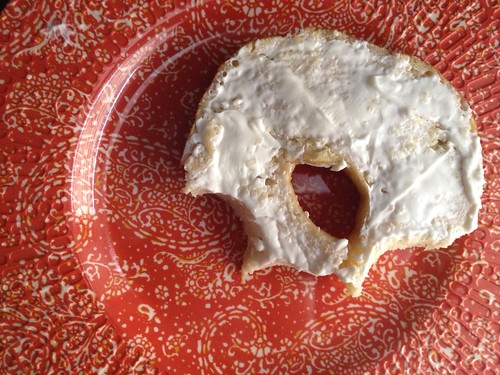
my favorite homemade oatmeal crust and even cured my own lox.  I bought the cream cheese homemade from Southport Grocery and picked up a whole smoked herring from Dirk's.

Bagels

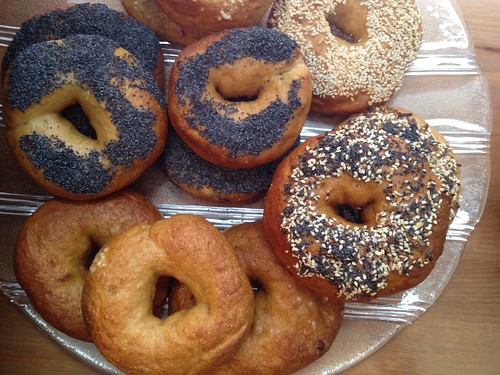
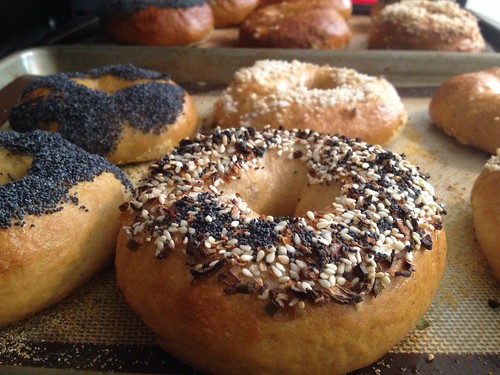
But the pièce de résistance had to be the bagels.  They're the key to any break fast. And if I was going to fast all day, I had to have better bagels than the ones available in our neighborhood (which are, to say the least, sub par).  I had seen recipes to make bagels for a long time, but they looked like a pain.  A multi-day process and weird ingredients like barley malt... I hadn't been quite ambitious enough to accomplish it before now.  But this seemed like the right excuse to take the plunge, and I am so glad I did.  Finding the strange ingredients turned out to be easier than I expected and to be honest, so was making the bagels!  I think making frosting is much more difficult!

Bagels

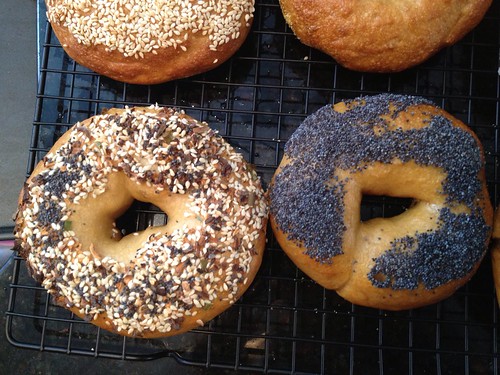
The whole meal was a great success.  The family was still talking about everything the next day - a sign that means I did something right!  And the bagels were definitely the star of the meal.  The Monkey Scientist's brother said they were the best bagels he'd ever had.  I didn't think they were far off, and definitely the best I've had in Chicago.  They were perfectly chewy and the malt gives them that "bagel" flavor. They were absolutely worth the extra effort!

Bagels

Homemade Bagels
from Smitten Kitchen
Note: this recipe takes at least 2 days, so think ahead!

Ingredients
Sponge
1 tsp instant yeast
4 c unbleached high-gluten or bread flour (I used bread flour)
2 1/2 c water, room temperature
Dough
1/2 tsp instant yeast
3 3/4 c unbleached high-gluten or bread flour
2 3/4 tsp salt
2 tsp malt powder or 1 tbsp dark or light malt syrup, honey, or brown sugar (you can find the malt syrup at Whole Foods, this is the brand I used)
To Finish
1 tbsp baking soda
2 tbsp malt syrup
Cornmeal or semolina flour for dusting
Sesame seeds, poppy seeds, rehydrated dried minced garlic or onions, or crushed sea salt for topping

Instructions
1. In the bowl of a standing mixer, combine 1 tsp of yeast, 4 c high-gluten or bread flour, and water.  Stir until you have a thin, smooth and very sticky batter.  Cover with plastic wrap and let it rise for two hours.  It will double in size and be very foamy.  It should collapse when tapped, but mine didn't really and was still ok.
2. Stir the additional 1/2 tsp yeast into the dough. With the dough hook attachment on the mixer at low speed, add 3 c of the flour and the salt and malt powder or syrup until the dough forms into a ball.  Stir in the last 3/4 c of flour to stiffen the dough.
3. At this point, you will knead the dough.  You can do it in the stand mixer, but if you have a standard Kitchen Aid, this is a very tough dough and it might not be able to handle it.  It really needs 6 minutes of kneading in the mixer, but after about 3-4 minutes mine started making bad noises and then smoking.  I finished kneading it by hand.   You can also just knead it by hand for about 10 minutes, which I think is what I'll do next time.  Once kneaded, the dough should be pliable and smooth and very stiff/firm.  All of the flour should be incorporated.  If the dough is dry and rips, add a few drops of water (I had to do this a couple of times) and continue kneading.  If it's tacky or sticky, add more flour - the dough shouldn't feel satiny not sticky.
4. Divide the dough into 12-14 bagels (if you have a kitchen scale, you can measure them to 4.5 oz.  I made 13 bagels).  If you like smaller bagels, you can make them smaller.  Form the pieces into round rolls.
5. Cover the rolls with a damp towel and allow to rest for about 20 minutes.
6. Line 2 baking sheets with Silpat mats or parchment and spray with cooking spray.  Poke your thumb through the middle of each roll to create a hole.  Widen the hole to about 2 inches by evenly stretching the dough.  Be careful to keep the dough equal all the way around so that it cooks evenly.
7. Place each bagel on the lined baking sheets about 2 inches apart.  Cover loosely with plastic wrap and let sit for 20 minutes.
8. Test one bagel to see if it's ready to retard overnight in the fridge.  Fill a bowl with room temperature water and put a bagel in it.  If it floats within 10 seconds (mine floated instantly), they're ready.  Dry it off and put it back on the pan.  If not, dry it off and let them sit at room temperature for another 10-20 minutes, then test again. 
9.  Once they're ready to retard, put the pans, loosely covered with plastic wrap, into the fridge at least overnight and up to 2 days. (Note: after 2 days, the sides of my bagels were a little dried out.  That's ok, they'll be fine once you boil them.)
10.  When you're ready to cook the bagels, bring the oven to 500 degrees F.  Put both of the oven racks in the middle.  Bring a wide pot to a boil.
11.  Add the baking soda and malt to the water.  Note it will boil up like a science fair volcano when you add the baking soda.  You may need to turn the heat down a little bit so that it doesn't boil over, just make sure it continues to boil.
12. Add a few bagels to the pot, making sure they have plenty of room.  I could fit 3 at a time.  Boil 1-2 minutes, then flip over and boil for an additional 1-2 minutes. (Apparently, the longer you boil the chewier they'll be. I couldn't tell the difference between the bagels that I boiled longer.)  Meanwhile, coat the Silpats lightly in corn meal.
13.  Remove the bagels with a spider or other strainer. If you're going to top them with seeds, put them immediately onto a plate filled with the topping.  I had 1 of poppy, 1 of sesame, 1 of salt, and one with a mix of sesame, poppy and dehydrated onion to use as "everything".  Then put the bagels seed-side up on the baking sheet on top of the corn meal.  If you want a plain bagel, move it immediately to the corn-meal coated lined baking sheet.
14.  Once you've boiled all the bagels, put the baking sheets in the oven and bake for 5 minutes.  Rotate the baking sheets 180 degrees and move the top to the bottom and visa versa.  Bake for an additional 5-10 minutes until the bagels are a nice dark brown.
15. Cool on a baking sheet for 15 minutes.

Note: If you live in Chicago, I recommend serving them with the homemade cream cheese from Southport Grocery (call ahead to order) and lox or smoked whitefish from Dirk's.

Tuesday, September 10, 2013

Dutch Baby with Lavender Sugar

Lavender Dutch Baby

Sunday mornings for me deserve a special breakfast.  Often this means french toast, but when the only bread in the house is multi-grain (and let's be serious, a good french toast should be made with challah or French bread) sometimes you need to up the ante a little bit.  I have been seeing recipes for dutch babies for months and I've been dreaming about them but they look... intimidating.  All that puffed dough in a cast iron skillet? Sounds complicated.

Lavender Dutch Baby

Wrong.  SO EASY.  Healthy? Not so much. But definitely easy!  And delicious?  Of course.  It reminds me of the fried dough we used to get at Clowntown, my hometown's annual carnival, every year.  But it's breakfast food and on Sundays, I don't even feel guilty about it!  The lavender on top takes it from a cheesy carnival treat to something just a little bit more gourmet.  I loved this so much as is, I didn't even pour maple syrup on it.  Now that's saying something.

Lavender Dutch Baby

Dutch Baby with Lavender Sugar
from A Cozy Kitchen

Ingredients
3 large eggs at room temperature 30 minutes
2/3 cup whole milk at room temperature (I used skim and it worked fine)
2/3 cup all-purpose flour
1/4 teaspoon pure vanilla extract
1/8 teaspoon cinnamon
1/8 teaspoon grated nutmeg
1/8 teaspoon salt
1/2 stick unsalted butter, cut into pieces
1/3 cup sugar
1 tablespoon of dried lavender

Instructions
1. Preheat the oven to 450 F. Put a 10" cast iron skillet on the middle rack of the oven and let it heat up for about 3 minutes (if it gets too hot the butter will burn).
2. In the bowl of your stand mixer, beat the eggs on high with the whisk attachment until pale and frothy. Add the milk, flour, vanilla, cinnamon, and nutmeg and beat just until smooth. You'll have a very thin batter.
3. Carefully remove the hot skillet from the oven and add the butter, swirling to coat the bottom evenly. It may brown a little bit - that's OK.  As soon as the butter is melted, add the batter and immediately return to the oven.  Bake until puffed and golden brown, 18-25 minutes (mine was done in 18, so be sure to watch it).
4. While the pancake bakes, mix together the sugar and lavender in a small bowl.  Press the lavender into the sugar, breaking it up and making it fragrant.
5.  When the pancake is finished, remove from the oven and top with the lavender sugar.  You may not need all the sugar - I only used about half and saved the rest for another day.  Serve immediately.

Monday, August 26, 2013

Egg-free French Toast

Eggless French toast

On Sunday morning I was craving French Toast.  Of course, the roommate is the only one who ever buys eggs in our house and, since he'd been gone for a week, we had none.  I told myself I wasn't going out until I had done a deep-clean of the house, so there was no going to the store or our usual brunch spot.  It was time to get creative.

I figured if anyone knew how to make French Toast sans eggs it would be a vegan, so I did a quick search and found a vegan French Toast recipe.  We all know I am not a vegan chef so I of course un-veganized it - adding back in milk and butter.  It's a great way to make French Toast if you're allergic to eggs or, like me, a lazy grocery shopper.  It's crispy on the outside and soft on the inside.  It would be awesome topped with fresh fruit or berries.  Basically, it's just batter-fried bread, and who can complain about that?  Certainly not me!

Eggless French toast

Egg-free French Toast
adapted from chef chloe

Ingredients
1/4 c skim milk
1/4 c flour
1 tbsp maple syrup (plus more for serving)
1 tbsp ground flax seed
1/4 tsp salt
1/2 tsp cinnamon
1 tbsp brown sugar
1/2 tsp vanilla
6 slices, 3/4" thick, french bread
1 tbsp butter

Instructions
1. Whisk together the milk and flour with a fork in a small bowl until smooth.
2. Add the maple syrup, ground flax seed, salt, cinnamon, brown sugar and vanilla and whisk to combine.
3. Dip the bread in the batter until both sides are well coated.
4. Melt the butter in a skillet over medium heat.  Once melted, add the bread, making sure not to crowd the pan.  If you need to do it in two batches, that's better than squishing the bread.
5. Allow the bread to brown on one side, then flip and allow to brown on the other side.  I like to press the bread while the second side is browning.
6. Serve with additional maple syrup, warmed.

serves 2

Tuesday, August 20, 2013

Rigatoni with Eggplant Puree

Eggplant rigatoni

We're back!  Our vacation was amazing.  We explored all over the Pacific Northwest then hung out at the beach in California for a few days.  We were out in the mountains and forests without cell service and it was the perfect excuse to check out from every day life for a little while.  There are lots of pictures up on my tumblr, strangeplaceforyoga, so go check them out!

Eggplant rigatoni

Cooking on our trip was well... minimal.  We picked up food from a few farmer's markets and cooked it over an open fire in the woods.  Usually this resulted in charred burgers and more baked potatoes than we'd ever eat at home, but we found a few treats as well.  Corn over the open fire was charred and absolutely delicious! I didn't even miss the butter.  Still, I was happy to get back home and start cooking again.

Eggplant rigatoni

The Monkey Scientist stayed out in California for a fellowship for a week after I left.  I have to admit - before he got back I was lazy.  But when he flew in the other night I put this meal together while his brother picked up him up at the airport.  It had just the amount of cutting necessary to relax me and remind me why I love cooking so much.  Plus, pasta = comfort food.  And pine nuts are my favorite.  I made a few pan-seared chicken breasts to throw on top because I knew he'd want some meat and they were an easy addition.  The dish is warm, cozy and comforting.  Despite the reliance on summer veggies, I'll definitely be bringing it back out this winter!

Eggplant rigatoni

Rigatoni with Eggplant Puree
from smitten kitchen

Ingredients
1 small eggplant, cut into 1-inch cubes
1 pint cherry tomatoes, halved (I used the golden variety)
3 cloves garlic, whole
3 tablespoons olive oil
1 teaspoon salt
1 teaspoon freshly ground black pepper
1 teaspoon red pepper flakes
1/4 cup toasted pine nuts
1 pound rigatoni pasta
1/4 cup torn fresh mint leaves
3 tablespoons extra-virgin olive oil
1/2 cup grated Parmesan
1 oz balsamic vinegar
1 tbsp freshly-squeezed lemon juice

Instructions
1. Preheat the oven to 400 degrees F.  Line a large baking sheet with foil.
2. Combine the cubed eggplant, tomatoes, garlic, olive oil, salt, pepper and red pepper flakes in a large bowl and toss to coat. Spread the mixture evenly on the foil-lined baking sheet.  Bake for 35 minutes or until the vegetables are tender and the eggplant is golden and beginning to brown on the edges.
3. Meanwhile, in a very small frying pan (I use one designed for 1 egg) add just the pine nuts.  Toast over medium heat, stirring nearly constantly, until they begin to brown.  Remove to a small plate or jar and set aside.
4. At the same time, bring a large pot of salted water to a boil.  Cook according to package instructions then drain, reserving at least 2 cups of the pasta water.
5. Combine 3 tbsp olive oil and the mint leaves in the bowl of your food processor.  Add the roasted vegetables, then puree.
6. Pour the pureed vegetables, Parmesan, balsamic vinegar, and lemon juice over the pasta.  The sauce will be thick, so add the reserved pasta water 1/2 cup at a time until it reaches your desired consistency.

Monday, July 22, 2013

Boozy Watermelon Granitas

image (6)

I'm smack dab in the middle of some serious summer vacationing.  Last week, we spent 4 days up in New Hampshire with my family.  We hung out by the lake, lounged in the water, waterskiied, did some paddleboard yoga, and ate more delicious food than anyone actually needs to eat in a 4 day period.  Needless to say, it was awesome.  But of course the best part was the family time with my parents, grandparents, aunt and cousins.  I wish we all lived closer!

image (8)

This past weekend, we took a trip up to Wisconsin to camp and catch a Brewers game.  It was meant to be a test-run for our camping gear, since we just got a whole bunch of new stuff to take on our big trip out West.  It was also a chance to check another baseball park off of our lists.  I've been to 3 new parks so far this summer and will be at one more (I hope) by the end of the week!  Despite the fact that traffic in both directions was pretty horrific, limiting our ability to actually do any hiking, we had a great time.  I'm excited for us to do the real thing next week.

image (10)

Before we left, I had sent this recipe to the Monkey Scientist's mom.  I didn't really read it, or think about how much work went into making granitas.  I just thought it looked good.  I should have known better - by the time we got back she'd stressed over making it all day and bought these cute little serving bowls for it.  I was so excited!  She's the sweetest.

image (5)

I tried to help out by making the coconut whipped cream, but it didn't work out great. The taste was spot on, but it never really stiffened up.  Not quite sure what I did wrong; maybe I overwhipped it in the electric mixer?  It didn't really matter though because these were so delicious that we all slurped them down pretty quickly.  When they started melting it almost turned into a soft coconut-watermelon ice cream.  What a refreshing and tasty summertime treat!

Next, we're off to the West Coast for our big summer trip. I'll be sure to tell you all about it when we get back!

image (7)

Boozy Watermelon Granitas
from How Sweet It Is

Ingredients
4 cups fresh cubed watermelon
4 tablespoons granulated sugar
1/4 cup coconut rum
1 (14-ounce) can of full-fat coconut milk, refrigerated overnight

Instructions
1. In the blender or food processor, completely puree the watermelon. Strain the mixture through a fine mesh sieve over a measuring cup and use a spoon to press every last bit of liquid out of the watermelon pulp.
2. Add the watermelon juice and sugar to a small saucepan over medium heat. Stir constantly until the sugar dissolves and once the liquid comes to a boil, turn off the heat.
3. Pour the juice into a 9x13-inch baking dish and whisk in the rum. Freeze for 4 hours.
4.  Use a fork and scrape the mixture into small icy bites. Freeze again and repeat the scraping one or two more times within the next two hours or so.
5.  When ready to serve, open the can of cold coconut milk (don't shake it first!) and remove all of the liquid. Scoop the cream into the bowl of an electric mixer and beat on high speed with a whisk attachment until peaks form, about 2 minutes. If desired, you can sweeten your coconut whipped cream with a little sugar.
6. Serve the granitas by layering a spoonful of the whipped cream, the granitas and more whipped cream. You can garnish with a sprig of mint if you have any on hand.

Friday, July 5, 2013

Guacamole

Guacamole

I hope you had a wonderful 4th of July!  We spent the evening on a friend's rooftop, where we could see fireworks in every direction.  It was spectacular!  And all of the fireworks were just far enough away that I wasn't irrationally afraid of them, like I often am.  Win!

Guacamole

The 4th is a particularly big celebration in the Monkey Scientist's family because so many family birthdays fall right around the holiday.  We've had a blast celebrating all week long, and it will continue this weekend!  For our birthday gift to the Monkey Scientist's brother and his girlfriend, we gave them this mortar and pestle from Sur la Table that I just love!  Not only is it made of volcanic rock, it's a little pig! Too cute. Of course we gave it to them on the 4th so that we could make guac for the party.

Guacamole

Much overdue to all of you, here is my go-to guacamole recipe.  I guess over the years I've adapted it from a plethora of recipes out on the web and made it my own.  We make it all the time - especially for big parties or family dinners.  It goes great on burgers, tacos, or just with chips.  It's the perfect treat for the summertime!  If you're not familiar with tomatillos, they're often sold with the tomatoes and avocados.  They look like miniature green tomatoes but they naturally have a paper-like outside that easily peels off.  They can be a bit sticky but that comes off with a good rinse under cold water.  They're the secret to my famous guacamole!

Guacamole

Guacamole

Ingredients
3 ripe avocados, removed from skins, pitted, and cut into chunks
1 medium to large tomatillo, diced
2-3 cloves garlic, diced
1 jalapeño, diced
juice of 1 lime
1 tsp salt
1 tsp freshly ground black pepper
1/2 tsp cayenne pepper (or more if you like spicy)

Instructions
1. Add the avocado, tomatillo, garlic, and jalapeño to a large bowl or mortar.  Smash with the back of a spoon, a potato masher, or a pestle until only small chunks remain.
2. Add the lime juice, salt, pepper, and cayenne pepper and stir to incorporate.

Wednesday, July 3, 2013

Shanghai Shrimp

Shanghai shrimp

This summer has been, needless to say, hectic so far.  But in the most fun sorts of ways!  My birthday was a blast!  We had a great yoga class with my favorite yoga teacher out on the lakeshore path.  There are lots of photos up on strangeplaceforyoga, so head over there and check them out.  We followed it up with an awesome (and plentiful) sushi dinner with friends (and my baby brother!) which made me smile.

I have also been traveling for work, and even though it may feel like I'm always on a plane, when I travel I get to do my favorite part of my job and I've enjoyed all of the interesting things I've been learning.

A couple weeks ago, we were able to spend a day up out on a friend's boat on Lake Geneva which was an absolute blast!  We've also been taking advantage of the many summer festivals in Chicago.  Last weekend we went to Country Fest, where we were able to lay out in my new birthday hammock all day and enjoy the great weather and music.  Last weekend I also had my first trip to Ravinia, where we had a great night with Darius Rucker, Rodney Atkins, and Jana Kramer.  I had the best night singing, dancing and picnicing!

Shanghai shrimp

The summer is only ramping up from here!  Soon I'll be headed on my last work trip of the summer (I hope) followed by a visit to my parent's house in NH.  I'm ready to get out on the lake and waterski, as well as spend lots of overdue time with family.  Once I get back, it will less than 2 weeks until our big trip! We're headed all over the Pacific Northwest and then flying down for a few days in San Diego to cap off the end to of the Monkey Scientist's last summer break.  I couldn't be more excited.  If you have any advice please share!

Shanghai shrimp

Hopefully between all of the travel and fun I'll have time to share another recipe with you soon.  In the meantime, this recipe was PERFECT for my crazy hectic lifestyle lately.  Aside from the produce, we had everything we needed in the house, which is always a plus for me.  Although the prep takes a little while, once the vegetables are chopped and the liquids are measured out, it doesn't take very long to come together.  Plus, the boys were happy because it made a LOT of food!  It was perfectly finished with a little watermelon for dessert, and I still had time to make Chipotle Brownies (man, does that post need to be updated) for the Mexican-themed party we're going to tonight!

Shanghai shrimp

Shanghai Shrimp
from Family Circle

Ingredients
1 7 ounce package rice stick noodles
3 tbsp canola or vegetable oil
3 tbsp low-sodium soy sauce (divided)
3 tbsp rice vinegar (divided)
1/4 plus 1/8 tsp salt
3/4 lb mini sweet peppers,tops trimmed, quartered
8 oz sugar snap peas
1 medium onion, thinly sliced
1 1/2 lb raw cleaned shrimp (thawed if frozen)
1/2 cup sweet chili sauce
2 tbsp fresh lemon juice
1 - 2 tsp Asian chili-garlic sauce (sambal oelek)

Instructions
1. Bring a large pot of salted water to a boil. Add the rice noodles and cook for 3 minutes, then drain.
2. Heat 1 tbsp of oil in a large wok over medium high heat. Add the cooked rice noodles, 1 tbsp of soy sauce, and 1 tbsp of rice vinegar. Cook, stirring frequently, for 2-3 minutes or until the noodles just start to brown from the heat and the sauce is evenly distributed.  Remove the noodles from the wok onto a large platter.
3. Add the remaining 2 tbsp of oil to the wok and heat over medium high heat.  Add the sweet peppers, sugar snap peas, and onion to the wok and cook, stirring frequently, for 5 minutes or until the onions just start to soften.  Add the shrimp and 1/8 tsp salt. Cook, stirring, for an additional 4 minutes or so, until the shrimp are opaque.  Whisk together 2 tbsp soy sauce, 2 tbsp rice wine vinegar, the sweet chili sauce, lemon juice, and chili-garlic sauce, then add to the wok and cook for an additional 1 minute.
4. Pour the vegetable and shrimp mixture over the noodles, with all of the sauce in the pan, and serve.

Friday, May 24, 2013

Roasted Gnocchi

Roasted Gnocchi

A few weeks ago I mentioned my new favorite trick for making gnocchi.  Let me preface this by saying I tried to make super authentic homemade gnocchi once.  I attempted to make Giada's Sweet Potato Gnocchi because - well they have maple in them.  I was living with a family friend, just after moving to DC and she's not exactly a cook.  In fact the only "bowl" she had in the house was her pasta pot.  I made do but well, not ideal for trying complicated cooking.

Roasted Gnocchi

My gnocchi came out like balls of glue.  It was the most disgusting thing I think I've ever made.  I was at the peak of being poor and unemployed, yet I think I still threw the whole batch away.  Their only redeeming quality was that they were covered in a brown butter maple sauce, which I'm pretty sure I drank.  I'm just not Giada, but that's OK with me.  So when my old coworker's sister taught me this trick for making pre-packaged gnocchi I was quite excited.  Gnocchi was back on my radar!

(Side note: yes, that's a Spotted Cow in the background.  The Monkey Scientist flew into Milwaukee on his way home from Florida and stopped on his way back to Chicago to get me some of this rare gem of a beer.  It was perfectly paired with this Midwestern weeknight dinner of pork, gnocchi and asparagus!)

Roasted Gnocchi

This is literally the easiest way to make gnocchi ever.  Is it a little more Sandra Lee than Giada?  Sure.  But I know my limits.  And the result is about 10000 times tastier than my glue-ball fail.  They are toasty and crunchy on the outside with a nice soft bite on the inside.  I like this version the best, with a little bit of a kick from some Cajun seasoning, but you could really make them any way you like.  The original version I had left out the Cajun seasoning and added shredded Parmesan that crusted up like the outside of an Asiago cheese bagel.  The possibilities are endless!

Roasted Gnocchi

Roasted Gnocchi

Ingredients
1 package of pre-made gnocchi
2 tbsp olive oil
1/2 tsp salt
1/2 tsp freshly ground pepper
1 tsp Cajun seasoning

Instructions
1. Preheat the oven to 380 degrees F.
2. Place the gnocchi on a foil-lined baking sheet and toss to coat with olive oil, salt, pepper, and cajun seasoning.
3. Bake for about 20 minutes, tossing a few times, until the outsides are crispy but the insides still have a bite.

Tuesday, May 21, 2013

Lemony Rice Salad

Rice

Recently, I took quite possibly the most spontaneous trip I've ever taken.  The Monkey Scientist was down in Florida with his family for Mother's Day and the roommate and I were feeling bored on Friday night.  A lot of our friends were working or out of town, so we didn't have much to do over the weekend.  So around 8 pm on Friday night, we booked a hotel in St. Louis.  We got up at 5 am and drove down there for a couple days.  Just like that.  It was so out of character for me!


Rice dressing
We had a blast on our mini vacation.  We've been friends for so long that it doesn't take much until we're both cracking up at each other.  Anyone who knows me well knows I tear up quite a bit when I laugh, and it was only about an hour into the drive that I had to stop and buy a box of tissues.  Once we made it down there, we scalped tickets to a Cardinals-Rockies game and enjoyed the beautiful weather.  While it was cold and miserable in Chicago, the weather was sunny and perfect in St. Louis!

pine nuts

The highlight of our trip was far and away the City Museum.  Have you ever been there?  I don't think I've stopped talking about it since.  It's a giant playground...for adults.  There are caves you can crawl in, tunnels in the ceiling that make you slide along on your belly, and a 10-story slide inside what looks like an old alley between two buildings.  And that's just the inside!  It was absolutely spectacular.  We had no idea what to expect, and we were blown away.  I think we spent almost 4 hours there.  If you're ever in St. Louis it's a must-see!  But I highly recommend you wear work-out clothes, which was the little tip we'd wished we were given!

Rice

This rice has nothing to do with St. Louis.  But it is really great.  The roommate had made it a few weeks ago on his night to make dinner, and I liked it so much I insisted he make it again.  It's lemony and fresh - just what I was looking for as we're hitting the peak of Spring.  It would be a great dish to bring to a barbecue this summer since it's just perfect at room temperature.  I know we'll be making this all the way through to fall!

Rice

Lemony Rice Salad
from Serious Eats

Ingredients
1/2 cup pine nuts
1 1/2 cups uncooked white rice
1 teaspoon lemon zest
1/4 cup fresh lemon juice (about 2 lemons)
2 tablespoons fresh orange juice
2 tablespoons white balsamic vinegar
3/4 teaspoon salt
1/8 teaspoon freshly ground pepper
2 tablespoons extra virgin olive oil
1 cup sliced green onions
1/3 cup golden raisins

Instructions
1. In a small skillet over medium heat, toast the pine nuts, stirring frequently, until just starting to brown. Don't let them burn!
2. Meanwhile, cook the rice on the stove or in your rice cooker, following the package instructions.
3. In a medium-sized bowl, whisk together the lemon zest, lemon juice, orange juice, white balsamic vinegar, salt, pepper, and olive oil.
4. When the rice is done cooking, stir together the hot rice, pine nuts, dressing, sliced green onions, and golden raisins. Allow to settle to room temperature and serve.

Friday, May 17, 2013

Gardening in an Apartment

Gardening

While this blog is about cooking, it's also about how to prepare great food at home even if you're living the apartment life, like me. I have just 1 oven, 4 burners (3 of which are small), and limited counter space. Yet nearly everything on this blog, I made at home. Which means you have no excuses. So when it comes to gardening, I want to encourage you to know that you can do it in your apartment, too! You're not going to grow an apple orchard, but there is no reason you can't grow some herbs and things!

Gardening w arrow

The first thing I've been practicing with is what I call shot glass scallions. This is the easiest thing you can try at home! I have managed to kill many a plant in my day, but this has been a great success!

When you're cutting up your green onions, leave just a little bit more than the roots at the bottom. Instead of tossing the ends, plop them in tall shot glasses with a little bit of water. I forgot to take a picture the first day, but after 2-3 days they had already started to sprout this much.  You can see from my arrow where I had cut them.  The green had all grown in that quickly!  I was excited.

Gardening

I changed the water once every 3 days or so.  After another week, this is how big my green onions were.  Almost usable!!  I'm so excited.  They needed barely any maintenance: no soil, just a little water and sunlight on our windowsill.  My mom had this great bud vase growing up that was the shape of 6 shot glasses connected to each other.  I think that would be perfect for this if I could find one. I might never need to buy scallions again if I just keep re-growing them!!

Gardening

This was such a success that I'm going to start trying to grow a few more herbs - basil, rosemary, thyme, and peppermint - in pots outside.  I have a history of killing all of the above herbs (and even letting a small basil plant disappear off my DC balcony in a thunderstorm once) so we'll see what happens.   We're also trying some cherry tomatoes and habanero peppers, which are even more of an experiment.  I have a pretty little flower, too.  So we'll see what happens.  I'll give you an update in a couple of months!

Gardening


Monday, May 13, 2013

Bacon Chicken Caesar Salad

Bacon Chicken Caesar Salad

Before my parents moved up to the lake, I used to spend my vacation time in New England on Cape Cod with my aunt, uncle and little cousins.  It's a shame that it's becoming harder and harder to squeeze in any time on the Cape now that I've moved further away and my job doesn't have the flexibility of my college internships.  I miss lobster rolls, my daily serving of incredible ice cream, and especially my Aunt's Chicken Caesar Salad (which she got from Jamie Oliver).  So with the first bit of what felt like summer last week, I was craving this salad for dinner.

Bacon Chicken Caesar Salad

Obviously I didn't quite think through the fact that having our oven on 400 for 2 hours on the first day when Chicago had temperatures over 80 was probably not the best idea I'd ever had.  But when I got home from yoga and this salad was done, I didn't even care that I was sweating bullets.  I was transplanted to a summer day on the Cape when I could still carry my littlest cousin to the beach and when she saw me her face lit up like I was Santa Claus.  Nowadays I just get pictures of her wearing high heels and makeup.  Sigh.

Bacon Chicken Caesar Salad

There are a couple of things to note about this salad.  The first is that this is not a "look I'm on a diet so I'm eating salad for dinner" salad.  You just let a loaf of bread soak up chicken fat and bacon grease for 2 hours and then ate it.  Don't kid yourself.  On a side note, these are literally the best croutons in the entire world.

If you do burn them a little bit because you turn the broiler on and then get distracted doing something important like studying for med school finals (I'm not saying that the Monkey Scientist burned all of the croutons while I was at yoga or anything like that), try to salvage them and just cut off the charred bits.  They'll be just fine as long as you didn't burn the whole thing!

Bacon Chicken Caesar Salad

The second is anchovies.  Yes, I know you're scared.  Yes, they smell like cat food (and look like it once you mash them up).  No, they aren't something I want on my pizza.  But this is Caesar salad folks. And without anchovies, it just isn't Caesar dressing.  I promise they won't taste like cat food once you drown them in olive oil, creme fraiche, and lemon juice.  Just trust me on this one, OK?  On the bright side, who knew that a can of anchovies cost barely more than a dollar? I don't even feel that bad that I threw the rest of the can away (because what the heck was I going to do with leftover anchovies).

Bacon Chicken Caesar Salad

Now when I say this is my favorite Caesar salad ever, I'm not joking.  The dressing is creamy and delicious. The croutons soak up all that fat, get crispy in the oven, and then when you put the dressing on them they soak it up and become chewable without destroying your teeth.  Again, best croutons in the world.  I enjoy the baked, dark meat chicken on this about 1000 times more than the rubbery slices of grilled chicken breast you get anywhere else.  Although my aunt actually uses bone-in, skin on chicken breasts and it works great, too.  And despite the fact that the roommate made a side of pasta, I stand by the fact that this salad is a solid meal.  Even the Monkey Scientist had it for his whole dinner.  It's worth every minute of sweltering over the oven.

Bacon Chicken Caesar Salad

Bacon Chicken Caesar Salad
slightly adapted from Jamie Oliver

Ingredients
4-6 chicken legs, skin on
1 round loaf sourdough bread (about 9 ounces), chopped into 1.5" cubes
6 slices bacon
3 tbsp olive oil
Sea salt and freshly ground black pepper
3 sprigs fresh rosemary, leaves picked and roughly chopped
1 large head romaine lettuce, chopped
dressing
1 clove peeled and smashed garlic
4 anchovy fillets in olive oil, drained
3 oz freshly grated Parmesan, plus a few shavings to serve
1 heaped tbsp creme fraiche
1 lemon, juiced (about 2 oz)
Extra-virgin olive oil (about 6 oz)

Instructions
1. Preheat the oven to 400 degrees F.
2. In a large glass baking dish, lay out the cubed bread, then bacon, then chicken legs.  Drizzle with about 3 tbsp (or more) olive oil and sprinkle with freshly ground sea salt, black pepper, and chopped rosemary.  Toss to coat evenly.
3. Bake at 400 degrees F for 25-35 minutes, or until the chicken can easily be peeled off the bone.  Remove the chicken, and toss the bacon and croutons.  Make sure to leave all the fat drippings from the chicken and bacon in there.  The croutons will soak that up and that's what makes them delicious!  Return to the oven and allow to bake until the croutons and bacon are crispy but not burnt, tossing every 5-10 minutes or as necessary.  If this isn't happening at 400 degrees F, turn the broiler on low, but watch carefully as the croutons could start to burn quickly!
4.  When the chicken has cooled slightly, use your hands or two forks to peel off the skin and discard, then peel the meat off the bones and shred.  Chop the crispy bacon into bite size pieces.
5.  Add the lettuce, chicken, croutons, and bacon to a large salad bowl.
6.  Assemble the dressing: Using a mortar and pestle (or in my case, a small bowl and the handle of a lemon reamer), smash the anchovies and garlic into a thick paste.  Whisk in the grated Parmesan, creme fraiche, juice of 1 lemon, and 3 times as much extra-virgin olive oil as lemon juice.
7.  Pour the dressing over the salad and toss to coat evenly.  Serve with a few Parmesan shavings on top.