Tuesday, February 28, 2012

Biscoff and Marshmallow Crescent Rolls

Biscoff and Marshmallow Crescent Rolls

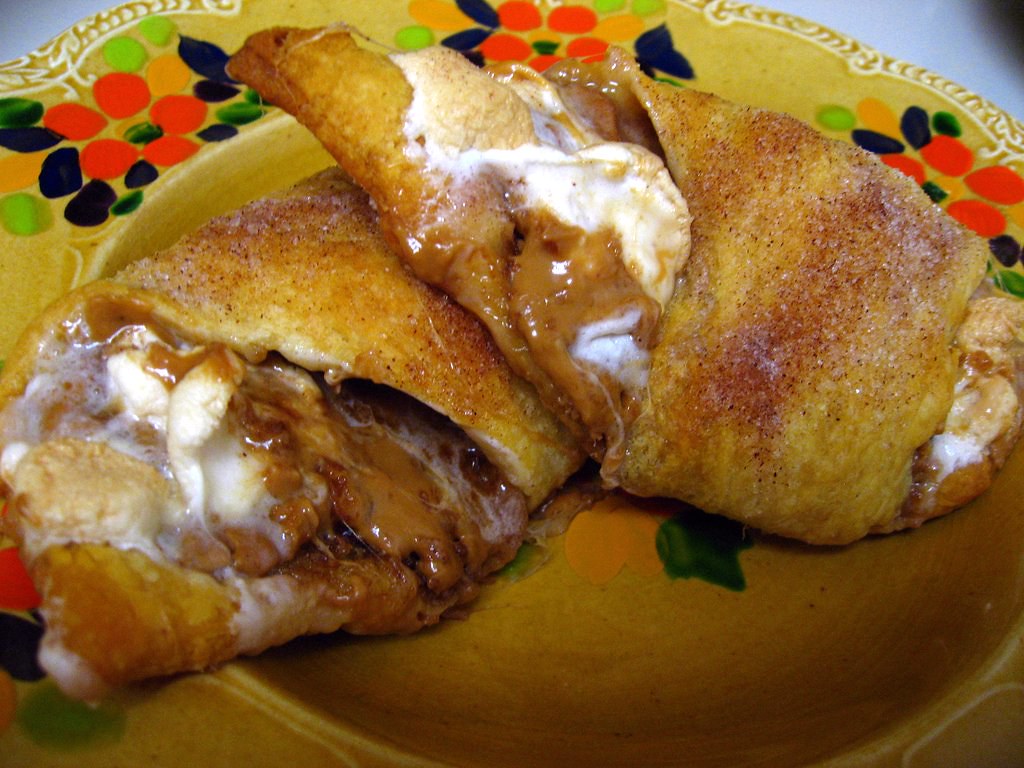
This is the easiest, most delicious recipe I have made for dessert in a long time.  I understand - major shortcut using crescent rolls - but sometimes we all need a little shortcut in life!  This is your go-to, last minute, throw together dessert.  You'll love it!

Biscoff and Marshmallow Crescent Rolls

I had a TOUGH Stroga class the other night, and thought I really earned a little treat when I got home.  I wasn't quite going as far to bake cookies or brownies, but I wanted an upgrade from a single scoop of biscoff spread.  We threw this whole recipe together in about 10 minutes, and baked it up while we ate (we're fast eaters).

Biscoff and Marshmallow Crescent Rolls

When I was telling Jeff about the amazing dessert we'd had last night, he told me they sounded like Balloon Biscuits.  A quick google search taught me that Balloon Biscuits are regional to the school district he grew up in, and that the school still uses the exact same clip art when sharing the recipe with their students as when he went there.  The recipe is pretty similar, but it lacks the key to this recipe's tastiness - Biscoff Spread.

Biscoff and Marshmallow Crescent Rolls

Have you all tried this?  You can buy it at World Market, some grocery stores, online (here in a multipack) or Trader Joe's has their own version, called Speculoos Cookie Spread.  Either way, man oh man is it good.  It's like peanut butter, but instead of peanuts it tastes like those cookies you get on Delta flights.  I bought it thinking I'd bake with it, but I may or may not have polished off a jar just by eating spoonfuls.  I have to admit, I'm pretty proud that I finally used it to bake instead of eating it plain!

Biscoff and Marshmallow Crescent Rolls

When you need a quick and easy recipe that even your kids could make, the Solon School District had the right idea and Picky Palate perfected it.  Buy crescent rolls.  Fill them with marshmallow and cookie spread.  Cover them in butter and cinnamon sugar.  Devour.  Just make sure you put a Silpat down or you could destroy your cookie sheet! I have a feeling you know just how sweet and fantastic these will be.  Just make sure you get a nice work out in first!

Biscoff and Marshmallow Crescent Rolls


Biscoff and Marshmallow Crescent Rolls
from Picky Palate

Ingredients
One 8 count roll of Crescent Rolls (I used store brand)
8 tablespoons Biscoff Spread (or Trader Joe's Speculoos Cookie Spread)
Approximately 80 mini marshmallows
1-2 tablespoons melted butter (I used closer to 1)
2 tablespoons granulated sugar
1/2 teaspoon ground cinnamon

Instructions
1. Preheat oven to 350 degrees F. Line a large baking sheet with a silpat liner or parchment paper. (Please don't skip this step!)
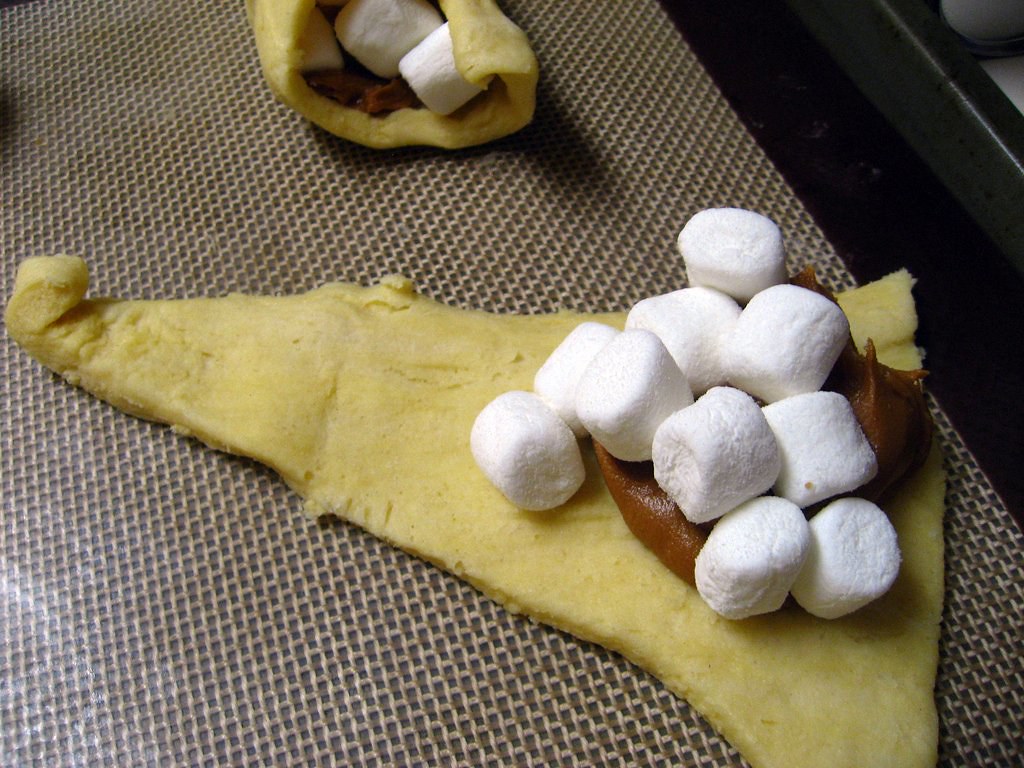
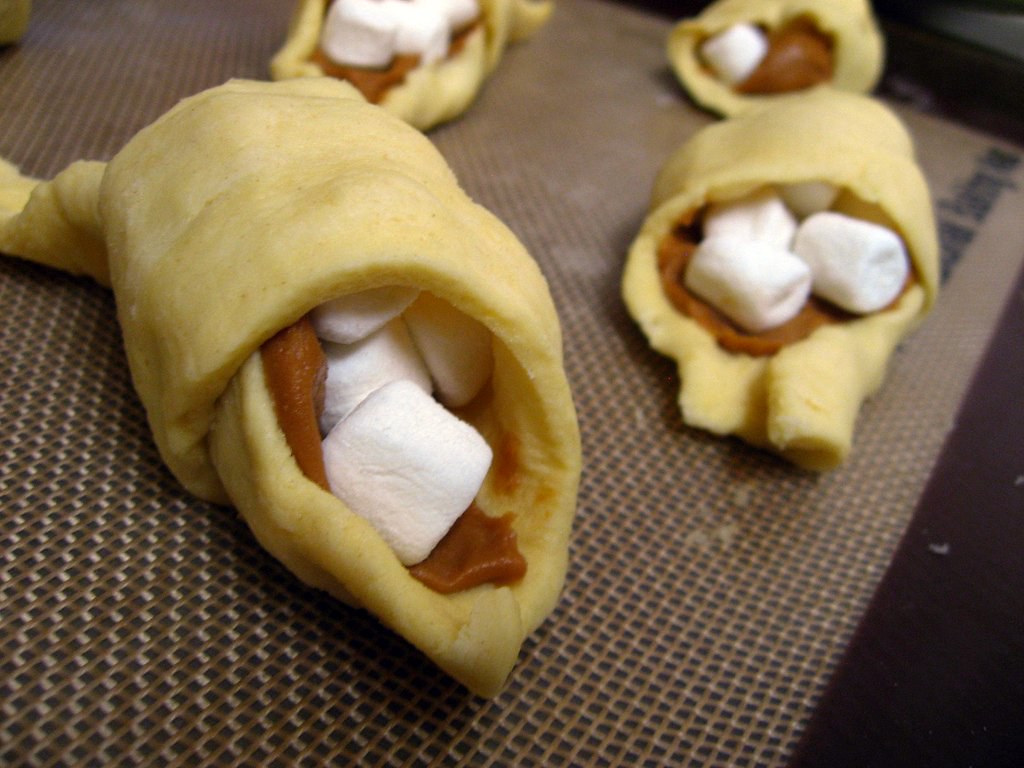
2. Unroll crescent rolls into 8 triangles on prepared baking sheet. Place 1 tablespoon of Biscoff spread onto the center of the wide end of the triangle. Top Biscoff with about 10 mini marshmallows then roll crescent up starting at wide biscoff marshmallow end. Space each crescent about 1 1/2 inches apart on the cookie sheet.
3. Brush melted butter over each crescent with a pastry brush. Stir together the sugar and cinnamon then sprinkle evenly over crescents.
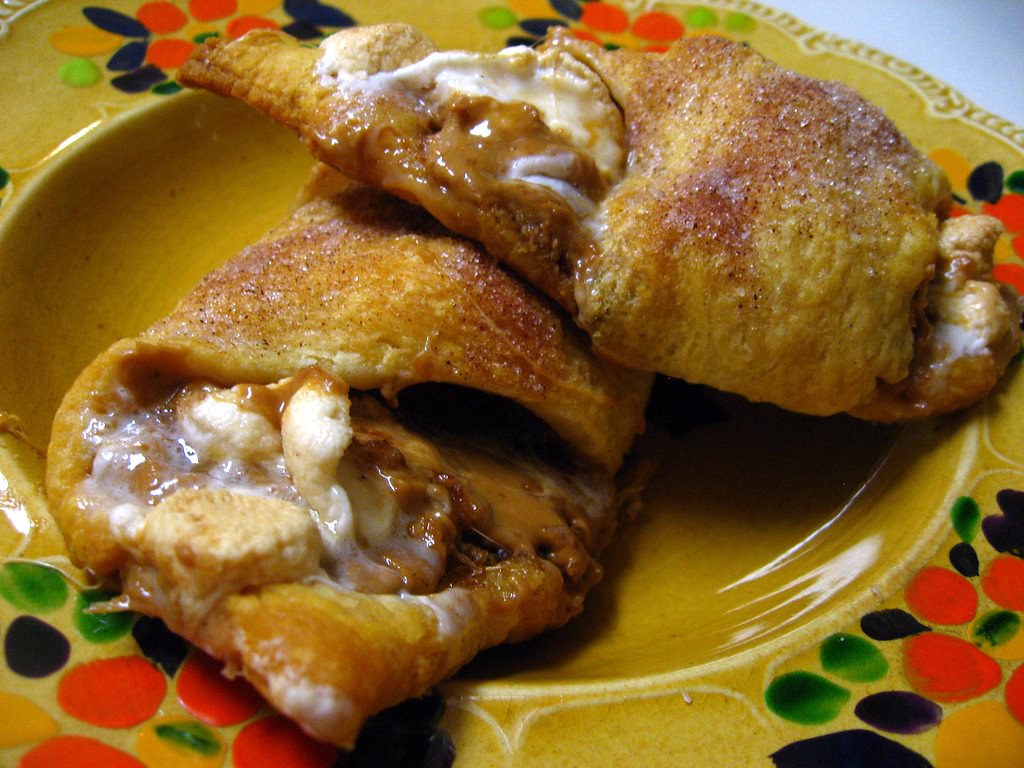
3. Bake for 15-17 minutes, until golden brown. Marshmallows will ooze everywhere. Once removed from the oven, take a plastic knife and bring warm oozed marshmallow back around each crescent.
4. Let cool for 10 minutes then serve warm.


Saturday, February 25, 2012

Cookie Cake

cookie cake

For Valentine's Day, I wanted to make a heart shaped dessert.  It only seemed appropriate.  I have a heart shaped pan that was my grandmother's, and a heart shaped cookie cutter, and I was actually able to use both for this dessert!

cookie cake

I'm going to come right out and be honest here - I got really sick from this dessert.  I tend to get a tummy ache pretty frequently, especially when I have too many sweets, but this one definitely did not make me feel too good.  I have a strong feeling this was from under baking.  My heart shaped pan is ceramic and probably a bit smaller than a 10" round pan, so I think I should have left it in the oven longer than 20 minutes.  The Monkey Scientist was fine though, so maybe I'm just a bit sensitive.  Just make sure it's really done before you take it out of the oven!

cookie cake

The fact that I used incredibly sweet butterscotch chips definitely didn't help my cause here either.  I recommend you go with something like bittersweet chocolate chips or even M & Ms when you make this.  Regardless, it absolutely needs to be topped with ice cream to cut the sweetness.

cookie cake

Despite the toll my tummy took, this was really very delicious.  The Monkey Scientist loved it and continues to stand by the fact that this is a great dessert.  I debated even posting it, but in the true spirit of recipe reviews I have to share the good, bad, and the ugly - and this one was a little bit of all 3.  A good recipe, bad execution, and ugly tummy rumblings.  If you do try it out, let me know how it goes with a metal pan!

cookie cake


Wednesday, February 22, 2012

Arroz con Pollo

arroz con pollo

Last week was a big week!  Not only was it Valentine's Day, but it was also the Monkey Scientist's birthday.  We celebrated with lots of delicious food!  This was the start of the week - a romantic and easy-to-pull-together dinner.  Nothing says romance like serious comfort food.

saffron and wine

Of course, this dish was just a little bit selfish.  The very short list of things that the Monkey Scientist won't eat includes olives.  I get it - they're super salty and definitely an acquired taste.  Dad despises them too.  But, since the olives are still big, he was able to pick around him and he didn't mind at all.  I liked the flavor they added to the dish, but it wasn't so strong that it ruined it for him.

browning the chicken

I did let him add his own touches, though.  Any time you see "salt and pepper" below, you can assume we added a good tablespoon of red pepper flakes as well.  It wouldn't be a good dinner without a little bit of heat around here! I enjoyed this addition, and if you're a spice lover I recommend you make this addition as well.

onions, saffron wine, tomatoes, bay leaf

As for difficulty, this really couldn't be easier to make.  I was worried because the rice wasn't cooking after 30 minutes (it was still quite hard) but I just kept adding 1/2 - 1 cup of broth at a time, putting another 10  minutes on the clock, and eventually it cooked to perfection.  When it was "done" there still appeared to be a little broth that wasn't absorbed, but once I stirred the rice up it soaked right in.  Even though I was adding time on, the chicken was super moist - not a bit overcooked.

arroz con pollo - prior to simmering

When it was finally done, it was super delicious.  The rice was cooked perfectly - warm, tender, and loaded with flavor.  The chicken was perfection.  We don't usually eat thighs but for Valentine's Day this was a special treat and absolutely worth it.  The Monkey Scientist said he thought it was delicious as well (especially because I managed to avoid getting any olives on his plate!).  After we finished, we ate the bits of rice that had become crispy on the bottom of the pan.  It was absolutely the best part!  Valentine's Day might be over this year, but you can make this for your honey any day of the year!

arroz con pollo

Sunday, February 19, 2012

10-Minute Meat and Tomato Sauce

pasta with 10 minute meat sauce

The other night, I really wasn't feeling that well.  I wanted to throw together a quick dinner, but I didn't have any spaghetti sauce in the house.  The Monkey Scientist had some leftover meat from his famous Superbowl Chili (I would have shared the recipe but I've been expressly forbidden by his mother), and I had a can of crushed tomatoes, a lemon, and some whole wheat penne.  Who knew that would be enough to throw together a quick and easy dinner?

10 minute meat sauce

This is (in the words of Chris Traeger) literally the easiest homemade tomato sauce ever.  It's cheaper and healthier than a jar of Prego, plus even more delicious.  You could season it any way you liked, but keeping it simple is pretty spectacular.  And, aside from cooking the meat which you'd have to do regardless, it can only possibly add 5 minutes to the time it would take to open a jar of sauce.  What more could you ask for?

10 minute meat sauce

This sauce is yummy just on penne, or would be great in a lasagna or on stuffed shells.  It's fresh from the lemon, and with a little kick from the red pepper flakes.  Vegetarians can skip the meat and it would still be great.  If you wanted to crush your own tomatoes in the summertime I'm sure it would kick it up another notch.  This will be replacing the Prego in my cabinet - although I'm not sure I can resist Trader Joe's sauce when I'm there!

pasta with 10 minute meat sauce

10-Minute Meat and Tomato Sauce
adapted from 101 Cookbooks

Ingredients
1/4 cup extra virgin olive oil
1 1/2 teaspoons crushed red pepper flakes
1/2 teaspoon fine grain sea salt
3 medium cloves of garlic, finely chopped
1/2 lb ground beef or turkey
1 28-ounce can crushed red tomatoes (don't use store brand)
pinch of sugar
zest of one lemon (less if you don't like lemon)
salt and pepper, to taste

Instructions
1. Combine the olive oil, red pepper flakes, sea salt, and garlic in a cold saucepan. Stir while you heat the saucepan over medium-high heat, saute just 45 seconds or so until everything is fragrant - you don't want the garlic to brown.
2. Add meat and cook until no pink remains, about 5 minutes.
3. Stir in the tomatoes and sugar, and heat to a gentle simmer. This takes just a couple minutes. Season to taste with salt and pepper. Stir in the lemon zest.

Thursday, February 16, 2012

Brussels Sprouts with Bacon, Dried Cherries and Israeli Couscous

Today's post is dedicated to the man who makes me smile each and every day. You're my bacon - you make everything better. Happy Birthday, Monkey Scientist.

brussels sprouts with cherries, bacon, and couscous

You might notice that this recipe is not tagged as "healthy".  Sure, it has brussels sprouts.  Israeli couscous is pretty healthy.  Dried cherries are a great snack.  But when we finished eating these, the Monkey Scientist turned to me and asked where the grease went from frying up the bacon and I had to turn down and look at my belly.  You ate it, dear.

bacon

To be fair, it's only 2 slices of bacon.  If you wanted, you could even drain some of the bacon fat off.  I've even heard of a coworker who used oil instead of bacon grease.  But if you're eating brussels sprouts, don't you deserve to have them taste like bacon?  Isn't it worth an extra Stroga class?

brussels sprouts

I tried to keep the meal under control by serving it up with some trout that had barely any olive oil on it but was seasoned well with lemon juice, salt, pepper, and garlic powder.  Since I was up at Whole Foods to get the bacon, I bought my fish there as well so it was additive free.  The whole meal came together really quickly, which was very much appreciated since we've been pretty busy lately.

brussels sprouts with cherries, bacon, and couscous

The taste was really outstanding.  Shredded brussels sprouts, as you know, are one of my favorite veggies and the Israeli couscous went really well mixed in.  I love Israeli couscous - the texture is one of my favorite things.  The saltiness of the bacon combined with the sweetness from the cherries was absolute perfection.

brussels sprouts with cherries, bacon, and couscous

Brussels Sprouts with Bacon, Dried Cherries and Israeli Couscous
from eat, live, run

Ingredients:
16-18 brussels sprouts, very thinly sliced
2 slices bacon, preferably black pepper-rubbed (available at Whole Foods and butcher shops)
1/2 cup Israeli couscous
1/3 cup dried cherries
1/4-1/2 tsp sea salt to taste

Directions:
1. Bring 3/4 cup water to a boil and add the couscous plus a pinch of sea salt. Reduce heat, cover and simmer for about 10 minutes or until no more water remains. Fluff with a fork and set aside.
2. Cook the bacon in a cast iron skillet until crispy. Remove bacon and roughly chop.
3. Add thinly sliced brussels sprouts to the hot bacon grease on the stove and saute for about five minutes, until the sprouts turn bright green.
4. Add back in the bacon bits along with the dried cherries and cooked couscous. Toss well and season with salt to taste.

Monday, February 13, 2012

Greek Salad Bruschetta

greek salad bruscetta

I'm not quite ready to talk about the Superbowl yet.  But I think I'm finally ready to talk about the food.  We did have lots and lots of food.

Buttered Baguettestoasted bruschetta slices

I wanted to make something a little bit lighter than the typical wings, chips, dip, and pizza this year.  I loved this bruschetta because it was a little bit different than regular bruschetta, was nice and light, and is easy to pick up and enjoy while watching the game.  Plus, it reminded me of the Greek salad we get when we visit our family friends in Florida, and it was right around the Superbowl last time I was down there.

chopped cucumberchopped tomatoes

The Monkey Scientist and his roommate hosted the Superbowl party this year and, despite the outcome, we all had a great time.  It was a true hodge-podge of our friends, but it was really great to get everyone together.  Folks seemed to like the bruschetta, although it may not have been the right crowd because the chicken tenders were eaten much faster.  I think this would be a great appetizer for a dinner party or even a family holiday because it comes together pretty quickly.  It's light, a bit acidic, and tasty.  Even though I am not a tomato-lover, I enjoyed this one a lot!

greek bruschetta

Greek Salad Bruschetta
slightly adapted from Two Peas and Their Pod

Ingredients
French baguette, sliced
1-2 tbsp butter, softened.
1/2 cup tomatoes, diced
1/2 cup cucumber, peeled and diced
1/3 cup kalamata olives, diced
1/4 cup red onion, diced
1/4 cup feta cheese
1 tablespoon red wine vinegar
2 tbsp lemon juice
1/8 teaspoon dried oregano
1/4 tsp Cavender's All Purpose Greek Seasoning
Sea salt and freshly cracked pepper, to taste

Instructions
1. Preheat oven to 400 degrees F.
2. Spread butter on baguette slices. Place baguette slices on a baking sheet. Bake for 7-10 minutes, or until baguette slices are golden brown and toasted.
3. In a medium bowl, diced tomatoes, cucumbers, kalamata olives, and red onion. Add red wine vinegar, lemon juice and feta cheese. Stir until well combined. Season with oregano, Cavender's, salt and pepper.  Bruschetta topping can be kept in the fridge for a couple hours before using.
4. Top baguette slices with bruschetta topping. Serve immediately.

Friday, February 10, 2012

Spicy Garlic Shrimp with Kale and Quinoa

Spicy Garlic Shrimp and Kale over Quinoa

Do you ever have those nights when you're just craving something super healthy, but still chocked full of flavor?  I was the other night, and I happened to find some quinoa in my cabinet.  I used my favorite - foodblogsearch - to look for a good recipe, but everything seemed to be vegetarian.  I wanted to use shrimp since I hadn't had seafood in a little while, so I added it to my search and came across this recipe.

Garlic

Now normally, I am not a kale fan (aside from the kale salad my best friend makes).  Kale chips? Not my style.  Remember when I made the Tomato Braised Chicken with Kale?  I told you all I just was not feeling the kale. It can be really bitter and I just don't like it that much.  But, as long as I was going to eat healthy, I needed my dark leafy green.  But, I thought I'd give it another shot.  Everyone else seems to love kale these days, why can't I?

I think the trick here was cooking the kale down with a little oil and butter until fully cooked.  I honestly just think it may have been a bit raw last time I made it, and maybe that's why it was so bitter.  This time a huge bunch cooked down by probably 70%, and it really wasn't bitter at all - in fact it was juicy and loaded with flavor from the lemon and tomato sauce.

Spicy Garlic Shrimp and Kale over Quinoa - just starting to cook

One of my favorite parts of this meal was the cost.  All of the ingredients cost $5.84.  It could easily serve 2 for dinner or 4 for lunch. I ate it for dinner and then for lunch for a couple of days.  Even if you are trying to save money, I recommend you get a nicer brand of tomato sauce.  A can of off-brand tomato sauce was 33 cents, while Tuttorosso was on sale (by surprise, it didn't even have a sign!) from 60 cents to 40 cents.  The difference in flavor is totally worth the extra 7 cents.

Spicy Garlic Shrimp and Kale over Quinoa

I sort of surprised myself, but I completely loved this recipe.  The kale was delicious, there was just a little bit of shrimp for some seafood (tastes like New England) and substance, and the quinoa was nutty and made the meal feel complete.  I liked it better when the quinoa was really mixed in with the kale and shrimp so that it could absorb all the flavors from the lemon, tomato sauce, and red pepper flakes.  Of course, I use way more red pepper flakes than the original recipe called for - and to be honest it wasn't even very spicy still.  If the Monkey Scientist had eaten this, I probably would have had to throw some cayenne in, but he was busy working late again.  I thought this was a delicious meal full of all sorts of healthy and delicious things.

Also - sorry that these photos are pretty out of focus.  My camera was not cooperating.  Some day I'll buy my DSLR and self-focus, but for now I just deal with what I have.

Spicy Garlic Shrimp and Kale over Quinoa

Spicy Garlic Shrimp with Kale and Quinoa
slightly adjusted from Healthy Green Kitchen

Ingredients:
1 cup white quinoa
pinch of Himalayan or sea salt (I used garlic salt)
1 tablespoon olive oil
1/2 tablespoon butter
5 small garlic cloves, peeled and minced
1/2 pound shrimp
1 bunch kale, chopped fine
8 oz can tomato sauce (I used Tuttorosso)
juice from 1/2 lemon
1 tsp crushed red pepper flakes (or to taste)
course sea salt and freshly ground pepper, to taste

Instructions:
1. Thoroughly rinse quinoa in a fine mesh strainer (this is important or it will be bitter). Bring 1 1/4 c water to a boil. Add quinoa, reduce heat to simmer and cover. Cook until all water is absorbed (about 12 minutes). Remove from heat and allow to sit in covered pot for 5 minutes before fluffing with a fork.
2. In a large cast-iron skillet or other heavy-bottomed pan, heat the butter and olive oil. Add the garlic and saute for 1 minute, being careful so it doesn't burn.
3. Add the shrimp and kale and cook over medium heat for about 5 minutes until the shrimp have just turned pink and the kale is cooked through.
4. Add tomato sauce and cook for another minute or so. Remove from the heat and add the lemon juice, red pepper flakes, salt and pepper. Taste and adjust seasonings, if necessary.
5. Serve over quinoa.

Tuesday, February 7, 2012

Sushi Making Class

Sushi Class - my spicy tuna roll

Last week, my camp friend, her younger sister and I went to an i wish... lessons' sushi making class at the Hill Center in Eastern Market.  We had bought the class on Living Social months ago, so I had been looking forward to this for a long time!  The class taught basic sushi making technique including how to make 3 rolls - cucumber, California, and spicy tuna.  We made a regular Maki roll as well as an "inside out" Maki roll.

Sushi ClassSushi Class - cucumber rollSushi Class - cucumber roll

Here is what I learned:

When you spread the sushi on the rice, make it a THIN layer, without crushing the grains.  Then you won't overfill your sushi.
Stack your filling only at the bottom of the roll, then roll up around it.
Hold the back of the mat with your thumbs while holding the filling with your fingers until you've gotten over the first roll.  Then pull back the mat while you roll, so it doesn't get wrapped in your maki.

Sushi making takes practice! It's hard to figure out what the right amount of rice and filling is so that you don't over or underfill your roll.

Sushi grade tuna isn't regulated by the FDA like meat.  It means that it was frozen at -31°F to prevent parasites from growing.  It can be purchased at Whole Foods or other high-end markets, and buying it frozen is probably better than "fresh".

Sushi Class - inside out rollSushi Class - california rollSushi ClassSushi ClassSushi ClassSushi Class - ella

We were all quite proud of the skills we developed.  Some of our rolls came out better than others (my California and little sister's Spicy Tuna rolls were a bit of a flop) but I think with practice we could get pretty good at this!  No matter how floppy they looked, they were all super delicious.  Now that I have the basic idea, I want to go to H Mart for the mat and rice and then make some more "American" sushi.  I'm thinking about BBQ pork, mango and kiwi, maybe even chorizo sushi!  So many possibilities!!

If you want to learn how to make sushi, you should check out an i wish... lessons class.  They have classes in DC, Chicago, Boston, and Detroit (which covers about 90% of my friends and likely readers).  It's a bit expensive, but watch for a Living Social or Groupon and it could be as affordable as going out to eat!

Sushi Class - MJ's roll

Sushi Rice
from i wish... lessons


Ingredients
3 c sushi rice, uncooked (you can buy this at an Asian market or most grocery stores)
1/2 c rice vinegar
3 tbsp sugar (or more to taste)
1/2 tsp salt
note: instead of the rice vinegar, sugar, and salt, you can alternatively buy sushi vinegar at an Asian market

Instructions
1. Wash rice - rinse in cold water repeatedly until the water is nearly clear (it will be very cloudy the first few times).
2. Cook rice according to package instructions (preferably in a rice cooker)
3. Make rice vinegar mixture by mixing salt and sugar into the rice vinegar until fully dissolved.  Add more sugar until you've reached your preferred balance of sweet and tart.
4. Place rice in a large bowl or bin for mixing and slowly pour rice vinegar as evenly as possible over rice surface.
5. Mix rice by tossing and slicing with rice paddle (or spatula).
6. Allow to cool for 20 minutes under moist rags before use.

Sushi Class - cucumber roll

Cucumber Roll
from i wish... lessons

Ingredients
3 cups prepared sushi rice (see above)
3 sheets nori (dried seaweed)
1 cucumber (sliced into strips lengthwise with a julienne cut)

Instructions
1. Prep nori by cutting sheets in half.
2. Place nori half-sheet at the very bottom of the rolling mat and spread a thin layer of sushi rice on top without pressing too hard on the grains.  Only cover 3/4 of the nori, leaving a clean strip along top (side furthest from you).
3. Line a couple of slices of cucumber alone the bottom edge of the nori (only go up about 1/2 inch).
4. Start rolling from the edge closest to you, using the bamboo mat to press the roll together as you go.  Once you have rolled it all the way, wrap the mat around it and give it a squeeze to give it a nice round shape.
5. Move to a cutting board and cut into 6-8 evenly sized pieces (don't cut on the mat!).

Sushi Class - mj's California roll

California Roll
from i wish... lessons

Ingredients
3 cups prepared sushi rice (see above)
3 sheets nori (dried seaweed)
1 tbsp white sesame seeds
3 crabsticks
1/4 cucumber (sliced into strips lengthwise with a julienne cut)
1/4 avocado (sliced into strip lengthwise with a julienne cut)

Instructions
1. Prep nori by cutting sheets in half.
2. Spread the sushi rice in a thin layer directly on the mat in a square slightly larger than the nori, then place the nori on top.
3. Place cucumber and avocado stacked along the bottom end of the nori (only go up about 1/2 inch). Split the crabstick in half and add on top of the cucumber and avocado. (It will peel apart like string cheese)
4. Start rolling from the edge closest to you using the bamboo mat to press the roll together as you go.  Once you have rolled it all the way, wrap the mat around it and give it a squeeze to give it a nice round shape.
5. Release it from the mat, sprinkle some sesame seeds on your cutting board, and roll the whole roll through the seeds to coat evenly.
6. Move to a cutting board and cut into 6-8 evenly sized pieces (don't cut on the mat!).

Sushi Class - my spicy tuna roll


Spicy Tuna Roll
from i wish... lessons


Ingredients
3 cups prepared sushi rice (see above)
3 sheets nori (dried seaweed)
1/2 lb raw sushi-grade tuna
1 tbsp mayo
1 tsp sriracha or other hot sauce
1/4 cucumber (sliced into strips lengthwise with a julienne cut), optional
1/4 avocado (sliced into strip lengthwise with a julienne cut), optional

Instructions
1. Mix mayo and sriracha in a bowl.  Add more sriracha until reaching your preferred spiciness level.  Chop tuna and mix with spicy mayo.
2. Prep nori by cutting sheets in half.
3. Place nori half-sheet at the very bottom of the rolling mat and spread a thin layer of sushi rice on top without pressing too hard on the grains.  Only cover 3/4 of the nori, leaving a clean strip along top (side furthest from you).
4. Place spicy tuna mixture, cucumber, and avocado (if using) along the bottom edge of the nori, stacked (only go up about 1/2 inch).
5. Start rolling from the edge closest to you, using the bamboo mat to press the roll together as you go.  Once you have rolled it all the way, wrap the mat around it and give it a squeeze to give it a nice round shape.
6. Move to a cutting board and cut into 6-8 evenly sized pieces (don't cut on the mat!).

Note: this is not a paid post.  i wish... lessons doesn't know who I am or that I'm posting.  I just had a great time!