Sunday, February 20, 2011

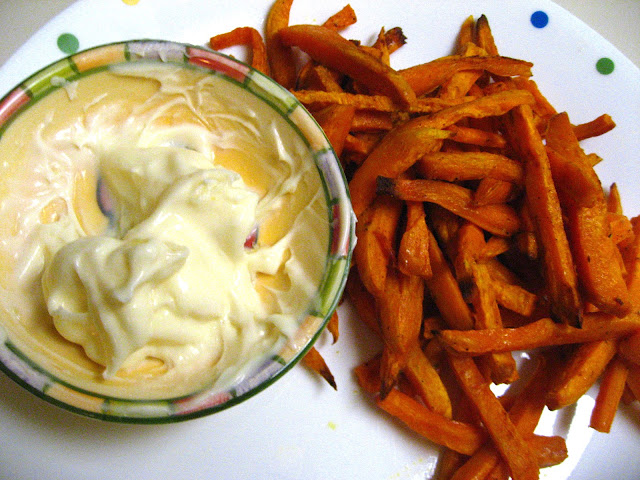
Baked Chipotle Sweet Potato Fries

At the farmer's market this Saturday, I picked up a wide variety of veggies to use this week.  I purchased everything in small portions so that I could cook for just me, and not have too many left overs.


I purchased a sweet potato because I was craving some homemade baked fries.  I found this recipe from one of my favorite healthy blogs, introduced to me by one of my very best friends from college.


I have always had trouble finding ground chipotle chile at my grocery store, but I picked up this jar of chipotle seasoning for the chocolate and chipotle brownies I made last summer.  Even though pre-blended spices is what almost sent Tiffany home on Top Chef this week, in this case it mixed almost the exact seasonings Gina called for in the original recipe.  However, I am still going to give you the original recipe, so you can mix your own.  All I did was use this as my only seasoning, with a little bit more garlic powder added.


These fries were super tasty!  They definitely weren't the sweet potato fries at Bartley's, but for baked fries they were very good!  I wish I'd had more patience and cooked them longer, they could have been crispier for sure.  I enjoyed them with a simple garlic aoli (garlic crushed into low fat mayo). I will have to try this one out again.


Baked Chipotle Sweet Potato Fries
from Gina's Skinny Taste


Ingredients
  • 1 sweet potato, (about 5" long) peeled and cut into 1/4" fries
  • 2 tsp olive oil
  • sea salt
  • ground chipotle chile
  • garlic powder 

    Directions

    Preheat oven to 425°.
    In a medium bowl, toss sweet potatoes with olive oil, salt, garlic powder and chipotle chile powder.
    Spread potatoes on a baking sheet. Avoid crowding so potatoes get crisp. Bake 15 minutes. Turn and bake an additional 10-15 minutes. Ovens may vary so keep an eye on them and be sure to cut all the potatoes the same size to ensure even cooking.

    Wednesday, February 16, 2011

    Whole Wheat Fig Newtons

    Still sick, and still baking to feel better.


    I was reading through some old blog posts that were posted before I started following some of my favorite blogs, and stumbled across this recipe.  Although my grocery store doesn't sell dried figs (I'll have to bring some home next time I'm at my parents' house, they always have some) I had a jar of fig spread that I'd used to make a stew a few weeks ago.

    I'll have to make the stew again and remember to take pictures, because last night I was all about some cookies. I replaced the fig newton filling with the fig spread.


    Unfortunately, it probably wasn't as thick as the spread that ELR suggested making.  Next time I will try to follow the original recipe.


    Other than that, I highly recommend flouring your work surface when you roll out the dough.  It's really sticky and hard to fold otherwise.  And as a a result, I had a bunch of cracks, which led to a lot of my filling pouring out of the cookie during baking.  Which meant some of my newtons were almost fig-free :(


    Although mine didn't turn out exactly how I wanted, the cookie dough did taste a lot like the original and I think they'd be pretty tasty if you make the filling as instructed.  I'll definitely have to try this one again once I get a hold of some dried figs!


    Mmmm, cookies and cold medicine with Muppets tissues.  At least I have cookies.


    Whole Wheat Fig Newtons
    from Eat, Live, Run
    makes about 40 cookies
    1 1/4 cup all purpose flour
    1 1/4 cup whole wheat flour
    3 ounces butter, softened
    1/2 cup + 2 T brown sugar, packed
    1 T cream (I used half and half)
    2 eggs
    1 tsp baking powder
    1/2 tsp baking soda
    1/4 tsp cinnamon
    1/2 tsp salt
    for filling:
    2 cups dried figs, stems chopped off
    about 3 cups apple juice
    1/4 cup granulated sugar
    Cream together the brown sugar and butter. Add the cream and beat until light and fluffy. Add the eggs, one by one, beating after each addition.
    In a separate bowl, combine the dry ingredients. Add to the butter and sugar mixture and mix until a soft dough forms (be careful not to over-mix). Turn dough out onto a floured countertop and form a smooth ball. Let chill in fridge for 2-4 hours, or overnight.
    Meanwhile, make the filling. Place the figs in a saucepot and cover with apple juice. Let sit for 15 minutes. Add sugar and bring to a boil, then reduce heat and simmer for 30 minutes. Let cool and puree figs and juice together.
    Preheat the oven to 350. Cut dough ball into two parts and keep the part you’re not using in the fridge. Roll out one part into a large rectangle (see above photo). Carefully pick rectangle up and put on a lined baking sheet. Spoon about a half cup of fig puree down the center of the rectangle, being sure to save room around all edges. Fold top and bottom down over the middle of the rectangle and let the edges barely overlap. Fold the outer edges of the rectangle in and pinch together. Repeat with other piece of dough.
    Bake for twenty five minutes, until golden. Let cool before slicing into newtons.

    Monday, February 14, 2011

    Shrimp Bisque with Sherry

    I woke up Valentine's day morning still fighting my chest cold and cough.  I decided the best way to fight it would be with a nice spicy soup.


    Soup season is almost over in DC.  Today the temperature got up over 60.  I'm definitely not complaining!


    I really enjoyed making the shrimp stock for this recipe.  I'd never made my own stock before, nevermind shrimp stock, so this was a great learning opportunity.  It was easssyyy!


    I kicked up the spice - using a bunch of chili powder and red pepper flakes instead of the cayenne.  I think it could have used a little bit of garlic as well.


    The soup was yummy!  I couldn't get it quite as smooth as I wanted it to be in my food processor.  I'm afraid I might have damaged the blades.  Does anyone know where I can get replacement blades for a Hamilton Beach food processor?


    Happy Valentine's Day!


    Silky Shrimp Bisque with Sherry
    from Cookin' Canuck

    Ingredients

    3/4 lb medium shrimp, shelled & deveined, shells reserved
    3 tbsp olive oil, divided
    1/3 cup dry sherry
    5 cups water
    1 bay leaf
    1 carrot, chopped
    1 large stalk celery, chopped
    1 medium onion, chopped
    1 tbsp plus 1 tsp long-grain white rice
    1 tbsp plus 1 tsp tomato paste
    1/4 tsp cayenne pepper
    1/2 tsp salt
    1/4 cup heavy cream (whipping cream)

    Directions

    Heat 1 tablespoon olive oil in a medium saucepan set over moderately high heat. Add shrimp shells and cook, stirring frequently, until the tails turn pink, about 2 minutes. Add sherry and cook, stirring frequently, until most of sherry is evaporated. Add water and bay leaf, bring the mixture to a boil, then reduce to a simmer. Let the mixture simmer, uncovered for 20 minutes. Pour shrimp stock through a fine-mesh strainer into a bowl. Press gently on the shrimp shells to release extra liquid. Discard shells and bay leaf.

    While stock is cooking, heat 1 tablespoon olive oil in a large saucepan set over medium heat. Add the shrimp and cook, stirring frequently, until the shrimp are just cooked through, 3 to 4 minutes. Transfer shrimp to a bowl and set aside. To the saucepan, add 1 tablespoon olive and carrots, celery, and onion. Cook until the onion and celery are soft, about 5 minutes. Stir in shrimp stock, rice, tomato paste, cayenne pepper, and salt. Cover the saucepan and simmer the mixture until the rice is tender, about 20 minutes. Reserve 8 shrimp and stir the remaining shrimp into the soup. Allow the mixture to cool for 10 minutes.

    Using an immersion blender or a regular blender (in 2 to 3 batches), puree the soup until smooth. Take care not to burn yourself. Return the soup to the saucepan and stir in cream. Reheat on low.

    Serve soup and garnish each serving with 2 of the reserved shrimp.

    Makes 4 servings (appetizer size)

    Easy Peasy Whole Wheat Bread


    I have been meaning to try out making bread for a while now. This was a big cooking and baking weekend, so I finally took the plunge. And it was easy!


    This recipe was a little bit strange because you mix the yeast right in with the dry ingredients instead of putting it by itself in warm water. However the recipe was exactly what it said - easy peasy. I made it in my standing mixer with the dough hook instead of using my hands and an electric mixer, as the original recipe called for.


    A great tip I read somewhere online - you know the dough is done rising when it has doubled in size and when you poke it, it dimples instead of bouncing back.


    It was super tasty!  It made great sandwich bread with a little mayo or hummus, turkey and fresh spinach.  My coworkers were really impressed with the look of it - they couldn't believe I made it!  It was also awesome, of course, as french toast :)  I think I'm ready to step it up and try my favorite... sourdough bread!


    Easy Peasy Whole Wheat Bread
    adjusted from scrapper jade on tasty kitchen

    Ingredients
    • 4-¼ cups Whole Wheat Flour, Or As Needed To Make A Soft Dough
    • 2-¼ teaspoons ActiveYeast
    • 1-¼ teaspoons Salt
    • ¾ cups Skim Milk
    • ¾ cups Water
    • ⅛ cups Honey
    • ⅛ cups Oil
    Directions
    Combine 1-3/4 cups flour, undissolved yeast and salt in a large mixing bowl. Heat milk, water, honey and oil until very warm (not boiling—it should just be a bit warmer than lukewarm). Gradually add to the flour mixture; beat 2 minutes at low speed in a standing mixer fitted with the dough hook, scraping the bowl occasionally. Add 1 cup flour, a little bit at a time, stirring between each addition until combined, scraping bowl occasionally. If the dough is sticking to the side of the bowl, add a little more flour, 1 tbsp at a time.
    Knead with dough hook until smooth and elastic, about 6 to 8 minutes. Let rest 10 min.
    Roll dough on a floured work surface into a 12 x 7-inch rectangle. Beginning at the short end of each rectangle, roll up tightly as for a jelly roll. Pinch seams and ends to seal. Place, seam side down, in a greased 8-1/2 x 4-1/2-inch loaf pan. Cover; let rise in a warm, draft-free place until doubled in size, about 30 to 60 minutes.
    Bake in a preheated 375ºF oven for 35 to 45 minutes or until done (mine took about 30 minutes, but I discovered that my oven was cooking too hot). Remove from pans; let cool on wire racks.

    Sunday, February 13, 2011

    Cinnamon Sugar Biscotti

    After my wonderful meal of roasted carrots and cornish hen, my roommate and I decided to stay in to watch movies.  Which, of course, meant we needed cookies. I was hoping 2 nights in would help me kick this chest cold!


    I just discovered a wonderful new blog.  I added it to my google reader and I think I starred almost every single one of the recipes that popped up.  Everything looked freaking awesome.


    Over the holidays, I made gingerbread biscotti several times.  Biscotti are so easy to make, they last a long time, and they're GOOD!  So I decided to try a Cinnamon Sugar Biscotti for roommate movie night, especially because Tracey got the recipe from joy the baker, who has never let me down.  The only adjustment I made was to use some whole wheat flour because I think it holds up really well in biscotti.


    And these did NOT let me down.  YUM.  Best biscotti I've made yet :)  (roommate even agreed, better than the gingerbread biscotti!) Fresh out of the oven they were soft, but once they cooled and were hard they were still really good dipped in some of my favorite tea.


    Cinnamon Sugar Biscotti
    adapted from tracey's culinary adventures via joy the baker

    Ingredients:
    1 cup all purpose flour
    1 cup whole wheat flour 
    1 1/2 teaspoons cinnamon
    1 teaspoon baking powder
    1/4 teaspoon salt
    1 cup sugar
    6 tablespoons unsalted butter, room temperature
    1 egg plus 1 egg yolk
    1 teaspoon vanilla extract

    Topping
    1 teaspoon cinnamon
    1/4 cup sugar
    1 egg, lightly beaten

    Directions:
    Preheat oven to 325 F.  Line a baking sheet with parchment paper.

    In a medium bowl whisk together the flour, cinnamon, baking powder and salt.  In the bowl of a stand mixer fitted with the paddle attachment, cream the butter and sugar on medium-high speed until light and fluffy, about 3 minutes.  Add the egg and then the egg yolk, beating well after each addition.  Mix in the vanilla.  Reduce the mixer speed to low and add the dry ingredients, mixing only until everything is incorporated and the dough comes together.

    Divide the dough in half.  On the prepared baking sheet, shape each half into a log that is 9 inches long and 1 1/2-inch-wide.  Space the logs at least 4 inches apart.  Brush the tops and sides of the logs with the beaten egg.  In a small bowl combine the cinnamon and sugar for the topping, then sprinkle about 2/3 of it generously on the logs.

    Bake until the logs are golden and slightly firm to the touch, about 40-45 minutes.  Remove the baking sheet from the oven but maintain the oven temperature.  Once the logs are cool enough to handle, use a serrated knife to cut each log into 1/2-wide slices on the diagonal.  Place the biscotti cut-side down on the baking sheet and sprinkle with the remaining cinnamon-sugar topping.  Bake the biscotti again until pale golden, about 10-15 minutes.  Remove and cool on wire racks.

    Indonesian Ginger Cornish Hen

    After I decided to make the roasted carrots, I realized I needed a meat to eat along with it.  I googled "roasted carrots and" to see if a side dish would pop up, but I'm not sure google got the point.

    It did however direct me to an Ina Garten roasted carrots recipe so I figured I would see what else she made on that episode of Barefoot Contessa.  It just so happened to be a recipe I had been eying for a long time...


    I couldn't find a chicken small enough to make for just little old me so I decided to replace the chicken with a cornish hen.  I'm a chicken (pun intended) so I had my butcher quarter the little guy for me. He didn't do a great job removing the back, but other than that it worked out!

    The hen was so yummy - especially with the roasted carrots!


    Indonesian Ginger Cornish Hen
    adapted from Ina Garten

    Ingredients  
    • 1/3 cup honey 
    • 1/4 cup soy sauce  
    • 3 cloves minced garlic  
    • 2 tbsp peeled and grated fresh ginger root (a lot of my ginger root wasn't looking good so I substituted some with ginger powder)  
    • 2 pounds cornish hen, quartered, with backs removed

      Directions

      Cook the honey, soy sauce, garlic, and ginger root in a small saucepan over low heat until the honey is melted. Arrange the cornish hen in 1 layer in a shallow baking pan, skin side down, and pour on the sauce. Cover the pan tightly with aluminum foil. Marinate 6 hours to overnight in the refrigerator.
      Preheat the oven to 350 degrees F.
      Place the baking pan in the oven and bake for 30 minutes. Uncover the pan, turn the hen skin side up, and raise the temperature to 375 degrees F. Continue baking for 30 minutes or until the juices run clear when you cut between a leg and thigh and the sauce is a rich, dark brown.

      Saturday, February 12, 2011

      Roasted Farm Fresh Carrots

      My favorite part of living in the section of DC that I do is that it is really more of a neighborhood than a city.  Sure, it's pretty busy right on Connecticut Avenue, but if you step off of the main road there is a quiet neighborhood full of little houses with yards and dogs and children (behind fences, fortunately) (and you know I meant the dogs and the kids).  There are also several schools.


      This morning, when I went for a run, I discovered that a farmer from southeast Pennsylvania has a small stand selling fruits and veggies outside of a neighborhood school on Saturday mornings.  Right around the corner from my house! I was thrilled!  Once a month or so a few other local growers come and sell things like meats and baked goods (breads) as well.

      I circled the block a few more times before my chest cold made running a lot less than fun and then stopped to explore.  I noticed that they had several varieties of carrots.  I remembered starring a roasted baby carrot recipe in my google reader but not knowing where to get baby carrots - so this was my chance!


      For a little change from the typical orange carrot, I picked out yellow and purple varieties (in retrospect probably not the best color combo to choose this week).  I wish I had remembered that the recipe called for a red onion because I would have bought that from the farmer as well.  Next week I'll be more prepared!


      The carrots were DELISH!  The best part by far, though, were the onions.  They were crispy, sweet and perfect!  I think the farm-fresh carrots made a big difference - they were so good. Definitely have to head back to this farmers market next week as well!

       What did I serve with it? Stay tuned! 


      Roasted Farm Fresh Carrots
      from Simply Recipes

      Ingredients

      • 1 1/2 lbs of 5 inch long thin carrots, carefully washed, patted dry, greens cropped to 1 inch above top of carrot
      • 1 medium red onion, peeled, cut lengthwise (root to top) into 8-12 wedges
      • 2 Tbsp olive oil
      • 1 Tbsp fresh chopped rosemary, or 1 teaspoon of dried rosemary
      • Garlic powder
      • Salt
      • Freshly ground black pepper

      Directions

      1 Preheat oven to 400°F. Gently toss together the carrots, red onion, rosemary to coat with the olive oil. Lay out on a rimmed baking pan, lined with aluminum foil. Sprinkle with garlic powder, salt, and pepper.


      2 Roast for 30 to 40 minutes on middle rack or bottom rack, until well browned.
      Serves 4.

      Thursday, February 10, 2011

      Mushroom and Goat Cheese Galette

      I love goat cheese. Every once in a while, Chavrie will send me a coupon and I'll feel inspired to make a great goat cheese based dish.


      Yes, $1 off inspires me.  Don't judge.


      I searched on foodblog search for a good goat cheese recipe but wasn't finding exactly what I wanted until I came across a mushroom tart that reminded me of one of my favorite recipes ever.  So I decided it was time for some seasonal adaption to our summer favorite.


      Something I used to hate about this recipe but now love - the time it takes to refrigerate the dough.  It forces me to go down to the gym or do my laundry - things I always tend to procrastinate because I have to finish making dinner.


      YUM YUM YUM!  The only issue is that it had a thin layer of water/liquid on top when it came out of the oven.  I soaked it up with a paper towel - but there has to be a way to prevent his from happening.  Maybe you could try drying out the mushrooms like Deb did the zucchinis.  I think there is probably liquid in the onion and spinach that would need to be soaked up too.  Any suggestions?


      Mushroom and Goat Cheese Galette
      adapted from smitten kitchen and insanity theory

      Serves 6

      For the pastry:
      1 1/4 cups all-purpose flour, chilled in the freezer for 30 minutes
      1/4 teaspoon salt
      8 tablespoons (1 stick) cold unsalted butter, cut into pieces and chill again
      1/4 cup sour cream
      2 teaspoons fresh lemon juice
      1/4 cup ice water
      Filling:
      2 portobello mushrooms, sliced into 1/4 inch thick slices
      2 tablespoon plus 1 teaspoon olive oil
      1 medium garlic clove, minced (about 1 teaspoon)

      6 oz fresh spinach
      1/2 small onion, chopped
      1/2 cup ricotta cheese
      4 oz goat cheese, crumbled

      Glaze:
      1 egg yolk beaten with 1 teaspoon water

      Make dough: Whisk together the flour and salt in a large bowl. Sprinkle bits of butter over dough and using a pastry blender, cut it in until the mixture resembles coarse meal, with the biggest pieces of butter the size of tiny peas. In a small bowl, whisk together the sour cream, lemon juice and water and add this to the butter-flour mixture. With your fingertips or a wooden spoon, mix in the liquid until large lumps form. Pat the lumps into a ball; do not overwork the dough. Cover with plastic wrap and refrigerate for 1 hour.
      Make filling: In a large saucepan, heat 1 tbsp of the olive oil over medium high head.  Add the onion saute until almost soft, about 5 min.  Add the spinach and continue cooking until spinach wilts, about 2 min. In a small bowl, whisk the olive oil and the garlic together; set aside. In a separate bowl, mix the ricotta, goat cheese, and 1 teaspoon of the garlicky olive oil together and season with salt and pepper to taste.  Add in the onion and spinach mixture.
      Prepare galette: Preheat oven to 400 degrees. On a floured work surface, roll the dough out into a 12-inch round. Transfer to an ungreased baking sheet (though if you line it with parchment paper or a sil-pat, it will be easier to transfer it to a plate later). Spread the cheese and onion mixture evenly over the bottom of the galette dough, leaving a 2-inch border. Shingle the mushrooms attractively on top of the ricotta in concentric circles, starting at the outside edge. Drizzle the remaining tablespoon of the garlic and olive oil mixture evenly over the mushrooms. Fold the border over the filling, pleating the edge to make it fit. The center will be open. Brush crust with egg yolk glaze.
      Bake the galette until the cheese is puffed, the mushrooms are slightly wilted and the galette is golden brown, 30 to 40 minutes. Remove from the oven let stand for 5 minutes, then slide the galette onto a serving plate. Cut into wedges and serve hot, warm or at room temperature.