Friday, May 24, 2013

Roasted Gnocchi

Roasted Gnocchi

A few weeks ago I mentioned my new favorite trick for making gnocchi.  Let me preface this by saying I tried to make super authentic homemade gnocchi once.  I attempted to make Giada's Sweet Potato Gnocchi because - well they have maple in them.  I was living with a family friend, just after moving to DC and she's not exactly a cook.  In fact the only "bowl" she had in the house was her pasta pot.  I made do but well, not ideal for trying complicated cooking.

Roasted Gnocchi

My gnocchi came out like balls of glue.  It was the most disgusting thing I think I've ever made.  I was at the peak of being poor and unemployed, yet I think I still threw the whole batch away.  Their only redeeming quality was that they were covered in a brown butter maple sauce, which I'm pretty sure I drank.  I'm just not Giada, but that's OK with me.  So when my old coworker's sister taught me this trick for making pre-packaged gnocchi I was quite excited.  Gnocchi was back on my radar!

(Side note: yes, that's a Spotted Cow in the background.  The Monkey Scientist flew into Milwaukee on his way home from Florida and stopped on his way back to Chicago to get me some of this rare gem of a beer.  It was perfectly paired with this Midwestern weeknight dinner of pork, gnocchi and asparagus!)

Roasted Gnocchi

This is literally the easiest way to make gnocchi ever.  Is it a little more Sandra Lee than Giada?  Sure.  But I know my limits.  And the result is about 10000 times tastier than my glue-ball fail.  They are toasty and crunchy on the outside with a nice soft bite on the inside.  I like this version the best, with a little bit of a kick from some Cajun seasoning, but you could really make them any way you like.  The original version I had left out the Cajun seasoning and added shredded Parmesan that crusted up like the outside of an Asiago cheese bagel.  The possibilities are endless!

Roasted Gnocchi

Roasted Gnocchi

Ingredients
1 package of pre-made gnocchi
2 tbsp olive oil
1/2 tsp salt
1/2 tsp freshly ground pepper
1 tsp Cajun seasoning

Instructions
1. Preheat the oven to 380 degrees F.
2. Place the gnocchi on a foil-lined baking sheet and toss to coat with olive oil, salt, pepper, and cajun seasoning.
3. Bake for about 20 minutes, tossing a few times, until the outsides are crispy but the insides still have a bite.

Tuesday, May 21, 2013

Lemony Rice Salad

Rice

Recently, I took quite possibly the most spontaneous trip I've ever taken.  The Monkey Scientist was down in Florida with his family for Mother's Day and the roommate and I were feeling bored on Friday night.  A lot of our friends were working or out of town, so we didn't have much to do over the weekend.  So around 8 pm on Friday night, we booked a hotel in St. Louis.  We got up at 5 am and drove down there for a couple days.  Just like that.  It was so out of character for me!


Rice dressing
We had a blast on our mini vacation.  We've been friends for so long that it doesn't take much until we're both cracking up at each other.  Anyone who knows me well knows I tear up quite a bit when I laugh, and it was only about an hour into the drive that I had to stop and buy a box of tissues.  Once we made it down there, we scalped tickets to a Cardinals-Rockies game and enjoyed the beautiful weather.  While it was cold and miserable in Chicago, the weather was sunny and perfect in St. Louis!

pine nuts

The highlight of our trip was far and away the City Museum.  Have you ever been there?  I don't think I've stopped talking about it since.  It's a giant playground...for adults.  There are caves you can crawl in, tunnels in the ceiling that make you slide along on your belly, and a 10-story slide inside what looks like an old alley between two buildings.  And that's just the inside!  It was absolutely spectacular.  We had no idea what to expect, and we were blown away.  I think we spent almost 4 hours there.  If you're ever in St. Louis it's a must-see!  But I highly recommend you wear work-out clothes, which was the little tip we'd wished we were given!

Rice

This rice has nothing to do with St. Louis.  But it is really great.  The roommate had made it a few weeks ago on his night to make dinner, and I liked it so much I insisted he make it again.  It's lemony and fresh - just what I was looking for as we're hitting the peak of Spring.  It would be a great dish to bring to a barbecue this summer since it's just perfect at room temperature.  I know we'll be making this all the way through to fall!

Rice

Lemony Rice Salad
from Serious Eats

Ingredients
1/2 cup pine nuts
1 1/2 cups uncooked white rice
1 teaspoon lemon zest
1/4 cup fresh lemon juice (about 2 lemons)
2 tablespoons fresh orange juice
2 tablespoons white balsamic vinegar
3/4 teaspoon salt
1/8 teaspoon freshly ground pepper
2 tablespoons extra virgin olive oil
1 cup sliced green onions
1/3 cup golden raisins

Instructions
1. In a small skillet over medium heat, toast the pine nuts, stirring frequently, until just starting to brown. Don't let them burn!
2. Meanwhile, cook the rice on the stove or in your rice cooker, following the package instructions.
3. In a medium-sized bowl, whisk together the lemon zest, lemon juice, orange juice, white balsamic vinegar, salt, pepper, and olive oil.
4. When the rice is done cooking, stir together the hot rice, pine nuts, dressing, sliced green onions, and golden raisins. Allow to settle to room temperature and serve.

Friday, May 17, 2013

Gardening in an Apartment

Gardening

While this blog is about cooking, it's also about how to prepare great food at home even if you're living the apartment life, like me. I have just 1 oven, 4 burners (3 of which are small), and limited counter space. Yet nearly everything on this blog, I made at home. Which means you have no excuses. So when it comes to gardening, I want to encourage you to know that you can do it in your apartment, too! You're not going to grow an apple orchard, but there is no reason you can't grow some herbs and things!

Gardening w arrow

The first thing I've been practicing with is what I call shot glass scallions. This is the easiest thing you can try at home! I have managed to kill many a plant in my day, but this has been a great success!

When you're cutting up your green onions, leave just a little bit more than the roots at the bottom. Instead of tossing the ends, plop them in tall shot glasses with a little bit of water. I forgot to take a picture the first day, but after 2-3 days they had already started to sprout this much.  You can see from my arrow where I had cut them.  The green had all grown in that quickly!  I was excited.

Gardening

I changed the water once every 3 days or so.  After another week, this is how big my green onions were.  Almost usable!!  I'm so excited.  They needed barely any maintenance: no soil, just a little water and sunlight on our windowsill.  My mom had this great bud vase growing up that was the shape of 6 shot glasses connected to each other.  I think that would be perfect for this if I could find one. I might never need to buy scallions again if I just keep re-growing them!!

Gardening

This was such a success that I'm going to start trying to grow a few more herbs - basil, rosemary, thyme, and peppermint - in pots outside.  I have a history of killing all of the above herbs (and even letting a small basil plant disappear off my DC balcony in a thunderstorm once) so we'll see what happens.   We're also trying some cherry tomatoes and habanero peppers, which are even more of an experiment.  I have a pretty little flower, too.  So we'll see what happens.  I'll give you an update in a couple of months!

Gardening


Monday, May 13, 2013

Bacon Chicken Caesar Salad

Bacon Chicken Caesar Salad

Before my parents moved up to the lake, I used to spend my vacation time in New England on Cape Cod with my aunt, uncle and little cousins.  It's a shame that it's becoming harder and harder to squeeze in any time on the Cape now that I've moved further away and my job doesn't have the flexibility of my college internships.  I miss lobster rolls, my daily serving of incredible ice cream, and especially my Aunt's Chicken Caesar Salad (which she got from Jamie Oliver).  So with the first bit of what felt like summer last week, I was craving this salad for dinner.

Bacon Chicken Caesar Salad

Obviously I didn't quite think through the fact that having our oven on 400 for 2 hours on the first day when Chicago had temperatures over 80 was probably not the best idea I'd ever had.  But when I got home from yoga and this salad was done, I didn't even care that I was sweating bullets.  I was transplanted to a summer day on the Cape when I could still carry my littlest cousin to the beach and when she saw me her face lit up like I was Santa Claus.  Nowadays I just get pictures of her wearing high heels and makeup.  Sigh.

Bacon Chicken Caesar Salad

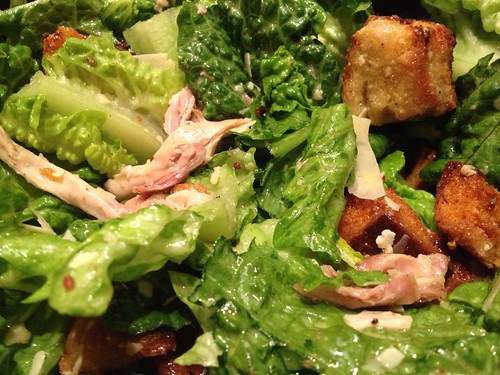
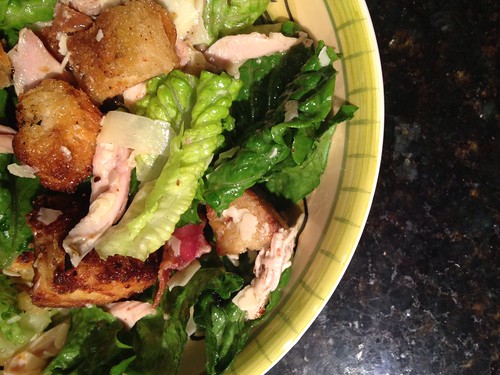
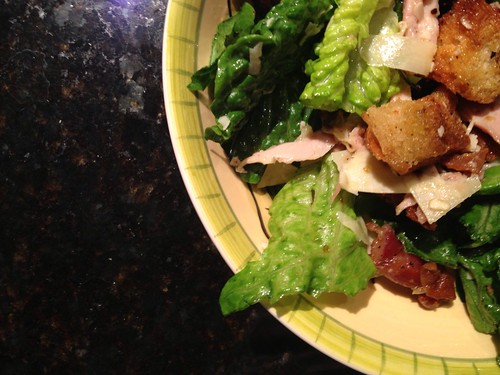
There are a couple of things to note about this salad.  The first is that this is not a "look I'm on a diet so I'm eating salad for dinner" salad.  You just let a loaf of bread soak up chicken fat and bacon grease for 2 hours and then ate it.  Don't kid yourself.  On a side note, these are literally the best croutons in the entire world.

If you do burn them a little bit because you turn the broiler on and then get distracted doing something important like studying for med school finals (I'm not saying that the Monkey Scientist burned all of the croutons while I was at yoga or anything like that), try to salvage them and just cut off the charred bits.  They'll be just fine as long as you didn't burn the whole thing!

Bacon Chicken Caesar Salad

The second is anchovies.  Yes, I know you're scared.  Yes, they smell like cat food (and look like it once you mash them up).  No, they aren't something I want on my pizza.  But this is Caesar salad folks. And without anchovies, it just isn't Caesar dressing.  I promise they won't taste like cat food once you drown them in olive oil, creme fraiche, and lemon juice.  Just trust me on this one, OK?  On the bright side, who knew that a can of anchovies cost barely more than a dollar? I don't even feel that bad that I threw the rest of the can away (because what the heck was I going to do with leftover anchovies).

Bacon Chicken Caesar Salad

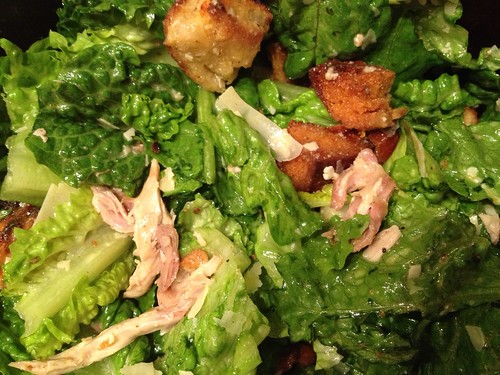
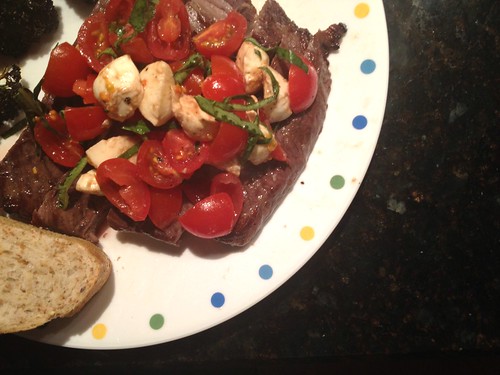
Now when I say this is my favorite Caesar salad ever, I'm not joking.  The dressing is creamy and delicious. The croutons soak up all that fat, get crispy in the oven, and then when you put the dressing on them they soak it up and become chewable without destroying your teeth.  Again, best croutons in the world.  I enjoy the baked, dark meat chicken on this about 1000 times more than the rubbery slices of grilled chicken breast you get anywhere else.  Although my aunt actually uses bone-in, skin on chicken breasts and it works great, too.  And despite the fact that the roommate made a side of pasta, I stand by the fact that this salad is a solid meal.  Even the Monkey Scientist had it for his whole dinner.  It's worth every minute of sweltering over the oven.

Bacon Chicken Caesar Salad

Bacon Chicken Caesar Salad
slightly adapted from Jamie Oliver

Ingredients
4-6 chicken legs, skin on
1 round loaf sourdough bread (about 9 ounces), chopped into 1.5" cubes
6 slices bacon
3 tbsp olive oil
Sea salt and freshly ground black pepper
3 sprigs fresh rosemary, leaves picked and roughly chopped
1 large head romaine lettuce, chopped
dressing
1 clove peeled and smashed garlic
4 anchovy fillets in olive oil, drained
3 oz freshly grated Parmesan, plus a few shavings to serve
1 heaped tbsp creme fraiche
1 lemon, juiced (about 2 oz)
Extra-virgin olive oil (about 6 oz)

Instructions
1. Preheat the oven to 400 degrees F.
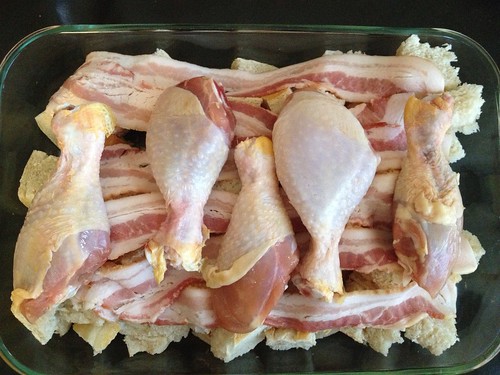
2. In a large glass baking dish, lay out the cubed bread, then bacon, then chicken legs.  Drizzle with about 3 tbsp (or more) olive oil and sprinkle with freshly ground sea salt, black pepper, and chopped rosemary.  Toss to coat evenly.
3. Bake at 400 degrees F for 25-35 minutes, or until the chicken can easily be peeled off the bone.  Remove the chicken, and toss the bacon and croutons.  Make sure to leave all the fat drippings from the chicken and bacon in there.  The croutons will soak that up and that's what makes them delicious!  Return to the oven and allow to bake until the croutons and bacon are crispy but not burnt, tossing every 5-10 minutes or as necessary.  If this isn't happening at 400 degrees F, turn the broiler on low, but watch carefully as the croutons could start to burn quickly!
4.  When the chicken has cooled slightly, use your hands or two forks to peel off the skin and discard, then peel the meat off the bones and shred.  Chop the crispy bacon into bite size pieces.
5.  Add the lettuce, chicken, croutons, and bacon to a large salad bowl.
6.  Assemble the dressing: Using a mortar and pestle (or in my case, a small bowl and the handle of a lemon reamer), smash the anchovies and garlic into a thick paste.  Whisk in the grated Parmesan, creme fraiche, juice of 1 lemon, and 3 times as much extra-virgin olive oil as lemon juice.
7.  Pour the dressing over the salad and toss to coat evenly.  Serve with a few Parmesan shavings on top.

Tuesday, May 7, 2013

Caprese-Topped Steak

Caprese-topped steak

I have been learning to love craft beers over the last few years.  Since college, I'm not a huge drinker, but I am getting quite skilled at drinking a half to a whole bottle of a really good beer lately.  It's been a long journey from ordering light beers to understanding what types of beers I actually like.  I know I'm not the only one who would choose a nice craft beer over a Bud Light.  The growing number of bars with loads of beers on tap are a statement that wine-lovers aren't the only ones who get to be picky anymore!

Caprese-topped steak

In DC, we used to love going to Comet Ping Pong, where not only is the beer list long, but the pizza is pretty stellar as well.  The fact that you can play ping pong while you wait for a table on their patio doesn't hurt either.  And it was at Comet Ping Pong that I learned to love a brown ale, but more specifically learned that my very favorite beer just might be Tommyknocker's Maple Nut Brown Ale.  If you're surprised that this beer infused with maple syrup is my favorite... Hi, I'm Dani and welcome to my blog that might as well be named yellebelly-full-of-maple.  And lucky for me, I found a single bottle of this gem in the Make Your Own 6-Pack section of my local Jewel last week.  Unlucky for me, I only found a single bottle.  Can we find me some more please?

Caprese-topped steak

My favorite beer, well most beers really, went great with this flank steak, broiled and topped with a caprese salad.  I know what you're thinking, "wait a minute, Dani, you ate tomatoes?"  Yes folks, I have been learning to tolerate, maybe even like, cherry tomatoes.  As long as they've never seen a refrigerator.  Maybe you can teach an old dog new tricks after all!  Because man, I loved every bite of this dish!

Caprese-topped steak

Caprese-Topped Steak
from How Sweet It Is

Ingredients
1 (2 lb) flank steak, about 1 inch thick
1 1/2 c dry red wine
1/2 c olive oil
4 garlic cloves, minced
1 tsp salt
1 tsp pepper
caprese topping
1 pint cherry tomatoes, quartered
1 small shallot, diced (I left this out)
1/2 c mini mozzerella balls, quartered
10 basil leaves, freshly chopped or chiffonaded
1 tsp balsamic vinegar
1/2 tsp olive oil
1/8 tsp garlic salt
pinch of pepper


Instructions
1.  In a large ziploc bag, combine the steak, red wine, olive oil, garlic, salt and pepper.  Shake it up, then let it marinate for 2-24 hours in the refrigerator.
2. Place the marinated steak on a foil-lined cookie sheet and broil on high for 6 minutes on each side, or until it's starting to char.  You're welcome to grill it too, if you're into that.
3. Pour the extra marinade into a small saucepan and bring to a boil. Turn down the heat and allow to simmer for 10-15 minutes until it is reduced and you've killed all the evil steak bacteria.
4.  In a bowl, combine the tomatoes, shallot (if using), mozzarella balls, basil, balsamic vinegar, olive oil, garlic salt, and pepper.  Toss to coat.
5.  Allow the steak to rest for 10 minutes before slicing (unless you're impatient like me and hungry enough to eat dried out steak).  Serve slices topped with caprese salad.  Serve the reduced marinade on the side as a sauce for those who'd like it (or would like to dip freshly baked french bread in it).

Friday, May 3, 2013

Malted Maple Blueberry Muffins

Malted Milk and Maple Blueberry Muffins

Last weekend was the first weekend with really gorgeous weather.  The kind of weather that makes me force the Monkey Scientist out of the house to play in the sunshine with me.  I wanted to celebrate with a bright and yummy breakfast to start the day on Saturday, which to me always means muffins.  I bought a bag of frozen Maine blueberries at Trader Joe's a while ago and used the first half to make Easter muffins.  They were corn and blueberry muffins and well... they were not a hit.  So I decided to scrap that recipe and try something new.

Malted Milk and Maple Blueberry Muffins

Of course, I couldn't leave well enough alone and make the recipe as it was written.  I'm too obsessed with maple and malted anything to allow that.  So I winged it and added quantities I thought would work (reasons I am not usually a baker) and magically it worked out!  I was sort of afraid they'd end up super dry or un-risen or something, but somehow my additions didn't disturb the recipe too badly.  Saturday win!

Malted Milk and Maple Blueberry Muffins

These muffins turned out wonderfully.  Right after I put them in the oven I had to run to yoga class, so I left the Monkey Scientist to pull them out of the oven and make sure they were done.  When I got home an hour later, one muffin was halfway in his mouth and another had disappeared.  Looked like an upgrade from my Easter muffin fail for sure!  Next time, I'd love to increase the maple flavor - maybe even using maple sugar instead of regular.  But this recipe is an easy weekend go-to for now!

Here's to hoping this weekend is just as beautiful as last!

Malted Milk and Maple Blueberry Muffins

Malted Maple Blueberry Muffins
adapted from Taste of Home
makes one dozen muffins

Ingredients
2 cups all-purpose flour
2 teaspoons baking powder
1/3 teaspoon salt
1/4 cup malted milk powder
1 stick butter, softened
1 cups sugar
2 eggs
1/2 cup milk
1 tbsp maple syrup
1 teaspoons vanilla extract
1 cups frozen Maine blueberries
topping
1 tablespoons sugar
1/4 teaspoon ground nutmeg

Instructions
1. Preheat the oven to 375 degrees F.
2. In a large bowl, whisk together the flour, baking powder, salt, and malted milk powder.
3. In the bowl of your standing mixer, cream the butter and sugar until light and fluffy.  Add in the eggs, milk, maple syrup, and vanilla extra and mix until combined evenly.
4.  Slowly add in the dry ingredients and mix until just incorporated.  Stir in the frozen blueberries with a spatula.
5. Evenly distribute the batter into a 12 muffin tin lined with muffin cups.  In a small bowl, combine the remaining sugar and nutmeg and sprinkle over each muffin.
6. Bake 20-25 minutes, or until a toothpick inserted in the middle of a muffin comes out clean.  Allow to cool in the muffin tin for 10 minutes before removing to a wire rack.