Wednesday, October 31, 2012

Happy Halloween!

blackberry ice cream sandywiches

Happy Halloween! Unfortunately, I am not spending the holiday at home, waiting for trick or treaters.  I guess I will have to check with the boys to see if any kids show up.  I have been stuck in DC for the last few days due to Hurricane Sandy.  At least I got plenty of use out of my Pumpkin Shirt while I have been here!

At least a few days inside led to some super tasty treats.  I made homemade ice cream sandwiches Sandy-wiches for my friends who let me stay with them while I waited until I could get a flight.  I used the regular old Toll House Chocolate Chip Cookie recipe, but halfway through baking I took the tray out of the oven and banged it on the open oven door to flatten the cookies out and make them extra crispy.  It's my mom's college roommate's trick and the key to her amazing cookies. (Although mine never come out quite as good as hers).

My friends don't have a standing or hand mixer, so I actually made the dough totally by hand (don't worry, we didn't lose power from Sandy, but I would have been prepared!).  In a bit of kitchen trickery, I used a lemon juicer (like this) to cream the butter and sugar.  It actually worked amazingly well!  While the cookies were still a little bit warm, I put blackberry ice cream between 2 cookies and wrapped them in Saran then threw them in the freezer for an hour or two.  They came out perfectly!

Untitled

We finally escaped the storm on Tuesday night and made it to the restaurant where the Monkey Scientist and I had our first restaurant date - Nam Viet - for some delicious Pho.  It hit the spot on a cool, rainy evening.

It's been great being back in DC - I had missed it (and my camp friend) a lot - but I'm ready to head back to Chicago.  Cross your fingers that I make it back tomorrow!

Have a great Halloween!

Friday, October 26, 2012

October's Secret Supper at Southport Grocery

When we moved to Chicago a few months ago, I have to admit I was nervous. Not because I didn't think we'd love Chicago, but because we signed a lease before I'd ever even stepped foot in the neighborhood we'd be living in. I'd gotten stuck in NYC with a cancelled flight after a business trip, and was unable to make it out to Chicago the weekend that the Monkey Scientist and our roommate came to look at places. Still, I trusted their judgement and I quickly realized how much I love our part of town!

Menu at Southport Grocery's October Secret Supper

One of the best restaurants in our area is the Southport Grocery & Cafe. A coworker had actually told me about it before I moved and I was not disappointed. Their brunch is top notch and their cupcakes are out of this world. And I moved from DC, land of cupcake shops. Plus they have a great little market with high end ingredients like jellies, pickles, sprinkles and real maple syrup. So when I heard they host a "Secret Supper" once a month, I knew I needed to get an invite. I grabbed 4 seats to the October party as soon as I heard about it (by joining their email list) for me, my bff, my roommate and the MS.

New England Clam Chowder at Southport Grocery Secret Supper

All of the food was really a step above anywhere we've gone lately. My favorite course was the clam chowder. Now I'm a New England girl, and this was some seriously good clam chowder. The liquid wasn't too thick and there was a great substance-to-liquid ratio. I hate when there are big chunks of potatoes in chowder, but these were perfectly diced and the texture was offset by crispy shallots. The clams were cooked exactly how I like them - just a bit chewy and not at all briny.  Plus the sourdough bread bowl they baked upstairs was perfection.  Sourdough is my favorite bread by far - I think I could live off of it. I couldn't ask for anything more out of this course (except for, well, more).

Pork and Orchiette at Southport Grocery Secret Supper

The main course was a Pork Confit and Orchiette served in a large mug.  As the Monkey Scientist put it, there might not be anything better than a mug full of pork.  It was topped with currants and a juniper gelee, and was mixed with local arugula and carrots.  Some of our table found it a bit sweet, and I thought the sauce might have been a little heavy.  Plus, cooked carrots just don't do it for me.  It wasn't the highlight of the meal but it was really great nonetheless.

Pumpkin Rice Pudding with Sesame Lace Cookie at Southport Grocery Secret Supper

For dessert, we were served a pumpkin rice pudding with a black sesame lace cookie.  I'm not sure I'd ever had a homemade lace cookie before, but now I'm determined to make them myself. They melt in your mouth  and have the perfect bit of crunch.  Sesame seeds aren't my favorite thing ever so I might experiment with other things I can put in the caramel if I make them at home.  The rice pudding sitting below the cookie was great too.  Rice pudding is one of my favorite desserts.  To be honest, I think we all expected a little more pumpkin flavor, but it was topped with dried cranberries and candied ginger which was amazing. I loved the mason jar presentation, too!

The only thing I didn't capture was the special treat at the end of the meal. They had homemade Reese's, Three Muskeeter, Almond Joy, and Butterfingers that their pastry chef had whipped up for us. I think we all felt sweets overload at the end of the meal (OK everyone but me. I don't understand sweets overload until it's way too late) but they were absolutely delightful, albeit a bit melty.  I especially liked the Butterfinger and thought the Three Musketeers was unique and delicious (the consistency was denser than the original).  This was definitely a special dinner for us (we even got a bottle of wine, and we never drink at dinner), but I'm hoping we can go to another Secret Supper sometime (maybe if my folks come visit!). It was a blast!

All gone

Tuesday, October 23, 2012

Salted Caramel

Untitled

Now that autumn is in full-swing, all I want to do is go apple picking. Unfortunately, the weather has not cooperated between the drought and early heat this spring - which led to a small harvest this year - and the rain storms we've had lately. I tried to plan a big trip and we had tornado warnings all weekend. Such a bummer. Still, there have been great Honeycrisps from Michigan at the grocery store and I've really been enjoying them!

boiling caramel

This weekend, I decided that if I was going to eat apples inside in the rain, I needed to dip them in caramel. This recipe was SUPER easy. I think I could have let the sugar get a little bit deeper caramelization, but I was so afraid of burning it that I pulled it off a little early. Next time I'll let it get a little darker. This recipe is fantastic though! I brought the leftovers to the Monkey Scientist's parents - I'm hoping his mom uses it to make some spectacular baked goods. It would be wonderful swirled in brownies or cake!

salted caramel sauce with apples

Salted Caramel Sauce
slightly adapted from Lick My Spoon

Ingredients
1 cup sugar
6 tablespoons unsalted butter, cut into chunks
1/2 cup heavy whipping cream
1/4 cup water
1 1/2 teaspoons sea salt
1 tsp vanilla extract

Instructions
1. Heat sugar and water in a 2-quart or 3-quart non-stick saucepan over medium-high heat. Stir to help the sugar dissolve, but stop stirring when the sugar comes to a boil. You can swirl the pan a bit if you want.
2. When the liquid sugar hits a dark amber color (I don't think I waited quite long enough), add all the butter to the pan. The mixture will foam up and thicken. Whisk until the butter has melted. Once the butter has melted, take the pan off the heat.
3. Add the cream to the pan (the mixture will foam up again) and continue to whisk to incorporate.
4. Add the sea salt and vanilla and whisk until caramel sauce is smooth.
5. Let cool in the pan for a couple minutes, then pour into a glass jar and let cool to room temperature. Don’t worry if the sauce seems a bit too thin at first, it will thicken as it cools. Store in the refrigerator for up to 2 weeks. Warm before serving to loosen it up again.

Saturday, October 20, 2012

Butternut Squash Risotto

butternut squash risotto

When I first met the Monkey Scientist, he was taking his MCAT and getting ready to apply for med school.  I knew when I met him that he probably wouldn't be staying in DC, but I think it only took about 3 months of dating before I agreed I'd probably move wherever he went.  The main reason being that I knew he was from Chicago and therefore that's where he'd probably end up.  After college, a whole bunch of my friends moved to Chicago (and my baby brother is here for college), so I'd actually been contemplating a move here long before I met him - he was just giving me the push I really needed to make it happen.

Lucky for me, this is exactly what happened.  By the time we moved here, some of my Chicago friends had moved on to other places, but some were just moving here and others were contemplating moving back.  It's been so wonderful being close to family and friends, even though it's meant leaving some DC friends behind. This week was a great example - we had my college roommate and her boyfriend over.  She's one of my favorite friends and we went through a lot together in college, so it feels like old times when we eat with her.

grated butternut squash, sage, chopped onions

For this particular meal, I decided to make one of my favorite comfort foods - risotto.  My college roommate and I learned to make risotto when we shared a tiny bedroom in our first apartment. It was so small, we could lie in bed and hold hands - despite our twin beds being up against opposite walls.  We would often lay in bed late at night or on a lazy Sunday and watch Food Network.  That year was a huge learning experience for me cooking.  It was my first time living on my own in a place with a kitchen and we spent loads of time experimenting with all different recipes.

The risotto we made in college always started with shallots and was pretty simple, but the basic technique for this was the same.  This version is just perfect for fall, though.  It fit well with ingredients I had leftover from making this pizza a few days prior (but with bacon instead of proscuitto, duh).  The butternut squash adds the perfect bit of sweetness to risotto.  The smell of grated butternut squash mixed with the chopped sage smelled perfectly like October.  And now that it's getting cold outside, risotto is just the perfect stick-to-your-ribs food.  We all really loved this recipe and I'm sure your family will, too!

butternut squash risotto

Butternut Squash Risotto
very slightly adapted from Recipe Girl

Ingredients
4-6 c low-sodium chicken broth (use vegetable for vegetarian)
2 tbsp extra-virgin olive oil
1 large yellow onion, finely chopped
1/2 tsp kosher salt
1/4 tsp black pepper
2 tbsp finely chopped fresh sage
1 small butternut squash- peeled, seeded, and grated (about 4 cups)
1 large clove garlic, finely chopped
1 1/2 c Arborio rice
1 c dry white wine
1/2 c freshly grated Parmesan cheese
juice of 1 lemon

Instructions
1. Warm the broth in a small saucepan over low heat. (Seriously, keep it on low.  Do not turn it higher.)
2. Meanwhile, heat the oil in a large saucepan over medium heat. Add the onion, salt and pepper and cook for 4 minutes or until the onions become translucent. Add the chopped sage and cook for 1 minute. Add the grated squash and garlic and cook until the squash begins to soften, about 3 minutes.
3. Add rice and cook, stirring constantly, for 3 minutes, or until the rice becomes somewhat translucent. Add the wine and cook, stirring frequently, until the liquid is absorbed, about 3 minutes.
4. Keeping the stove on medium to medium low, add the broth, 1/2 cup at a time, stirring as you add more and then occasionally while it's absorbing. Waiting until it is absorbed before adding another 1/2 cup.  To tell when it's time to add more, I like to push the rice to the side so I have a little well in the middle where I can see the bottom of the pan.  If that well has liquid in it, stir and wait a minute.  If it's really dry, time for more liquid. It should take about 30 minutes for all of the broth to be absorbed.  Start with 4 cups and taste it.  If the rice is still really hard, keep adding until it has a bite but doesn't taste uncooked.  When it's almost done, squeeze the lemon juice in and stir to absorb.
3. Remove from heat and stir in the Parmesan. Spoon into individual bowls. For presentation, you can garnish with chopped sage (or in my case, chopped chives).

Wednesday, October 17, 2012

Jack-O-Lantern T Shirts!

Untitled

A couple weeks ago, my friends and I participated in a scavenger hunt to raise money for a local hospital.  I agreed I'd make our team uniforms, so I decided I'd make us orange shirts with Jack-O-Lantern faces.  I thought it would be a fun way to bring in the Halloween spirit, plus we can always use them again for Halloween.  To save money, I wanted this to be a total DIY project!

attempt at ombre

The t-shirts are just men's undershirts that I bought in a 6-pack at Target.  I dyed them with Rit liquid dye from Michael's.  At first, I attempted to dye them ombre, so they faded from white to dark orange, but I couldn't get a straight line across the top so it didn't look very good.  Then I tried to just make a fade from light to dark orange, and although there is some fade I ran out of time and patience to make it very distinct.  I think if you waited long enough, though, it could be very cool.

Drying my tie dye

I decided to paint on the faces using fabric paint and a stencil I cut out of cardboard. At first, I tried to use spray fabric paint on a tester piece of paper but it really didn't work well at all.  Instead, I used regular fabric paint and a sponge brush to paint it on.  Since it's hard to make brush strokes on fabric, I basically dabbed the paint inside my stencil with the sponge brush.

Untitled

Although we didn't win our scavenger hunt, I am really happy with how our shirts came out.  And they ended up only costing about $30 for 6 shirts (I only made 5, but I had enough to make 6). We wore them with these cute Jack-O-Lantern socks that I got for $1 at Target.  Sadly, I'm going to be on a business trip on Halloween, but I'm going to bring along my shirt to wear at night.  I'm sad that I will miss any trick-or-treaters we get (I'm not really sure we'll even get any, but the odds are better than when I lived in a high rise apartment in DC), but I plan on dressing up the weekend before while I'm visiting DC.  I think I'm going to be Jordyn Wieber, since I received so many phone calls during the Olympics that I sort of look like her.  What are you going to be?

Jack-o-lantern t-shirts (DIY)

Sunday, October 14, 2012

The BEST Brisket

Brisket

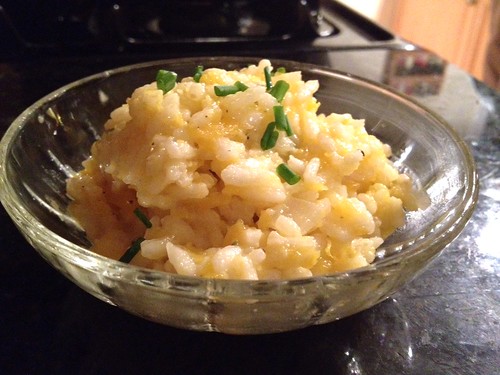
I have owed you this blog post for a long time now.  I actually made this brisket for Rosh Hashana... which somehow became nearly a month ago.  Time has been slipping away from me so quickly - I can't believe it's mid-October.  Anyways, even though it took me a long time, I had to share this recipe with you.  It's probably the best piece of meat I've ever cooked.

BrisketBrisket

Although I've hosted a few Passover dinners, this was my first time hosting Rosh Hashana.  Now that we're living in Chicago, we are lucky enough to be able to share the holidays with the Monkey Scientist's family.  We had his parents, brother, and brother's girlfriend over for Rosh and it was the best time.  They're all so nice and wonderful to be around.  And the food was beyond plentiful.  We had enough to feed at least 10 more people!  I guess that's what happens when you literally cook from Friday night until Sunday night for just about every waking hour....

BrisketBrisket

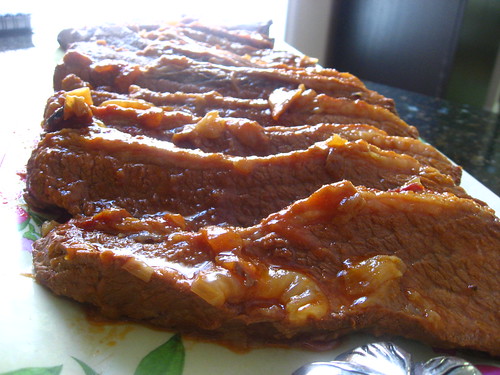
The star of the meal was definitely this brisket.  I hid it behind some tzimmes (which wasn't so popular at Rosh night 1, but was a hit when I brought the leftovers to a friend's house for night two!), but it still managed to shine.  Although this recipe takes a long time, Nach Waxman is the man to trust when it comes to brisket.  After all, he owns the largest food-related book store in the country!

Brisket 

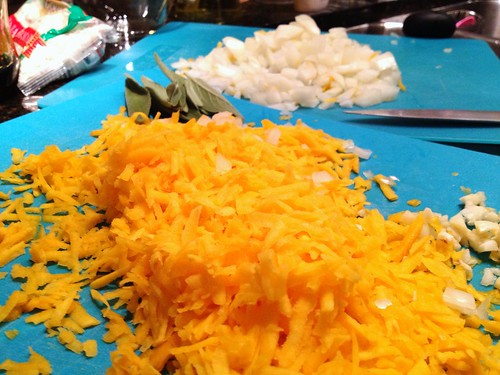
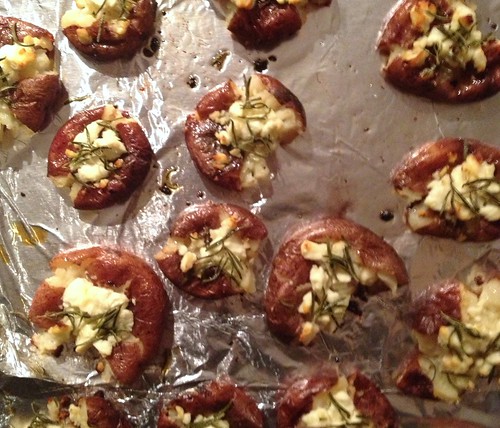
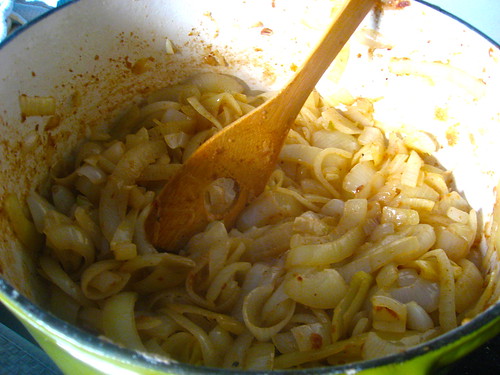
I should warn you, however,  that you have to slice 8 onions for this recipe. EIGHT.  For anyone who knows me, you know I have the wateriest eyes in the world when I chuckled.  When I chop one onion I'm sobbing.  When I chop 8? I actually couldn't close my eyes for a good 12 hours.  I might recommend buying onion goggles.  They have to work better than the torture I put myself through!!

 Brisket

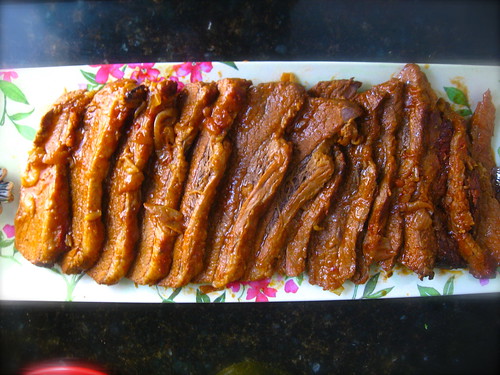
I haven't eaten a lot of brisket in my life, but this is far and away the BEST brisket I have ever tried.  (Yes, better than my old favorite, the Southwestern Pulled Brisket, but that's wonderful in it's own way). It is tender, juicy, and just takes like beef should.  There's nothing frilly or sweet, it's just perfect.  And the best part? It gets better in the fridge for the next day or two.  That is, if there are any leftovers.  It's a lot of work, but your family will love you if you make this.  I promise.

Brisket

Nach Waxman’s Best Brisket Recipe
from Leite's Culinaria

Ingredients
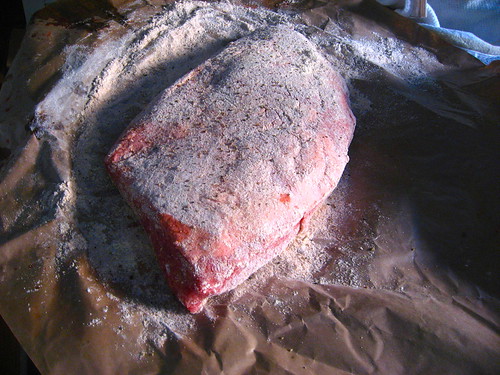
One 5- to 6-pound first-cut beef brisket, trimmed so that a thin layer of fat remains
All-purpose flour, for dusting
Freshly ground black pepper
3 tablespoons corn or other mild vegetable oil
8 medium onions, peeled and thickly sliced
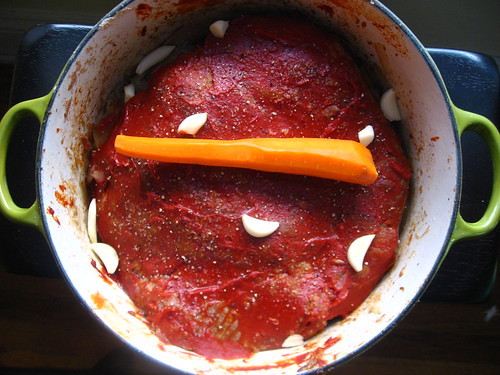
3 tablespoons tomato paste
Kosher salt
2 to 4 garlic cloves, peeled and quartered
1 carrot, peeled and trimmed

Instructions
1. Preheat the oven to 375°F. Have ready a large ovenproof enameled cast-iron pot or other heavy pot that has a lid and is large enough to just barely contain the brisket snugly.
2. Lightly dust the brisket with flour, then sprinkle it with pepper. Heat the oil in the pot over medium-high heat. Add the brisket to the pot and cook on both sides until crusty and browned areas appear on the surface here and there, 5 to 7 minutes per side.
3. Transfer the brisket to a platter. Turn up the heat under the pot a bit, then add the onions and cook, stirring constantly with a wooden spoon and scraping up any browned bits stuck to the bottom of the pot. Cook until the onions have softened and developed a rich brown color but aren’t yet caramelized, 10 to 15 minutes.
4. Turn off the heat and place the brisket on top of the onions. Pour any juices that accumulated on the platter over the brisket. Spread the tomato paste over the brisket as if you were icing a cake. Sprinkle the brisket with salt and pepper, then add the garlic and carrot to the pot. Cover the pot, transfer it to the oven, and let it cook, untouched, for 1 1/2 hours.
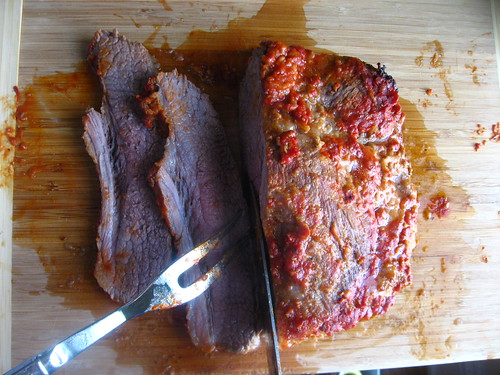
5. Transfer the brisket to a cutting board. Using a very sharp knife, thinly slice the meat across the grain into approximately 1/8-inch-thick slices. Return the slices to the pot, overlapping them at an angle so that you can see a bit of the top edge of each slice. The end result should resemble the original unsliced brisket leaning slightly backward. If absolutely necessary, add 2 to 3 teaspoons of water to the pot.
6. Cover the pot and return it to the oven. Lower the heat to 325°F and cook until the brisket is fork-tender, about 2 hours more. Check once or twice during cooking to make sure that the liquid hasn’t bubbled away. (Mine had more than enough liquid, maybe from not trimming enough fat.) If it has, add a few more teaspoons of water—but no more. Also, each time you check, spoon some of the liquid on top of the roast so that it drips down between the slices.
7. It’s ready to serve right away with its juices, but it’s even better the second day. Let the brisket cool, cover it loosely with foil, and refrigerate it overnight to serve the day after. Skim any fat from the surface of the liquid and reheat the brisket, covered, in an oven turned to 325°F for about an hour.

Thursday, October 11, 2012

Twice-Baked Potatoes with Feta and Rosemary

Twice Baked Potatoes with Feta and Rosemary

I had these last week and I have been waiting very impatiently to share them with you.  Omigoodness.  Now, I could bake little red potatoes covered in olive oil every day and probably be quiet happy.  They're definitely a favorite comfort food.  But add rosemary and feta cheese? Deliciousness.

twice baked potatoes with rosemary and feta

We served these with some simply seared and baked bone-in, skin-on chicken thighs and they were perfection. They're perfectly salty and fill my ever-existent carb need. They actually crisp up so nicely that you can pick them up with your hands, which means I think they can pass for appetizers (as long as you use little enough potatoes). This recipe is so super simple, I promise anyone can pull it off and impress their guests!

twice baked potatoes with rosemary and feta

Twice-Baked Potatoes with Rosemary and Feta
from fresh365

Ingredients
10-15 tiny or 6-8 medium red potatoes
olive oil
1/2 c crumbled feta cheese (crumbled goat cheese would work too)
3 tbsp fresh rosemary leaves
salt and pepper, to taste

Instructions
1. Preheat the oven to 450F. Scrub potatoes and poke each one with a fork. Line a baking sheet with foil.
2. Place stabbed side up, in a single layer, on the baking sheet. Drizzle with a good amount of olive oil.
3. Bake 35-50 minutes, until fork can be inserted easily. Remove the baking sheet from the oven, and cut a deep X into each potato. With a fork or a paper towel, push the top of each potato until it opens (it will look messy).
4. Drizzle each potato with a bunch more olive oil. Sprinkle with feta cheese, rosemary leaves, salt and pepper (they won't need much salt - I think I forgot the salt and pepper and they only were lacking the pepper). Return to the oven and bake for an additional 15-20 minutes until the edges and cheese are golden-brown and crunchy.


This recipe was featured on Full Plate Thursday on 10/18/12!

Miz Helen’s Country Cottage

Sunday, October 7, 2012

Tourtière (French Canadian Meat Pie)

Untitled

The strangest thing happened today.  I woke up and was dead set on making tourtière, for no apparent reason.  One of my mom's best friends is French Canadian (although she has always lived in the States) and every year for Christmas she makes the most delicious meat pie, called tourtière, that her family made growing up.  She knows I love it, so she always makes an extra and has us for dinner sometime the following week so that I can enjoy it.  It's become something I look forward to each winter.

Untitled

A couple years ago, I decided I wanted to make it myself.  I dug around looking at recipes online and emailed my mom's friend for the recipe.  I had it sitting in my inbox for almost 2 years, but I never got around to making it!  So this morning, I dug it up and decided I just had to make it.  The Monkey Scientist thought I was crazy (Canadian food?) but he couldn't say no to meat and pie.

tourtiere

So I went to the store, and got everything I needed, and made two pies (one to eat, one to freeze for another night this winter).  We ate and enjoyed them and the Monkey Scientist went back to studying.  Then I was online and realized that - by total coincidence - it is Canadian Thanksgiving tomorrow.  Although I've always known this to be a Christmas dish, it appears that it is also eaten on Thanksgiving in Canada.  The Monkey Scientist told me he thinks I have a 6th sense for Canadian holidays - what do you think?

tourtiere

As far as the recipe goes, this one is something I will keep around.  It is the perfect meal for a cold day because it's so warm - both in temperature and from the cinnamon, all spice, nutmeg and cloves.  It just tastes like a Christmas night by the fire in New Hampshire to me.  The Monkey Scientist and I liked it with a little Chulula on top, but it is just great on it's own as part of a holiday meal - whether it's Canadian Thanksgiving, US Thanksgiving, Christmas, New Years, or just a winter's night with the family.

Happy Canadian Thanksgiving to everyone celebrating!

tourtiere

Tourtière (French Canadian Meat Pie)
adapted from Yankee Magazine, All Recipes, and LB
makes 2 pies

Ingredients
filling
2 small potatoes, chopped
2 finely chopped onions
2 lbs ground pork
2 lbs ground beef
1 1/2 c water
1 tbsp salt
1/2 tsp pepper
2 tsp allspice
1 tsp cinnamon
1/2 tsp nutmeg
1/2 tsp ground cloves
crust
4 c unbleached AP flour (plus more for the rolling surface)
1 tsp salt
1 3/4 c shortening
1 large egg, lightly beaten
1 tbsp vinegar
1/2 c ice water
to assemble
1/4 c milk

Instructions
1. Preheat the oven to 400F (you can wait to do this until you begin assembling the pies).
2. In a very large pot, bring several cups of water to a boil, then add the potatoes and onions.  Cook about 20 minutes, or until potatoes can be easily pierced with a knife.
3. Drain the water, and return the potatoes and onions to the pot.  Add the pork, beef, 1 1/2 c water, salt, pepper, allspice, cinnamon, nutmeg, and ground cloves to the pot.  Bring to a boil, then reduce heat and simmer, covered, for 1 hour.
4. When the meat is done cooking, drain the liquid into a bowl and place the meat into a separate bowl. Put both bowls in the refrigerator and chill for at least an hour.
5.   In a large bowl, combine the flour and salt.  Add in the shortening and cut with a pastry cutter until you have pea-sized clumps.
6.  Add the egg, vinegar, and ice water to the flour and shortening mixture.  Work into a soft, cohesive dough ball. Cut the dough into quarters.  On a well-floured surface, roll out each quarter of the dough ball into rounds for the bottoms and tops of each pie.  Transfer one pie crust into each of your your two pie dishes.
7.  Remove the liquid and meat from the fridge.  Scrape the solidified fat off the top of the liquid and discard.  Fill each of your pie dishes with half of the meat mixture.  Top with one tablespoon of the liquid in each pie.  Top your pies off with your last two pie crusts and pinch edges to seal.  Cut slits in the top of each crust so that steam can escape.
8. Brush the tops of the pies with milk.  Bake in the preheated oven for 50 minutes or until golden brown.  Serve immediately or freeze until you're ready to serve.

Thursday, October 4, 2012

Italian Wedding Soup

Italian Wedding Soup

The cold has really started to set in here in Chicago!  I grew up in Boston and went to school in Michigan, so I'm no stranger to the cold, but somehow 3 winters in DC has made me a little unprepared for the cold.  I've been wearing what was my DC-winter coat for two weeks already! And it's only getting colder from here...  I can't complain too much though, it is October.  But seriously, when did that happen? Wasn't it August like, yesterday?

A quick note: I wrote this post about a week ago, when it was still 40 or 50 degrees outside.  Since then, we've had a couple of really gorgeous days (today it might even hit 80!) and I have been so appreciative.  But there is no denying that the cold weather is coming back and there will be much more soup to come!!

Untitled

Anyways, there is one great thing about the colder weather.  It's soup season!!!  I have been on a bit of a mini meatball kick for a few weeks now.  It started when I had a sudden urge to make rigatoni with mini meatballs a few weeks ago (and yeah, that was amazing) and is continuing with this soup.  The only thing I don't like about mini meatballs is rolling all of them.  It takes forever and my hands get so dried out with meat.  If you have kids, this is where I recommend bringing them into the kitchen and putting them to work!! (Or sending them over to me, I'll put them to work! Just be sure to take them home with you after, please.)

Italian Wedding Soup

I never used to be a huge kale fan, but I like it a lot in this soup!  If you buy it at Trader Joe's, it's already washed and perfectly cut for this soup. However, they give you more than you need in a bag, so use only like half a bag.  It wilts down, but not so much.  Just use your best judgement.

Italian Wedding Soup

The first soup of the season was a tasty one!  The Monkey Scientist said, "That's a good soup!"  I liked that it had so many components - vegetables, pasta, and savory meatballs.  It is leaps and bounds above the canned Italian wedding soup, which in my opinion isn't even worth eating.  If you like this soup, be sure to check out my Mini Chicken Meatball soup.  It's similar and delicious in it's own way!

Italian Wedding Soup

Italian Wedding Soup
adapted from Tracey's Culinary Adventures

Ingredients
12 c low-sodium chicken broth (I made my own!)
4 carrots, cut into 1/2-inch dice
1 tbsp (about 3 cloves) minced garlic, divided
1 bunch (half TJ's bag) kale, stems removed, leaves cut into thin strips
1/2 c grated Parmigiano-Reggiano cheese, plus more for serving
2 eggs, lightly beaten
1/2 c Panko bread crumbs
1/2 tsp salt
1/2 tsp pepper
1/4 tsp crushed red pepper flakes
5-6 dashes worcestershire sauce
1 lb ground turkey
2 tbsp olive oil
1 1/2 c ditalini pasta (or other small shape)

Instructions
1. Preheat the oven to 350F and line 2 large baking sheets with foil. Brush with olive oil.
2. In a large Dutch oven, combine chicken broth, carrots, garlic, and kale. Cover and bring to a boil over medium-high heat, then lower and simmer 30-40 minutes until the carrots are tender.
3. Combine the cheese, eggs, bread crumbs, salt, pepper, red pepper flakes, and worcestershire in a medium bowl.  Add meat and combine with your hands but don't overmix.  Roll into 1" balls and line along the cooking sheet.  Drizzle over the top of the meatballs with olive oil.  Bake 15-20 minutes, or until cooked through.
4. When the carrots are tender and the meatballs are still cooking, add the pasta to the Dutch oven and cook 10 minutes (or according to package instructions).  Turn off the heat and, once cooked, add the meatballs to the soup.
5.  Serve immediately, topped with extra Parmigiano-Reggiano.

Tuesday, October 2, 2012

Owl Clock

Owl Clock

I realize I've been sharing a lot more crafts than food with you lately, but I just had to show you my latest creation.  I got the idea from Artzy Creations, but I had to adapt a little because I couldn't find a wood cutout in the shape of an owl (or anything big enough for a clock, really).  So I bought another shape I liked, thinking I'd just do something abstract, and halfway through I realized it was still looking like an owl, so I just went for it.  I am really happy with how it came out!

Untitled

You can find all of the instructions over on Artzy Creations.  I got all of my pieces at Michael's.  The paper I used was for sale on the 25 cent rack!  I got a few packs with all different patterns - I think I'll be able to use them for lots of crafts.

Untitled

The only major problem I encountered was that, because I used a big piece of wood and not a wood cut out, the clock wasn't long enough to go all the way through the wood.  I needed to take a big hunk of wood out of the back for the clock to fit in.  Of course, I don't have any very fancy tools, so I went to the hardware store and for $5 they did it for me!  It was a great deal if you ask me.

Untitled


And while we're talking crafts, I also decoupaged this vase with some tissue paper I had around the house.   Then I picked up these flowers for only $3.99 at Trader Joe's on Sunday - my place feels so fun and autumnal!  It was a very crafty week!  What do you think of my mod podge creations?  I am pretty excited about them!  Don't worry though, there is a food recipe coming soon!